
MISSISSIPPI RIVERBOAT PI VERSION: 8. LEVEL: Advanced MAIN TOOLS USED: Path Drawing Tools, Continue Draw, Path Edit, Transform Tools, Outline Drawing Tool, Object Paint Eraser, Retouch Tools/Burn, Line & Arrow Tool. TERMS OF USE: Please Read - Thank You! |
|
INSTRUCTIONS - PAGE 2Back to Page 1 |
|
|
|
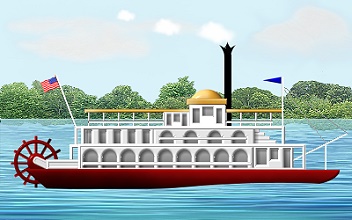
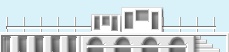
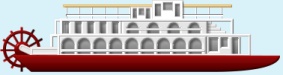
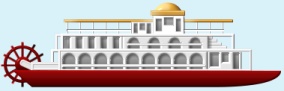
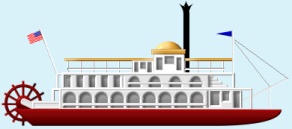
TOP DECK 65. Using the Line & Arrow Tool - Color - white: Mode - 3D Round: Border - 1: Depth - 30: draw a straight line about 15H pixels. 66. Duplicate this line 5 times and then arrange these lines as shown. Align these by putting the two end pieces in place and the others roughly between them. Then select them all and Right Click/Align/Top and then Right Click/Align/Distribute evenly/Horizontally. 67. Now draw a handrail across these posts as before. 68. Select the post and the handrail and Right Click/Merge As Single Object. 69. Right Click/Duplicate this piece then use the Object Paint Eraser to remove two of the posts/handrail as shown and put in place. 70. Using the Path Drawing Tool: Shape - Rectangle: Color - white: Mode - 3D Round: Border - 3: Depth - 30: draw a shape 40W x 25H pixels. 71. Right Click/Duplicate this shape, change the Mode to 2D and fill with same 2 color gradient light - darker grey (Hex#C8C8C8 to Hex#5C5C5C) that you used before. 72. Right Click/Arrange/Send to Back. 73. Select the white rectangle, change the Mode to Continue Draw and, using the same method as you used in Instruction 35, create some windows. 74. Add the same shadow settings that you used previously to this shape. 75. Right Click/Split Shadow. Select the shadow only and use the Object Paint Eraser to remove any shadow that does not fall inside the cabin. 76. Use the same methods to produce the second, smaller cabin shown. 77. Now draw a long narrow rectangle for the roof (I have used a gold color - Hex#F7BC5B) and then Right Click/Arrange/Send to Back and put in place. 78. Draw a second gold roof for the main cabin on this deck and then use the Half Circle Shape for the domed part of the roof. If necessary, click on the Material button/Border/Depth tab, maximise the Border setting and check the 'Smooth spine' box to get a better look.
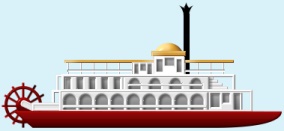
79. I still felt that all these gold shapes looked a little 'flat', so I converted each one to an image and used the Retouch Tools/Burn to add extra whoomph! to the shading. 80. Finally for this deck I have used the Path Tools - using the Rectangle and Crown 2 shapes to make the smokestack for the boat. Merge the two black shapes then Right Click/Arrange/Send to Back and put in place.
I know by now you probably feel as if you've SWUM up the Missisippi but we're nearly finished - on to the rigging, flagpoles etc :-) |
|
|
RIGGING & FLAGS
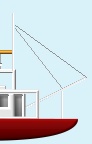
81. First of all use the Line & Arrow Tool in white, Border - 1, to add the four lines shown opposite.
82. Now change the Outline Width to Hairline, Color - Hex#606060, and draw the two rigging lines shown.
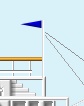
83. Now use the A 11 Shape to draw a small pennant flag - any colour you wish.
84. Use the Transform Tools/Rotate & flip - to flip it Horizontally and put in place on the front mast.
85. Finally open the flag.ufo object supplied at the start of this tutorial. Click on Format/Image Size. Make sure the 'Selected object' is checked and set the Width and Height at 50%. Click OK. 86. Add the flag to the back of the boat as shown. 87. Select all parts of your boat except the wheel, if you are going to animate and Right Click/Merge As Single Object. |
|
|
Add your own finishing touches... or maybe You can also use the animation part of the tutorial to give |
 |
|
|
Free Spirit Graphics If you would then like an invitation to join, please Email Me. We'd love to have you along! |
|
|
If you need any help - or want to make suggestions to improve this tutorial - or for new ones |
|


This site © Rosie Hardman-Ixer 2001/2/3 |