
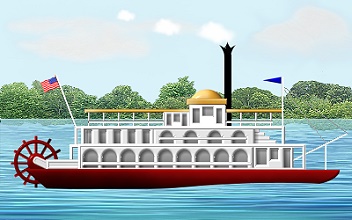
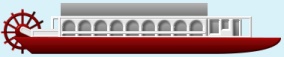
MISSISSIPPI RIVERBOAT PI VERSION: 8. LEVEL: Advanced MAIN TOOLS USED: Path Drawing Tools, Continue Draw, Path Edit, Transform Tools, Outline Drawing Tool, Object Paint Eraser, Retouch Tools/Burn, Line & Arrow Tool. NOTE: Unless you wish to use your own flag at the rear of the boat, please download this Flag ufo to use in the tutorial. TERMS OF USE: Please Read - Thank You! |
|
INSTRUCTIONS - PAGE 1 |
|
|
|
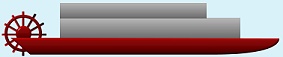
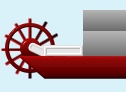
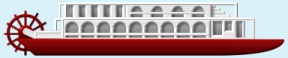
THE HULL & PADDLES 1. Open a new canvas (as we are going to be working in white a lot a coloured background will be best) - 400W x 250H pixels. 2. Using the Path Drawing Tool, Custom Shape - Shape 1: Color - any for the time being: Mode - 3D Round: Border - 3: Depth - 30: draw a shape approximately 85W x 25H pixels. 3. Use the Transform Tools/Rotate & flip - to flip the shape Vertically. 4. Use the Transform Tools/Resize to stretch the shape until it is 335W x 25H pixels. 5. Fill this shape with a two-color gradient - using Hex#A50303 to Hex#090000 with a top-to-bottom fill. 6. Click on the editing button to go into Path Edit. 7. Pull the top left node into the position shown opposite. 8. Using the Rectangle shape; same colours: Border - 3: Depth - 30: draw a small shape 4W x 60H pixels.
9. Right Click/Convert Object Type/From Text/Path to Image. 10. Using the Transform Tools/Rotate by degree - change the degree to 30 degrees. 11. Click on Copy/Rotate Counterclockwise - 5 times (this puts the darker shading on the right-hand side, closer to the boat) to produce the paddles shown. Shift/Click to select all the paddles and Right Click/Merge As Single Object. 12. Now use the Circle shape (Border - 4: Depth - 30:) to draw a centre hub for the paddles - 20W x 20H pixels and put in place. 13. Use the Outline Drawing Tool - Shape - Circle: Color - same gradient: Mode - 3D Round: Border -2: Depth - 30: to draw a shape 45W x 45H and put in place. 14. Select the paddles, hub and outer ring and first Right Click/Align/Center both - then Right Click/Merge As Single Object. 15. Right Click/Arrange/Send to Back. |
|
|
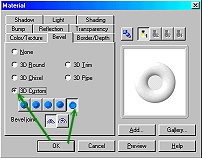
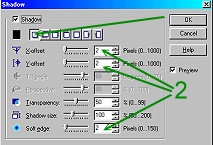
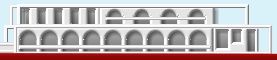
LOWER DECK 16. Using the Path Drawing Tool, Shape - Rectangle: Color - 2 color gradient light - darker grey (I have used (Hex#C8C8C8 to Hex#5C5C5C) with a top-to-bottom fill: Mode - 2D: draw 2 shapes - 17. Put in place. 18. Using the Path Drawing Tool, Shape - Rectangle: Color - white: Mode - 3D Round: Border - 4: Depth - 22: draw a shape 40W x 11H pixels. 19. Click on Material button/Bevel tab and apply a Custom Bevel as shown. 20. Now using the Rounded Rectangle shape, draw a shape 20W x 8H pixels - then use the Transform Tools/Rotate by Degree to rotate this shape 25 degrees to the right. 21. Right Click/Arrange/Send Backwards and put this and the other white rectangle in place as shown. NOTE: Do check to make sure that everything is in place as per the illustration. I've seen a couple of pics where the paddles would not even have touched the water! We are going to put water a little way up the hull so where I have it should be just fine. 22. Using the Path Drawing Tool, Shape - Rectangle: Color - white: Mode - 3D Round: Border - 3: Depth - 30: draw a shape 196W x 26H pixels. 23. Change the mode to Continue Draw, and using the Custom Shape - Arch 3: draw a small arch as shown. 24. Click back into 3D Round Mode. 25. Click on the Edit tool to go into Path Edit. 26. Click on the background to deselect the two shapes then click on the arch only. 27. Now click on the Duplicate button 8 times. 28. Shift/Click to select all the arches (if you click just UNDER the arch top in each case you should be able to select them easily) and then click on the Align button/Align Top. 29. Click on the background to deselect all the arches again and move the right-hand arch to the position shown. 30. Select all the arches again - then click on the Align button/Distribute Horizontally. 31. Click on the Edit button again to exit Path Edit Mode and return to 3D Round Mode. 32. Right Click/Shadow and apply the settings shown opposite. 32. Put arches in place on the boat. 33. Select the red hull of the boat and Right Click/Arrange/Bring to Front to cover the bottom of the arches piece. 34. Using the Path Drawing Tool, Shape - Rectangle: Color - white: Mode - 3D Round: Border - 3: Depth - 30: draw a shape 45W x 28H pixels. 35. Change the mode to Continue Draw and draw some rectangles for the windows as shown. 36. Return to 3D Round Mode, add the same shadow that you applied to the arches. 37. Put your piece in place on the boat, then Right Click/Split Shadow. Select the shadow only (best done in the Layer Manager) and then, using the Object Paint Eraser, erase the right hand part of the shadow so that only the shadows inside the windows are left. 38. Once again, select the red hull of the boat and Right Click/Arrange/Bring to Front to cover the bottom of the cabin piece. 39. Path Drawing Tool, Shape - Rectangle: Color - white: Mode - 3D Round: Border - 2: Depth - 30: draw a shape 190W x 2H pixels. 40. Put in place on the boat for the handrail. 41. Using the Outline Drawing Tool: Shape - Rectangle: Color - white: Mode - 3D Round: Border - 1: Depth - 30: draw a shape 255W x 27H pixels. 42. Put in place on boat as shown and then once more select the red hull of the boat and Right Click/Arrange/Bring to Front. 43. Draw another small rectangle, 11W x 27H pixels and put in place at the back of the boat for a viewing platform. Right Click/Arrange send to Back. 44. Select all the white sections of your boat, plus the red hull (NOT the grey parts!) and Right Click/Merge As Single Object. NOTE: If you are NOT thinking of trying to animate your boat then you can also include the paddle wheel in the above merge. |
|
|
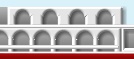
MIDDLE DECK 45. Using the Path Drawing Tool: Shape - Rectangle: Color - white: Mode - 3D Round: Border - 3: Depth - 30: draw a shape 115W x 20H pixels. 46. Change the Mode to Continue Draw. 47. Using the Ribbon shape (see opposite) draw an arch as shown. 48. Click on the Edit button to go into Path Edit. 49. Using the same method that you used for the first set of arches, create three more arches in the piece and then click on the Edit button to return to 3D Round Mode. 50. Put the piece in place on the boat. 51. Right Click/Send Backwards. 52. Apply the same shadow as before to these arches. 53. Using the Path Drawing Tool: Shape - Rectangle: Color - white: Mode - 3D Round: Border - 3: Depth - 30: draw a shape 83W x 20H pixels. 54. Now change the Mode to Continue Draw and draw a small rectangle. 55. Go into Path Edit Mode and create four more rectangles using the same method you used for the arches. 56. Return to 3D Round Mode and add the same shadow as before. 57. Put in place, then Right Click/Send Backwards (or ALT + down arrow on your keyboard) TWICE to send this piece behind the arches. 58. Using the same methods that you used for the lower deck, create a handrail, awning and back viewing platform for your boat (see illustration, left).
59. Using the Path Drawing Tool: Shape - Rectangle: Color - White: Mode - 3D Round: Border - 2: Depth - 30: draw a tiny shape 25W x 5H pixels. 60. Right Click/Duplicate this three times and arrange the pieces as shown. 61. Shift/Click to select these four pieces and then Right Click/Merge As Single Object. 62. Put the piece in place on the boat then use the Transform Tools/Resize to lessen the height slightly as shown. 63. Right Click/Arrange/Send to Back as the steps from the top deck to the middle deck. 64. You can now select ALL parts of your boat (except the wheel, if you are going to animate!) and Right Click/Merge As Single Object. OK - that's the middle deck done.... have a breather with cup of coffee or tea... stretch your mouse hand!... and then onto PAGE 2 :-) |
|
Free Spirit Graphics If you would then like an invitation to join, please Email Me. We'd love to have you along! |
|
|
If you need any help - or want to make suggestions to improve this tutorial - or for new ones please EMAIL me! TUTORIAL LIST (By Version & Level) TUTORIAL LIST (Alphabetical) |
|


This site © Rosie Hardman-Ixer 2001/2/3 |