
ACES PI VERSION: 8. LEVEL: Beginner MAIN TOOLS USED: Path Drawing Tool, Path Edit, Transform Tool/Resize. TERMS OF USE: Please Read - Thank You! |
|
INSTRUCTIONS - PAGE 3 | |
|
|
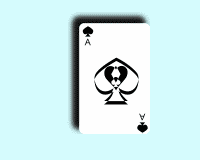
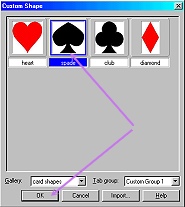
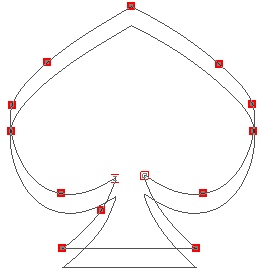
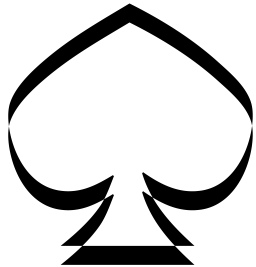
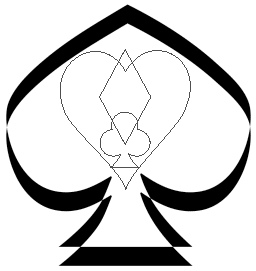
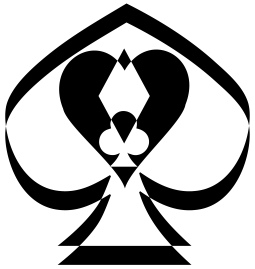
PART 6 - FANCY SPADE The Ace of Spades is very often a decorative card in the pack - so we are going to make an original centrepiece for this card from our shapes. 41. Using the method described in Part 2 of the tutorial, click on the Path Drawing Tool/Custom shape - and select the spade shape from your saved shapes. 42. Using this, draw a spade shape approximately 240W x 240H pixels. 43. Click on the Editing button. 44. Click on the Duplicate button on the Attribute Toolbar. 45. Move the duplicated shape upwards to the point shown. 46. Hold down the Shift key and select BOTH shapes and click on Align/Align Center. NOTE: Align Middle aligns them Vertically. If you ever need to align any objects in both planes - you will need to click on both of these in turn - though of course it doesn't matter which order you do them in. 47. OK - now let's click on the toggle and see what we have here! Your spade should look something like the one on the left now. NOTE: 48. If you are happy with your result, click out of Path Mode and change to the heart shape. Draw a heart inside the spade shape as shown. (If you have trouble getting the size correct - use the Transform Tools/Resize to correct it). 49. Change the mode to Continue Draw and draw a club shape. 50. Now draw a diamond shape. NOTE: However - I've included an illustration (left-below) of what my three shapes looked like - just for information. 51. Now go into Path Edit mode (see Note below). NOTE: 52. Try combining your three shapes in different ways - keep clicking on the Toggle button to check the results - and once you have a design you like, click out of Path Edit mode. NOTE: If you cannot do this because you have already selected multiple shapes - click away somewhere in the white area to deselect all the shapes - and then try again. 53. Shift/Click to select both parts of your image and Right Click/Merge As Single Object. This converts the Path Shapes to an image - so we cannot save this for future use with the Path Drawing Tool. You can either store this image as an object in your EasyPalette OR Merge it with the background and use instructions 32 - 34 to turn it into a Path Shape like the Club and Spade. Want to go back and redo/check anything? Or on this page?..... No? On to making the finished cards then!........ |
|
|
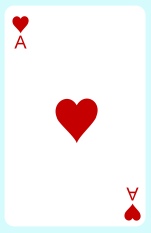
PART 7 - THE CARDS OK folks - from here on it should be easy (no more editing!). 54. Open a new, canvas, 400W x 300H pixels. The best colour for this is a pale shade of any colour - not black or white (mine is Hex#D5FBFD). 55. Using the Path Drawing Tool - click on the Shape button/Custom Shape and change the Gallery at the bottom back to Shapes Library. 56. Using the Path Drawing Tool, Custom Shape - Rounded Rectangle 1: Color - White: Mode - 2D: draw a shape 145W x 220H pixels. Do be sure to get the correct 'rounded rectangle' shape here (see illustration) - some of the other rounded rectangle shapes in PI are not suitable shapes for playing cards. 57. Right Click/Duplicate this 3 times and drag the copies to a new canvas for now. 58. Click on the Shape button and change the Gallery back to the one containing your suit shapes. 59. Select the heart shape and draw a small heart. Change the color to red. 60 Right Click/Duplicate this shape and use the Transform Tools/Rotate and flip - to flip the shape Vertically. 61. Draw a larger heart for the center of the card. 62. Use the Text Tool to add a capital A. Duplicate this and flip it Vertically using the Transform Tools/Rotate and flip. 63. Put all these pieces in place on your card as shown. 64. Right Click/Select All Objects. Right Click/Merge as Single Object. 65. Drag one of the rectangles you made to the canvas and use the same method with your clubs and diamonds. 66. For your Ace of Spades, use a simple spade for the centre - or the fancy one you made (use the Transform Tools/Resize to make this fit your card). 67. Add a drop shadow to each card and use the Transform Tools/Rotate freely - to turn the hands into a 'hand' - and you've finished! ANYONE FOR A GAME OF CARDS? |
 |
|
 |
|
|
Free Spirit Graphics If you would then like an invitation to join, please Email Me. We'd love to have you along! |
If you need any help - or want to make suggestions to improve this
tutorial - or for new ones |


|
This CD © Rosie Hardman-Ixer 2004 |