
ACES PI VERSION: 8. LEVEL: Beginner MAIN TOOLS USED: Path Drawing Tool, Path Edit. TERMS OF USE: Please Read - Thank You! |
|
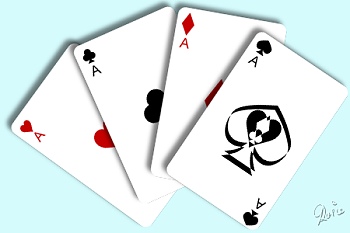
INSTRUCTIONSI have been asked time and again to write a simple tutorial for the Path Edit Tools - so I have chosen to make four playing cards, first experimenting with/getting to know the various Path Edit tools to make a diamond, heart, spade and club for these. I am aware that the diamond and heart can be easily done with ready-made shapes in PhotoImpact but I am choosing to make these from scratch, just to demonstrate the tools involved. The Path Edit Tool is a wonderful, versatile tool - that can be used in many ways that cannot possibly be covered in one tutorial but I hope that this one will help to de-mystify it for beginners and encourage you to experiment with it further. | |
|
|
PART 1 - THE DIAMOND When creating Path Shapes I always tend to start by drawing an ellipse shape. I've found it the most versatile and useful shape because I can start by drawing it any width and height I choose and it has just four basic editing points in Path Edit Mode. First of all we are going to convert it into a diamond - to demonstrate the 'Convert line' and 'Toggle' tools. 1. Open a new, white canvas - 300W x 300H pixels. 2. Using the Path Drawing Tool - Shape - Ellipse, Colour - Red: Mode - 2D: draw a shape 140W x 260H pixels. 3. Click on the Editing button on the Attribute Toolbar. This brings you into Path Edit Mode. NOTE: However when you click out of Path Edit Mode again your path object will have retained all its previously applied 2D or 3D attributes. 4. Move your cursor over the line as shown and it will turn into a little hand. NOTE: 5. Click - and the line will turn red. Now you can convert it to a straight line. 6. Click on the straight line button under' Convert line' on the Attribute Toolbar. 7. Do this with each of the four lines and voila! - we have our diamond! 8. Want to see what it looks like as a solid now? NOTE: The difference between the two is simply that the Toggle button keeps you in Path Edit Mode if you have further work to do there - clicking on the Editing button takes you back into the original Path Tool you were working with (2D, 3D Round etc). 9. If you are happy with the shape - click on the Editing button to take you back into 2D Mode and change the colour of your diamond to red. 10. Drag this red diamond to the EasyPalette Object Libraries and save it in your own shapes gallery if you have one. If you do NOT know how to do this, go on to the next section which will describe how to save Path Shapes for future use with the Path Drawing Tool. If you know how to save shapes you will be able to simply save your shape now and miss out the next section. |
|
|
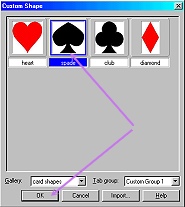
PART 2 - SAVING YOUR PATH SHAPES In this section we are going to learn how to save our shapes in the EasyPalette as we make them, so we can use them in future with the Path Drawing Tool. 11. First of all open the EasyPalette and Click on the Object Libraries button/Object Library Manager/Create - give your new library a name (such as My Shapes or Card Shapes) and OK. 12. One by one, drag the shapes you have made to the grey, empty space on the right where the thumbnails are formed. In the box that opens each time, give the file a name (heart, club, diamond, spade) - and OK. 13. When you are ready to use these shapes all you will have to do is click on the Path Drawing Tool Shape button/Custom Shape. At the bottom of the box that opens use the pull down arrow next to 'Gallery' to select the shape gallery you just made - and use the shapes just the way you would any other path shapes. |
|
|
PART 3 - THE HEART 14. Now draw another ellipse (140W x 260H pixels) and click on the Edit button to take you into Path Edit Mode again. 15. Drag the TOP edit point (node) downwards to the point shown. NOTE:Whenever you click on an edit point you get: a) Two adjustment handles on the point you clicked on. b) One handle on each of the edit points on either side of the point you clicked on. This gives you all you need to change the curvature of the lines either side of the edit point you clicked on. 16. Drag the two side edit points outwards as shown. NOTE: A lot of people have trouble with this aspect of Path Edit but frequently I find that the problem stems from the fact that they are trying to use these handles in Non-free edit mode instead of Free edit mode. If you look on the Attribute Toolbar you will see two buttons under Edit mode. Make sure you click on the right-hand one of these (Free edit mode).
(In Non-free edit mode you will move the handles in pairs, affecting the lines on both sides of the edit point. Whilst this has advantages in certain circumstances, I would always recommend that you use Free edit mode - which gives you the ability to move adjustment handles singly). It might be worth your experimenting with Non-free edit mode and Free edit mode here - just to see what the difference is.... It's amazing how many people get to love the Path Edit tools once they get into Free-edit mode! 17. SO! - click on the Free edit mode button NOW! 18. We want to adjust points on both sides of the heart evenly - so rather than clicking first on the edit node on one side and then the edit node on the other side (which means a bit of guess-work at getting an even result....) - click on the top central edit point again. Remember - This gives us handles available to both sides of the point! 19. Drag the adjustment handles to the points shown. (Don't forget that Toggle button if you want to check the shape in 2D mode). 20. Now click on the bottom central editing point and drag the 4 adjustment handles to the points shown. 21. Check the shape with the Toggle button again and, if you are happy with it - click on the Editing button to take you back into 2D Mode and change the colour of your heart to red. Now isn't that a great heart? 22. Drag this red heart to the EasyPalette and save it for future use as detailed above. Ready for the Clubs and Spades?..... Want to peep at the end of the tut?... |


This site © Rosie Hardman-Ixer 2001/2/3 |