'HEART OF THE COUNTRY' SPICE-RACK PI VERSION: 6/7. LEVEL: Intermediate MAIN TOOLS USED: Path/PathEdit Tools, Continue Draw, Transform Tools, Paintbrush, EasyPalette, Text Tool. OPTIONAL DOWNLOADS: TERMS OF USE: Please Read - Thank You! |
|
INSTRUCTIONSPAGE 1 - THE WOODEN RACK |
|
|
|
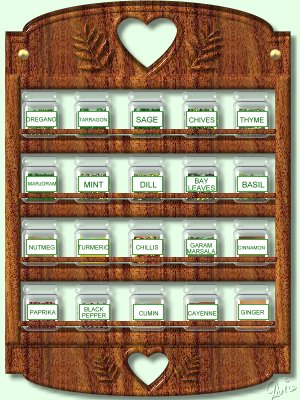
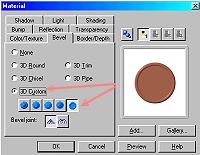
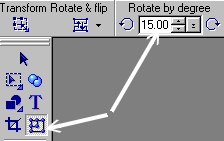
THE TOP 1. Open a new canvas, 300W x 400H pixels with a white or suitable background colour. I used a pale green - Hex No: #E6FFE6 - as this has a nice, fresh country feel. 2. Using the Path Tools, Custom Shape - Ribbon: Mode - 3D: Border - 7: Depth - 30: draw a shape approximately 75W x 75H pixels. 3. Apply a wood preset of your choice. I am using a Wood Preset - Vertical 12 by Fr. Michael (hosted by the PIRC, these are available Here. Click on Cool Stuff #3 - Free Presets on the right-hand side). If you use these presets you will need to reset the Border to 7 after applying the preset. 4. Now click on the Material box/Bevel tab and apply the Custom Bevel shown in the illustration opposite and OK. 5. Using the Transform Tools/Resize - stretch the shape across your canvas until it is approximately 285W pixels wide. Your top should now look like the illustration. 6. Change the Mode to Continue Draw and, using the Path Tools - Custom Shape/Heart - draw a heart in the centre of your top piece. If this is not quite in the centre, click on the Path Tools/Path Edit Tool and move the heart into the right place. (To do this you will need to click in a blank space then move the cursor over the heart until it becomes a little hand - then you can move the heart to the right place). Once you have the heart in the correct place - click on the Editing Tool button on the Attributes Toolbar to return to ordinary 3D Custom (see illustration). 7. Using the Path Tools: Custom Shape - Leaf 2 (or a shape of your choice): draw a shape approximately 40W x 50H pixels. 8. Right Click/Shadow and apply the settings shown opposite to the leaf object. Check Shadow box. 9. Using the Transform Tools/Rotate by Degree, change the degree number to 15 and then rotate the leaf-shape 15 degrees to the left and put this piece in place on the left-hand side of the heart.. 10. Right Click/Duplicate the leaf piece and then, using the Transform Tools/Rotate & Flip, Flip the piece Horizontally and put in place on the right-hand side of the heart. 11. Right Click/Select All Objects. Right Click/Merge as Single Object. Your top is finished! |
|
|
THE BOTTOM PIECE 12. Using the Path Tools, Custom Shape - Ribbon: Mode - 3D: Border - 7: Depth - 30: draw a shape approximately 55W x 55H pixels. 13. Apply the same preset and bevel as in 3 & 4 above and then stretch the piece to the same width as your top piece (approximately 285W pixels). Now use the Transform Tools/Rotate & Flip to flip the piece Vertically. 14. Repeat instructions 6 to 11 above and place the finished bottom piece near the bottom of your canvas (leave a small gap for adding a shadow later). Select the top and bottom pieces and then Right Click/Align/Left - to line up the pieces accurately. |
|
|
THE SHELVES AND FRAME First the sides of the frame..... 15. Using the Path Tools, Shape - Rectangle: Mode - 3D: Border - 5: Depth - 30: draw a shape approximately 15W x 300H pixels for the side of the frame. Put in place at the side of the rack Right Click/Duplicate this piece and put in place on the other side of the rack. 16. Using the Path Tools, Shape - Rectangle: Mode - 3D: Border - 5: Depth - 30: draw a shape that is the Width of your top and bottom pieces x 15H pixels. 17. Right Click/Duplicate this 4 times. 18. Put one of these pieces in place just slightly over the base of your top piece and one in place just slightly over the top of your bottom piece and space the others roughly between them (don't be too fussy at this stage as we are about to Align them properly). Now - select all five of the pieces you just created and Right Click/Align/Left. Then Right Click/Align/Space Evenly/Vertically (make sure 'Even (fix object on both ends)' is checked) and OK. 19. Select the two side pieces and Right Click/Arrange/Bring to Front. Make sure all sections of the frame and shelves are aligned neatly. Now Right Click/Select All Objects. Right Click/Merge as Single Object. OK - now lets give some 3D depth to the rack.... 20. Right Click and Duplicate your Rack object. Move the original piece to the very top of the canvas and the duplicated piece slightly below it. 21. Select the back (original) piece and click on Format/Brightness and Contrast and click on the bottom left square about 5 times to darken the piece and OK. Now for some fixing screws.... 22. Using the Path Tool, Shape - Circle: Colour - Gold: Mode - 3D: Border - 6: Depth - 30: draw a small shape and fill this with Copper 3 from the Material Attribute Gallery in the EasyPalette. Right Click/Duplicate this piece and put the screw heads in place on the headboard of the rack. 23. Right Click/Select All Objects. Right Click/Merge as Single Object. The next pieces are optional. Now for some retaining bars to stop those precious jars falling off the shelves! 24. Draw a rectangle approximately 257W x 5H pixels. You will need four of these - so Right Click/Duplicate this piece 3 times. 25. Put these in place on your rack then select all four and Right Click/Merge As Single Object but DO NOT merge with the rest of the Rack! Now we are ready to create the bottles.... so take a deep breath and on to Page 2! |