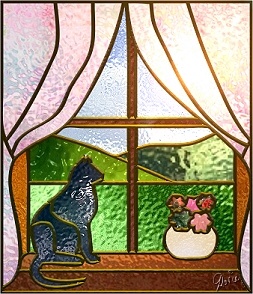
MAKING PATTERNS FOR STAINED GLASS GRAPHICS PI VERSION: 6/7. LEVEL: Intermediate (some knowledge of basic tools is assumed) MAIN TOOLS USED: Outline Drawing Tools, Line and Arrow Tools, Object Paint Eraser, Text Tool. NECESSARY DOWNLOAD: If you do not have the Cat Silhouette Font named in this tutorial and you wish to use it - you can get it Here. See note in 'Using a Font' below! TERMS OF USE: Please Read - Thank You! |
(Shown at 75% of actual size) |
INSTRUCTIONS |
|
|
|
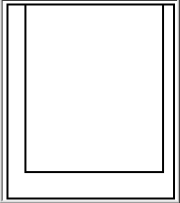
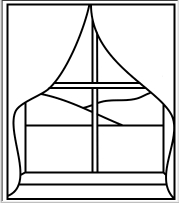
BASIC LINES
1. Open a new canvas - 350W x 400H pixels - white background. 2. Using the Outline Drawing Tool - Shape-Rectangle: Colour-black: Mode-2D: Border-2: draw a frame for your picture.
3. Using the same tool, draw an outline for the window. (Mine is 276W x 336H pixels - but it doesn't have to be exactly the same as mine).
4. Using the Line and Arrow Tool - Straight Line: Again Border-2: draw in the main lines for the windows and sill. NOTE: It is very important, for a good leading, to make sure that there are NO gaps where lines should meet and that no little bits of line stray beyond the frame.
5. Using the Line and Arrow Tool, either Freehand Drawing Tool or Spline Tool - draw in two lines to represent the curtains. |
|
|
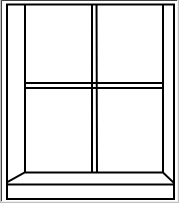
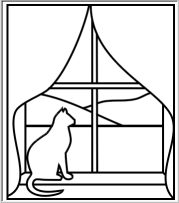
ERASING UNWANTED LINES Now you can see that you have a lot of unwanted lines in the pattern - where things would be hidden behind the curtains, so now we're going to get rid of those. 6. Click on the rectangle that you drew to make the main window-frame in part 3. Right Click/Convert Object Type/From Text/Path to Image. Now we can use the Object Paint Eraser to erase any parts of the frame that we don't need (see illustration opposite). 7. Repeat this process with any other lines that need parts erasing 8. Now how about a bit of simple scenery through the window? Try drawing simple hills or trees and a horizon line. 9. Using the Object Paint Eraser, remove any bits you don't need, as before. Remember! Keep it SIMPLE. This is for stained glass - you need good, bold, well-outlined shapes, not too much detail! |
|
|
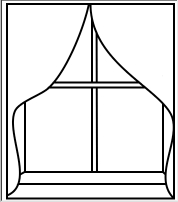
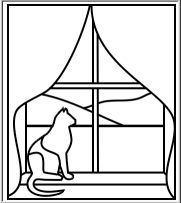
USING A FONT OK - if you are very artistic and can draw people, animals etc well - great - you could do this next bit by hand. However there is an easier way to draw some elements of your pattern and that is by using dingbat-type fonts. The one I am using here is called Cat Silhouettes (see Download above if you don't have this). NOTE: Remember - you do NOT have to install fonts into Windows to use them in PI. You can keep fonts in a folder on your hard-drive and, when you wish to use them, double click on them to open them. If you do this BEFORE opening PI the font will appear in the font list in the Attributes Toolbar. If you open the font file AFTER opening PI it will not appear there - but it WILL appear in the fonts list in the Text Panel. Just close the font again when you have finished using it. 9. Now use the Text tool to type a black CAPITAL N (or one of the other cat shapes if you prefer!), size 175, using the Cat Silhouette Font. Click OK. 10. Now change the Mode to 3D Pipe and change the Border to 2 in the Panel. 11. Put the cat outline in place on the window-sill, making sure that you try to leave workable areas for filling in with glass. 12. Now, using the same method as before, erase any of the unwanted lines behind the cat. (see illustration opposite). 13. You can leave the cat as it is - or add a few lines to make extra details for the glass as I have done. |
|
|
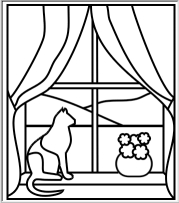
MORE DETAILS 14. This is where your imagination can take over. How about adding a bowl of flowers using the Outline shapes available? Or a few extra lines in the curtains - so you can vary the shades in the glass and give the impression of folds? Just use the techniques described above and you will find it possible to create all kinds of patterns for yourself. Don't forget - you can use all the shapes in the Path Tools (plus any of the lovely ones available for download on the web!). Where you use solid shapes - just change the Mode to 3D pipe and change the Border to 2. |
|
(Shown at 75% of actual size) |
CREATE THE LEADING 15. Once you have your picture as you want it (DO check there are no extra unwanted lines!) - click on the outside frame-line of your picture (the first one you drew) and Right Click/Arrange/Bring to Front. This will give a much nicer finish to your picture when you use Trace. 16. Right Click and Merge All. 17. Click on Edit/Trace and accept the default settings. Click OK. 18. Change the Mode to 3D. Adjust the Border to your taste and fill with a preset of your choice (I have used Copper 9 from the Material Attribute Gallery in PI7. This preset gives a dark, bold shading but with some nice highlights). I have also added a little lighting from the Lighting Gallery in the EasyPalette.
Now you have a black and white pattern and leading ready to fill with your favourite glass! For help with how to fill with glass please check out my tutorial for a stained glass heart frame Here. |
 |
|
|
Free Spirit Graphics If you would then like an invitation to join, please Email Me. We'd love to have you along! |
|
|
If you need any help - or want to make suggestions to improve this tutorial - or for new ones |
|
This site © Rosie Hardman-Ixer 2001/2/3 |