
RIBBON HEART & ROSE PI VERSION: 8 (but can also be done in 6 & 7). LEVEL: Intermediate MAIN TOOLS USED: NOTE: TERMS OF USE: Please Read - Thank You! |
|
INSTRUCTIONS |
|
|
IMPORTANT NOTE - PLEASE READ! When drawing shapes which are later to be used in the Wrap Galleries it is essential that these shapes are drawn to size - i.e. you draw them to the size specified with the Path Drawing Tool. Drawing them approximately to size and then using the Transform Tools to resize them is NOT the same thing and the Wrap Galleries will not work properly if you do this. You will end up with a tiny little shape that does not look like the one in the tutorial. If, for any reason, you cannot draw the shape to size using the numbers at the bottom left of the PI workspace for reference (inexperience with the mouse, shaking hands etc), and HAVE to use other tools to correct the size of your path shape - then you will need to Right Click/Convert Object Type/Reset Text/Path Object before you continue. |
|
|
|
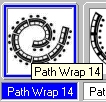
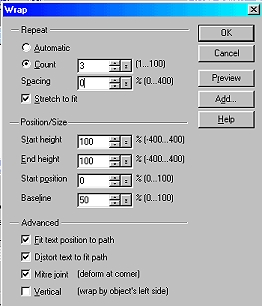
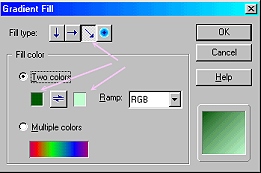
THE ROSE 23. Open a new, white canvas, 400W x 400H pixels. 24. Using the Path Drawing Tool, Shape - Round,Color - 2 color gradient (I have used Hex #FC7EA0 and Hex #FEDEF3 for mine with a Left-to-Right fill): Mode - 2D: draw a shape 120W x 120H pixels. 25. Using the Path Drawing Tool, Shape - Ellipse: same gradient fill: Mode - 2D: draw a small shape 15W x 30H pixels (see note below!). 26. Open the EasyPalette/Wrap Gallery/Path Wrap and Right Click on Path Wrap 14/Modify Properties and Apply. 27. In the box that opens, change the Count to 3, the Spacing to 0 and the Baseline to 50 - and OK.
28. You should now have two shapes that look like the ones on the left - the circle and the petal shape.
29. Keeping the petal shape selected, first Right Click/Convert Object Type/From Text/Path to Image and then use the Retouch Tools/Burn to shade the inner edges of the petals as shown. NOTE:
30. Put the petal shape in place over the circle as shown.
31. Right Click/Duplicate the petal shape and use the Transform Tools/Rotate & flip - to rotate the shape 90 degrees to the left and put in place as shown.
32. Right Click/Duplicate this petal shape and use the Transform Tools/Rotate & flip - to rotate the shape 90 degrees to the left TWICE and put in place as shown.
Now - see those white gaps? The one on the left is a beautiful petal shape - so rather than add more petals we're going to fill this in with that circle you made earlier...
33. In the Layer Manager, select the circle and then use the Transform Tools/Resize to stretch the shape to fill in those white gaps (see picture, left). Everyone will position their petals slightly differently, so the amount you will have to do this, to fill in the gaps, will also vary. 34. Now select the petal shape again, Right Click/Duplicate this and use the Transform Tools to make the shape much smaller and add this to the centre of the rose. NOTE: 35. Once you are happy with your rose, Right Click/Select All Objects - then Right Click/Merge as Single Object. 36. Lastly, I have used the Retouch Tools/Burn and Smudge - to add a little more shading and to soften some of the lines on the petals. |
|
|
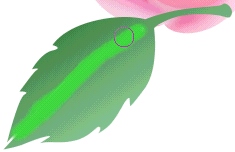
THE LEAVES 37. Using the Path Drawing Tool, Custom Shape - Leaf 5: Color - a Gradient Fill using a dark green to light green diagonal fill (my colours were Hex #004600 and Hex #B7FFC9): Mode - 2D: draw a shape approximately 230W x 150H pixels. 38. Now let's get rid of that gap down the central spine of the leaf... Click on the Paint Tools/Paintbrush and the Mode button on the Attribute Toolbar to go into 'Paint as Object' mode.
Change the Color to Hex #30D430 and paint over the gap in the leaf as shown. 39. Click back onto the Pick Tool and in the box that pops up click on Yes. 40. Right Click/Arrange/Send Backwards - then select both parts of the leaf and Right Click/Merge as Single Object. 41. Finally, use the Burn Tool to add some more shading to the leaf. 42. Right Click/Duplicate the leaf and use the Transform Tools/Rotate & flip - to flip the Duplicate Horizontally. I also made a second Duplicate and reduced the size of this to put at the front of my rose. 43. Use the Transform Tools/Rotate Freely - to rotate the leaves to the required position behind the rose. 44. Once you have all your rose and leaves made, Right Click/Select All Objects - then Right Click/Merge As Single Object (see completed rose, left - shown at 50% true size). You might now like to save this rose for future use at it's present size. 45. Drag the rose to your heart canvas and use the Transform Tools/Resize to reduce this to the size required for your heart. NOTE: |
|
|
46. Select your heart and rose, Right Click/Merge as Single Object and then finally Right Click/Shadow and add a dropped shadow if required....
....and there's your finished picture - for Valentine's Day, Engagements, Weddings, Anniversaries or just any time you want to say that all-important thing.... |
|
|
A beautiful arrangement of roses made from this tutorial by Carol at Thanks for this Carol! |
|
 |
|
|
Free Spirit Graphics If you would then like an invitation to join, please Email Me. We'd love to have you along! |
|
|
If you need any help - or want to make suggestions to improve this tutorial - or for new ones |
|


This site © Rosie Hardman-Ixer 2001/2/3 |