
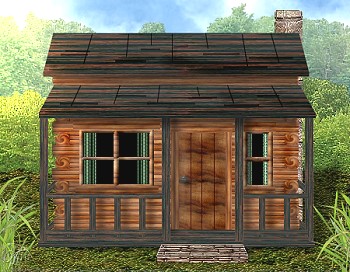
THE LOG CABIN PI VERSION: 8. LEVEL: Intermediate (A good working knowledge of the tools below is needed). MAIN TOOLS USED: Path Drawing Tool, Effect - Whirlpool, Format - Brightness & Contrast, Transform Tools, Continue Draw, Path Edit Tools, EasyPalette, Paintbrush, Shadow/Split Shadow, Object Paint Eraser, Retouch Tools (Burn - optional). NOTE: TERMS OF USE: Please Read - Thank You! |
|
INSTRUCTIONS |
|
|
|
THE MAIN BUILDING 1. Open a new, white canvas, 450W x 350H pixels. 2. Using the Path Drawing Tool, Shape - Rectangle: Color - any: Mode - 2D: draw a shape 315W x 15H pixels. 3. Open the EasyPalette and fill this with the "rwood3" preset from my grained wood presets. 4. Now draw another rectangle, 275W x 15H pixels. 5. Using the same preset but with a circle shape, draw a small circle 20W x 20H pixels. You should now have the shapes illustrated in the first picture on the left. 6. Keeping the circle selected, click on Effect/Distort/Whirlpool - and click OK. 7. Right Click/Duplicate this piece and put in place. 8. Right Click/Select All Objects. Now Copy and Paste this a total of five times - putting each copy in place immediately below the last as shown. 9. Select the TOP rectangle and copy that once and put in place at the bottom. Your picture should now look like the one shown. 10. Now we need to fill in those gaps. Draw a large rectangle, 300W x 190H pixels. 11. Darken this by clicking on Format/Brightness & Contrast and clicking on the BOTTOM LEFT square twice - and OK. 12. Right Click/Arrange/Send to Back. 13. Right Click/Select All Objects and then Right Click/Merge As Single Object. This is a good time to Save your cabin as a .ufo. Do remember to do this regularly :-) |
|
|
THE WINDOWS You may open a second canvas to make the windows, if you wish. 14. Using the Path Drawing Tool again (2D is fine for now), draw a rectangle 95W x 75H pixels. 15. Right Click/Duplicate this shape and put the first of these rectangles to one side for the moment. 16. Using the Duplicated rectangle - change the mode to Continue Draw and draw a small rectangle, 38W x 30H pixels, as shown. 17. Change to Path Edit Mode and select the small rectangle that you just drew. If you find this a problem - first check that under 'Edit point' on the Attribute Toolbar you have the left-hand 'Pick tool' selected... and then, if necessary, click somewhere in the white area and try again. 18. Click on the Duplicate button 3 times and put the three duplicates in place as shown. You can also use the Align button to align the windows if necessary. 19. Once you are happy with the window, click out of Path Edit Mode and into 3D Mode and change the Border to 4: Depth - 30. 20. Select the other copy of the rectangle and change the colour to black. Slide this into place behind the window frame you just made. 21. Now draw a rectangle 38W x 75H pixels. 22. Using the same method (I have chosen to have just two panes this time) - make the second, smaller window. 23. Now draw 2D rectangles - using the same wood preset - for the tops (lintels) and bottoms (sills) of the windows as shown. 24. Now draw another rectangle 20W x 75H pixels and fill this with the Forester preset from my Striped Material presets - then change the mode to 2D if you like darker curtains. Duplicate this piece and use Right Click/Arrange/Send Backwards - to send these curtains behind the window frames.
25. Draw another narrower rectangle the same way, Duplicate this and put the curtains in place behind the smaller window frame.
26. Put these windows in place on your cabin front.
DO NOT MERGE the various parts of the windows yet - but you can Right Click/Group them - if it helps in moving them. |
|
|
THE DOOR 27. Using the Path Drawing Tool, Shape - Rectangle: Color - same wood preset: Mode - 2D: draw a shape 125W x 10H pixels. 28. Right Click/Convert Object Type/From Text/Path to Image. 29. Use the Transform Tools/Rotate & flip - to rotate the piece through 90 degrees (right or left). 30. Right Click/Duplicate this piece - then put the two pieces in place for the door jamb. NOTE: 30. Draw another rectangle 80W x 10H and put this in place for the lintel above the door (see illustration). These pieces will not show up too well at the moment - but don't worry about this. We are going to shade them later on - to give them more depth. 31. Now draw another rectangle - 60W x 125H - for the door and put in place. 32. Click on Format/Brightness & Contrast and click on the bottom left-hand square two or three times to darken the door. 33. Using the Paintbrush tool - Size - 2: Color - Dark Brown (I used Hex #511D11): Straight Lines - draw some narrow lines down the door to represent the pieces of wood. 34. Now add a small, 3D circle to represent the doorknob - this time using preset "rwood8" from my Grained Wood presets (or any wood darker than that used for the cabin). |
|
|
THE ROOF 35. Using the same dark wood preset, draw a 2D rectangle - 315W x 50H pixels - for the roof. 36. Now use the Transform Tools/Perspective - to widen the lower edge of the roof. 37. Add a narrow rectangle beneath this in the same wood as shown - to give the wood depth. 38. Now draw another rectangle - 315W x 35H for the porch roof. 39. Use the Transform Tools/Perspective again - to widen the lower edge of this roof (you can go slightly wider with this one) and add another small rectangle as you did for the main roof. 40. Using the Paintbrush tool - Size 2: Color - Black: paint some lines on the larger roof pieces as shown (before using the paintbrush on each piece you will have to Right Click/Convert Object Type/From Text/Path to Image). 41. Select both parts of the Main Roof and Right Click/Merge As Single Object. 42. Select both parts of the Porch Roof and Right Click/Merge As Single Object. |
|
|
OK - let's check out how it looks now.... I do believe it's beginning to look like home! Take a rest - have a coffee - and then let's build that porch! |


This site © Rosie Hardman-Ixer 2001/2/3 |