
THE LOG CABIN PI VERSION: 8. LEVEL: Intermediate (A good working knowledge of the tools below is needed). MAIN TOOLS USED: Path Drawing Tool, Effect - Whirlpool, Format - Brightness & Contrast, Transform Tools, Continue Draw, Path Edit Tools, EasyPalette, Paintbrush, Shadow/Split Shadow, Object Paint Eraser, Retouch Tools (Burn - optional). NOTE: TERMS OF USE: Please Read - Thank You! |
|
INSTRUCTIONS - PAGE 2 |
|
|
|
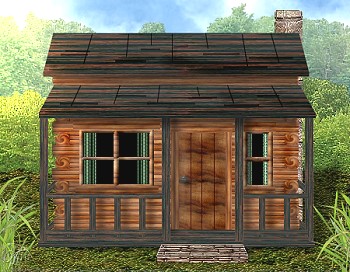
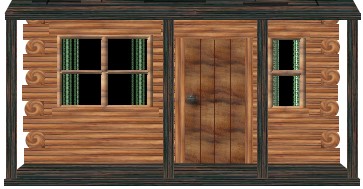
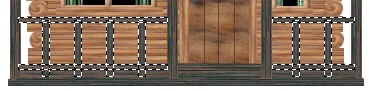
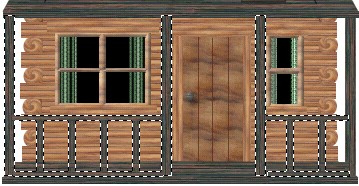
THE PORCH 43. Using the dark wood preset again, draw a rectangle 315W x 15H pixels for the porch floor. 44. Use the Transform Tools/Perspective to widen the lower edge of this as before. 45. Draw another rectangle the width of the widened edge x 7H pixels and put in place below this as shown. 46. Now draw another rectangle 160W x 10H pixels for a post. 47.Right Click/Convert Object Type/From Text/Path to Image - then use the Transform Tools/Rotate & flip - to flip the image through 90 degrees (right or left). 48. Copy and Paste this piece 3 times and put the pieces in place as shown. 49. Now draw the porch rails (shown by the selection lines in the pic opposite) in the same manner - being careful to keep the grain correct on the upright pieces as before. 50. Select all the pieces indicated in the picture on the left and Right Click/Merge As Single Object. 51. Right Click/Shadow, use the third shadow from the left (top right shadow) and OK. 52. Right Click/Split Shadow. Now select the shadow and, using the Object Paint Eraser, carefully erase any shadow in the white areas to the left and right of the cabin. 53. Select the porch roof and Right Click/Arrange/Bring to Front. Using the same method as in 51 and 52, add a shadow below the Main Roof and the Porch Roof sections, Splitting the Shadow and erasing any unwanted areas. If you choose to leave your porch open at the sides, omit instructions 54 - 56. 54. Draw another small rectangle - 20W x 10H pixels and then, using the Transform Tools/Slant - angle this as shown. 55. Right Click/Duplicate this piece as shown - then select both these pieces and Right Click/Arrange/Send to Back. 56. Put in place at the side of the porch. Duplicate these two pieces and use the Transform Tools/Rotate & flip - to flip them Horizontally. Right Click/Arrange/Send to Back and put in place on the right-hand side of the porch. Not far to go now.... just a firm step for those wet days and somewhere for a fire to burn safely!...... |
|
|
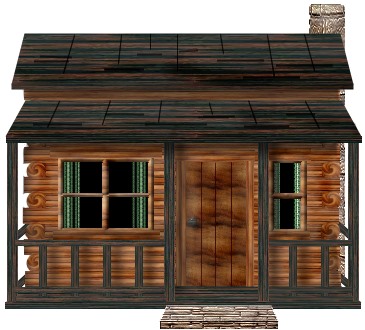
THE CHIMNEY AND STEP 57. Using the Path Drawing Tool, Shape - Rectangle: Mode - 3D Round: Border - 1: Depth - 30: draw a rectangle 35W x 275H pixels and fill this with the "ornamental stone" preset from my Wall presets. 58. Right Click/Convert Object/From Text/Path to Image and use the Object Paint Eraser to take off those sharp, square edges from the top of the chimney so it looks more realistic. 59. Right Click/Arrange/Send to Back and put in place on the cabin. 60. Using the same preset, Border and Depth - draw another 3D rectangle, 105W x 16H pixels. 61. Use the Transform Tools/Perspective again to widen the lower edge of the step and then draw a shallower rectangle the same width to put below it. Now we have all the pieces for our cabin - all that remains is a little shading to add realism! |
|
| SHADING It is up to you whether you do this part of the tutorial - but I find that the difference to the final picture is worth the effort! 62. I use the Retouch Tools/Burn to add my shading. Before you can use this tool, any pieces of your picture that are still Path Objects need to be converted to image objects by using Right Click/Convert Object Type/From Text/Path to Image. I tend to use different sizes of Shape for this type of shading - depending on the size of what I'm shading - but I always use the Level set at about 45 - 50% and the Soft Edge setting at 100% as I find this gives me more control over the results. The illustration left shows the cabin after shading....
|
|
|
BACKGROUND: Once I had the background behind the cabin done, I Merged all the pieces of the cabin and added a shadow. Finally, I added my signature - then Right Click/Merge All and added a little lighting from the EasyPalette/Lighting Gallery/Lightbulb. And there is... |
 |
|
|
Free Spirit Graphics If you would then like an invitation to join, please Email Me. We'd love to have you along! |
|
|
If you need any help - or want to make suggestions to improve this tutorial - or for new ones |
|


This site © Rosie Hardman-Ixer 2001/2/3 |