
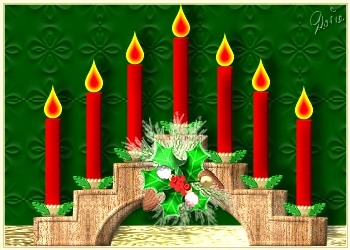
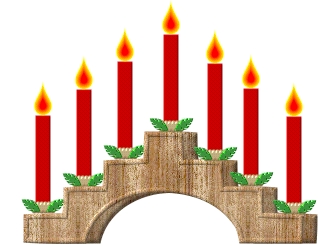
CHRISTMAS CANDLE-BRIDGE PI VERSION: 6. LEVEL: Beginners MAIN TOOLS USED: Path Tools: Path/Edit Tools: Edit/Trace: Transform Tools: Burn Tool OPTIONAL DOWNLOADS: PSP USERS! You can now find a PSP Version of this tutorial at Moon's Designs! Enjoy! TERMS OF USE: Please Read - Thank You! |
 |
INSTRUCTIONS |
|
 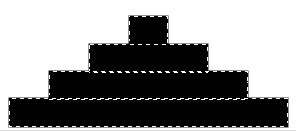 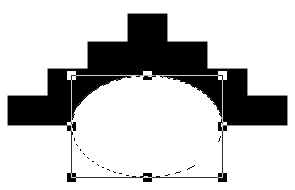 |
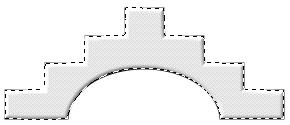
MAKING THE WOODEN BRIDGE - Part 1. 1. Open a new canvas 350W x 250H pixels. 2. Using the Path Tool, Shape-Rectangle: Colour-Black: Mode-2D - draw a rectangle approximately 280W x 30H pixels. 3. Draw three more rectangles 200W x 30H 120W x 30H 40W x 30H pixels. 4. Place the four rectangles on top of one another as shown. Right Click and Select All Objects. Right Click/Align/Center Horizontally. Right Click/Merge As Single Object. 5. Using the Path Tool - Shape Ellipse: Colour-White: Mode 2D - draw an ellipse as shown. 6. Right Click/Merge All. |
|
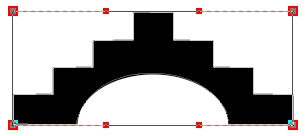
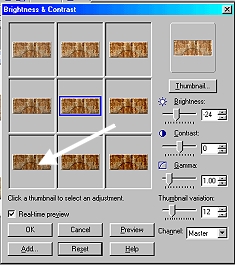
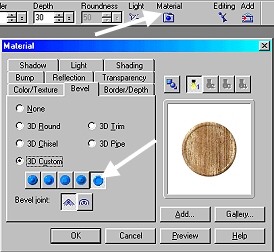
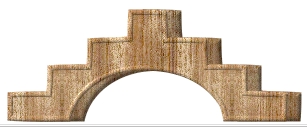
MAKING THE WOODEN BRIDGE - Part 2. 7. Click on Edit/Trace/Image - settings 14 - 1 - 128 and Click OK. 8. Change the Mode setting back to 3D Round. 9. Open a new canvas - the same size as the original - and move your bridge path shape to this. You can now close the original canvas. 10. Fill the Path Shape with a wood preset of your choice. Right Click/Duplicate your Path Shape. 11. Select the original Path Shape and Click on Format/Brightness and Contrast. Click on the bottom left box four times as shown. Click OK. 12. Click on the second Path shape. Click on the Material button - then on Bevel. Check 3D Custom and the setting shown opposite. Click OK. 13. Move the Path shapes into position - with one offset from the other. The bridge section is now complete! |
|
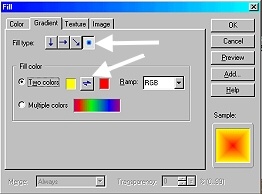
MAKING THE CANDLES. 14. Using the Path Tool - Shape-Rectangle: Color-any you wish!: Mode 3D: Border-2: Depth-30 - draw a Rectangle approximately 15W x 95H pixels. 15. Using the Path Tool - Custom Shape-Plastic Tube: Color-Gold: Mode 3D: Border-3: Depth-30 - draw a small shape for the candleholder. Click on the Material button/Shading and check the Metallic-Gold option. Click OK. 16. Use the Transform Tool/Resize to shorten the height of the holder if you wish. 17. Using the PathTool - Custom Shape-Raindrop: Mode 2D: draw a candle flame as shown. Click on Edit/Fill/Gradient and use the colours and settings shown opposite. Change the Border setting to 6. 18. Using the Path Tool - Custom Shape-Leaf 7: Color-Green: Mode 3D: Border-1: Depth-30 - draw a small leaf shape. 19. Use the Transform Tool/Rotate Freely - to rotate this to the left. Right Click/Duplicate this shape. Use the Transform Tool/Rotate and Flip and Flip the second shape horizontally. 20. Put the two leaf shapes in place as shown. 21. Select all the parts of your candle & holder by keeping your finger on the Shift key and clicking on each one. Right Click/Merge As Single Object. 22. Right Click/Duplicate the candle 6 times. Put in place on your bridge. 23. Shift/Click on the left three candles. Right Click/Arrange/Send to Back. Right Click/Select All Objects/Merge As Single Object. 24. (Optional) Use the /Retouch Tools/Burn Tool to shade the right hand side of your candles. 25. (Optional) Add the decorative trim from the zip file - or use your own decoration for the front of the bridge. Your candlebridge is finished! |
|
|
|
|
Click here to go to my flickering candle tutorial to find out how to animate your flames! (Start at Stage 13 and vary the flame shape for each candle) |
 |
|
|
Free Spirit Graphics If you would then like an invitation to join, please Email Me. We'd love to have you along! |
|
|
If you need any help - or want to make suggestions to improve this tutorial - or for new ones |
|
This site © Rosie Hardman-Ixer 2001/2/3 |