
CHRISTMAS PUDDING PI VERSION: 8. LEVEL: Intermediate MAIN TOOLS USED: TERMS OF USE: Please Read - Thank You! |
|
INSTRUCTIONS |
|
|
|
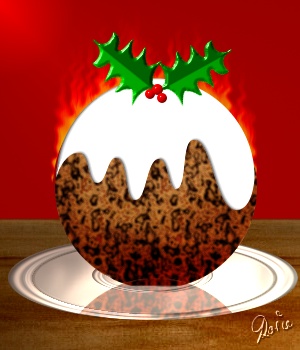
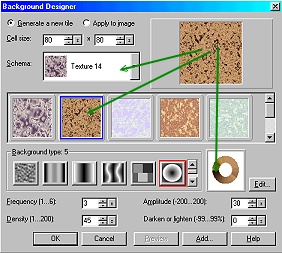
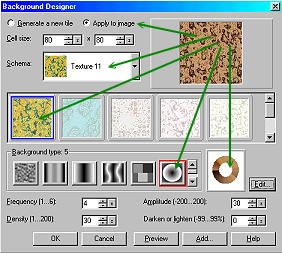
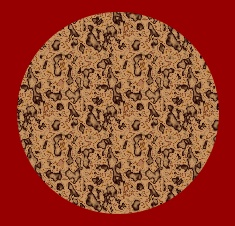
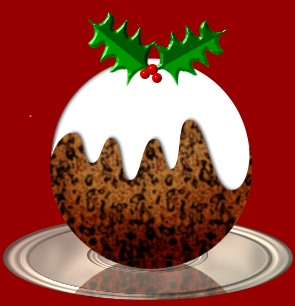
THE PUDDING 1. Open a new canvas, 300W x 350H pixels. This can be any colour but a nice Christmas-sy colour like a deep red (mine is Hex #970000) looks best. 2. Using the Path Drawing Tool, Shape - Circle: Colour - any: Mode - 2D: draw a shape 200W x 200H pixels. 3. Keeping your circle shape selected, now click on Web/Background Designer and Click on Texture 14: Second pattern along as shown: Background Type 5. Now click on the Edit button to open the Palette Ramp Editor. 4. Click on the Add button and then OK. This adds this colour scheme to your Palette for future use. 5. Now click on Texture 11: First pattern in row: Background Type 5. Click on the Edit button again and select the colour wheel you just added to the Palette Ramp Editor and OK.
6. Check the Apply to Image button and then OK. Your pudding should now look like the one opposite.
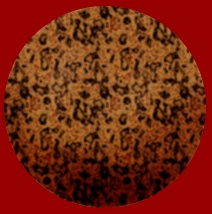
7. Now let's cook that pudding! Use the Retouch Tool/Burn - Shape - 75: Level - 50: Soft Edge - 50: and shade your pudding to give a nice deep, rich colour.... ooh yummy! Increase the Level to 65 to create a darker shading at the base as shown. 8. Now click on Effect/Blur - choose the middle of the three levels and OK. |
|
|
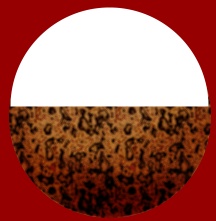
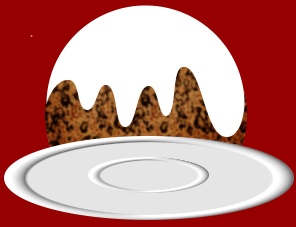
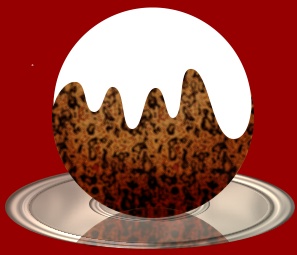
THE SAUCE 9. Using the Path Drawing Tool, Custom Shape - Half Circle: Colour - white: Mode - 2D: draw a shape to fit across the top of the pudding. Use the Transform Tools/Resize to stretch the shape a little if necessary.
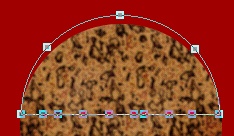
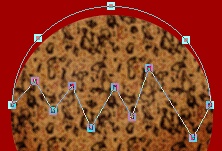
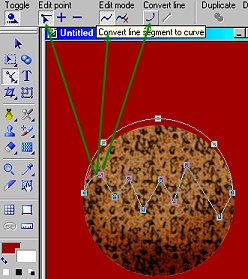
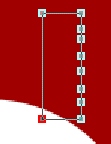
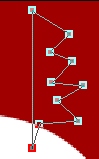
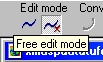
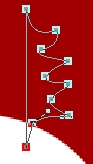
10. Now click on the Editing button on the Attribute Toolbar to go into Path Edit Mode. Click on the + sign under 'Edit point' and add a number of points to the bottom line of the shape. 11. Now click on the first (left-hand) button under 'Edit point'. 12. Pull the nodes you created alternately up and down to form a zig-zag edge as shown. Don't make these too even or the sauce will not look realistic when it's finished.
13. Now click on each of the lines between the edit points you created (move your cursor over the line until it becomes a little hand and then click) and then on 'Convert line/Curved line' - to convert each line segment to a curve. v 14. When you have converted all the straight lines to curves, click out of Path Edit Mode and back into 2D Mode.
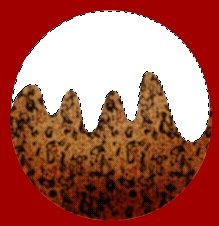
Your sauce shape should now look something like the bottom pic (opposite) in this section.
(Good job this isn't real life or we might have had sauce all over the table.... ;-) ) |
|
|
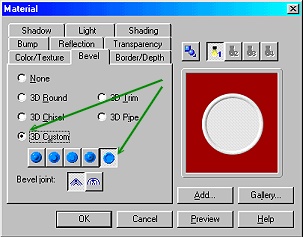
THE DISH 15. Using the Path Drawing Tool, Shape - Ellipse: Colour - any: Mode - 3D: Border - 7: Depth - 30: draw a shape 290W x 80H. 16. Now click on the Material button/Bevel - select the 3D Custom Bevel shown and OK. 17. Draw a smaller ellipse - 120W x 35H and place this on top of the first one in the position shown. You can now fill these two shapes with any preset that you like best. I am using a simple metallic one. 18. Once you have your dish coloured, select both parts of the dish and use Right Click/Arrange/Send to Back to send these shapes behind the pudding. The Reflection (Optional): If you are making a ceramic, or textured dish, this section probably wouldn't be needed. Because I had made a metallic dish that would reflect the pudding I created the reflection as follows: a. I selected the main shape of the pudding and Right Click/Duplicated it. b. I then used the Transform Tools/Rotate and flip - to flip it Vertically. c. Clicking on Right Click/Properties, I increased the Transparency to 50% and clicked OK. d. Using the Object Paint Eraser, I then carefully erased all the part of the reflection that I didn't need. |
|
|
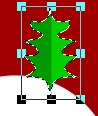
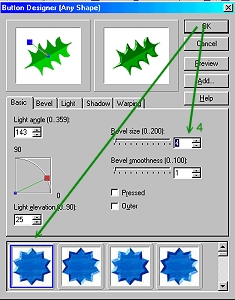
THE HOLLY TRIM You may have a holly stamp or ufo you can use for this - but here's how to make your own. 19. We are going to make the leaf in two halves. Using the Path Drawing Tool, Shape - Rectangle: Colour - Light Green (mine is Hex #00C400): Mode - 2D: draw a shape25W x 70H. 20. Now click on the Editing button on the Attribute Toolbar to go into Path Edit Mode. 21. Add some extra edit points to the right hand side of the rectangle using the same method you used for the sauce. 22. Now pull these into the positions shown to form a zig-zag edge. 23. Once again - convert all the lines between the nodes into curves. TIP! 24. Click on each edit point to use the adjustment handles to create a holly leaf shape as shown. 25. Once you are happy with the shape of the leaf - come out of Editing Mode and return to 2D Mode. 26. Right Click/Duplicate the leaf and change the colour of the duplicate to a darker green. 27. Use the Transform Tools/Rotate and flip - to flip the duplicate horizontally. 28. Put the second half of the leaf in place alongside the first one and then, selecting both halves, Right Click/Merge as Single Object. 29. Using the Transform Tools/Rotate freely - Rotate the leaf to the right. 30. Right Click/Duplicate the leaf and then, using the Transform Tools/Rotate freely - rotate the duplicate to the left. Put in place on the top of the pudding. 31. Using the Path Drawing Tool, Shape - Circle: Colour - red: Mode - 2D: draw some small shapes for the berries. You may prefer to keep your picture in 2D Mode but if you wish to create a more 3D look you can convert the Sauce and berries to 3D Mode - then adjust the Border and Lighting for a nice white appearance. For the leaves - you can click on Web/Button Designer/Any Shape - I would suggest the settings shown - Bevel Size 4 and the preset indicated..
|
|
|
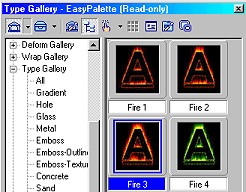
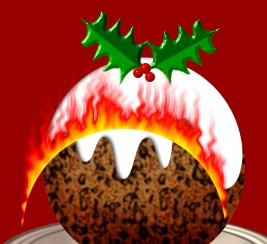
FINISHING TOUCHES! 32. A little flaming brandy? This is so easy it'll knock your socks off! First of all - select the main, circular pudding shape. Right Click/Duplicate this.33. Now open the EasyPalette/Type Gallery/Fire and double click on Fire 3. Close the EasyPalette. 34. Using the Object Paint Eraser, erase the thin, bottom part of the fire (see left). 35. Right Click/Properties and change the Transparency to 35% 36. Right Click/Arrange/Send to Back. 37. Put in place on the pudding. See - I told you it was easy! 38. Finally I used the Object Paint Eraser to take a little off the bottom of the pudding - so it wouldn't roll off the plate! |
|
|
|
 |
|
|
Free Spirit Graphics If you would then like an invitation to join, please Email Me. We'd love to have you along! |
|
|
If you need any help - or want to make suggestions to improve this tutorial - or for new ones |
|
This site © Rosie Hardman-Ixer 2001/2/3 |