
XMAS TREE ORNAMENT PI VERSION: 8 (but can be done in 6 & 7). LEVEL: Beginner MAIN TOOLS USED: Path Drawing Tools, Transform Tools, EasyPalette. NECESSARY DOWNLOAD: Zip file with three bumps for centre of ornament HERE TERMS OF USE: Please Read - Thank You! |
|
INSTRUCTIONS |
|
|
|
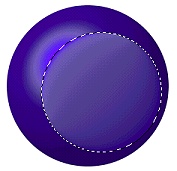
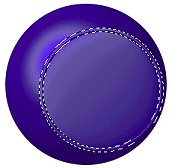
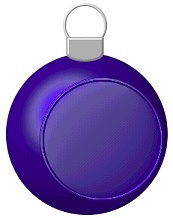
THE BASIC PIECES Before you start the tutorial, download and unzip the file with the 3 bumps (available above) into a folder of your choice. 1. Open a new, white canvas - 300W x 300H pixels. 2. Using the Path Drawing Tool, Shape - Circle: Color - any color of your choice (mine is Hex#150185); Mode - 3D Round: Border - 108: Depth - 30 : draw a shape 215W x 215H pixels. 3. Click on the Material Box/Shading and change the shade to metallic if preferred. 4. Hold down the ALT key on your keyboard and draw another circle - 160W x 160H pixels slightly offset from the centre of the first circle as shown. Click on the Material Box/Shading and change the shade to metallic (it is necessary for this piece). 5. Change the Depth setting to 2. 6. Right Click/Duplicate this piece. 7. Change the Mode to 3D Pipe. Change the Border to 3 and Depth to 30. Put in place as shown. 8. Using the Path Drawing Tool, Custom Shape - Arch 3: Color - any; Mode - 3D Round: Border - 4: Depth - 30: draw a shape. Now use the Transform Tools - Rotate & flip to flip the shape Vertically and Resize to change the size to Width - 50 & Height - 35. Put in place as shown. 9. Use the Outline Drawing Tool - Shape - Circle: Color - any; Mode - 3D Round: Border - 2: Depth - 30: draw a shape 54W x 54H pixels. Right Click/Arrange/Send to Back and put in place. OK - now we have all the pieces of our bauble - let's decorate! |
|
|
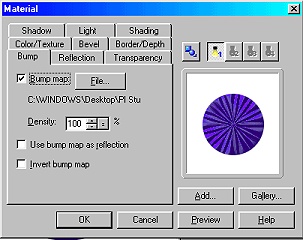
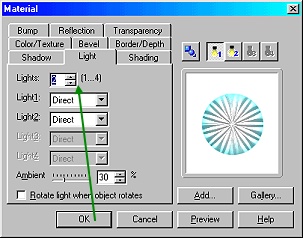
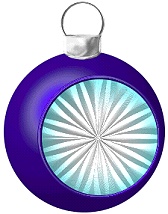
THE CENTRE DECORATION 10. Reselect the smaller circle you made in 4. above. 11. Click on the Material button and then the Bump tab. Click on File... and browse to the folder that you unzipped the bump files to. Select any of the bump files (I am using centrestarbump1.jpg) and click Open. TIP: Sometimes, checking the 'Invert bump map' button here will give a completely different effect to your finished centre and is worth experimenting with! 12. Now click on the Color/Texture tab/Gradient - check this and click on the colour box to open the Gradient Fill box. Choose either a two color fill or a Multiple color fill - I have used a two color (Hex #20CDDB and white) and OK. Click on the Light tab and change the number of lights to 2 and OK. You will find that be changing the Border & Depth and by moving the light for each of the light bulbs with your cursor (see the Lighting section in the Path Panel/3D tab), you can alter the effects on the centre decoration a lot. You can also click on More... in the lighting section in the Path Panel (this opens up the Material box/Lighting) and change the type of lights to Spot, instead of Direct and this again will give you a different effect. You can now use any presets you may have in your EasyPalette to colour the other pieces of your ball if you wish. Gold or silver hanger looks best for the hanger - in my bauble I have used Silver 1 from the Material Attribute Gallery/Metallic. Of course you may have a lot of ideas for additional decoration - this is just a start! (see below)! :-) |
|
|
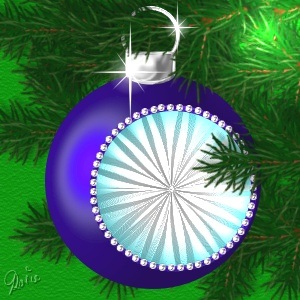
Here is the finished ornament with a couple of sparkles, some beads, a spruce tube used for the tree and a little lighting to finish. |
 |
|
|
Free Spirit Graphics If you would then like an invitation to join, please Email Me. We'd love to have you along! |
|
|
If you need any help - or want to make suggestions to improve this tutorial - or for new ones |
|

This site © Rosie Hardman-Ixer 2001/2/3 |