
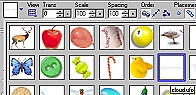
THE WITCH PI VERSION: 6/7. LEVEL: Beginner MAIN TOOLS USED: Path Tools, Transform Tools, EasyPalette, Stamp Tool, Paint Tools (Optional). NECESSARY DOWNLOADS: Witch Kit TERMS OF USE: Please Read - Thank You! |
|
INSTRUCTIONS |
|
|
|
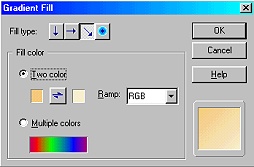
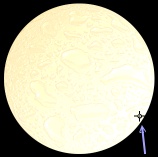
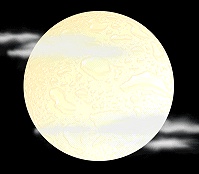
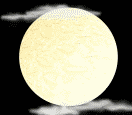
THE MOON & CLOUDS 1. Open a new, BLACK canvas - 400W x 350H pixels. 2. Using the Path Drawing Tool, Shape - Circle: Mode - 3D Round: Border - 150: Depth - 1: draw a shape 300W x 300H pixels in the centre of your canvas. 3. Click on Color/Gradient and fill with a two-colour gradient using colours Hex#F9C268 and Hex#FBEEC8 and a diagonal fill as shown. 4. Open the EasyPalette/Material Attribute Gallery/Bump and click on Bump No: M20 (PI6 - Material Gallery/Bump/Moon). 5. In the Path Panel, click on the light-bulb button and move the cursor over the surface of the moon to the point illustrated. This should give you a lovely 'glow' on the moon as shown in the second illustration. 6. Using the Stamp Tool - select the cloud.ufo stamp shown. Make sure that Object on the Attributes Tool bar is set to Separate Objects and then stamp some clouds across your moon. Nice, wispy, long clouds seem to look best - so stamp a cloud - if it looks right hit the Space Bar to deselect - if it doesn't look a good shape, hit Delete. You should end up with something like the pic opposite. |
|
|
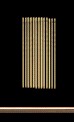
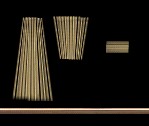
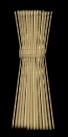
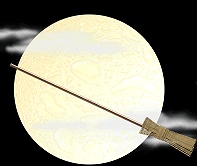
THE BROOM 7. Using the Path Drawing Tool, Shape - Rounded Rectangle: Color - any at this stage: Mode - 3D Round: Border - 3: Depth - 30: draw a shape 360W x 5H pixels for the broom handle. 8. Fill this with any suitable wood preset. TIP: If you are using a wood with a strong horizontal grain - after you have filled the shape, Right Click/Convert Object/From Text Path to Image before the next step - this will keep the grain running true after we use the Rotate Tool later. 9. Using the Path Drawing Tool, Custom Shape - Vertical Lines 1: Color - any at this stage: Mode - 3D Round: Border - 14: Depth - 30: draw a shape and then use the Transform Tools/Resize to make this shape 20W x 70H pixels. 10. Open the EasyPallette/Material Attribute Gallery/Metallic and fill this shape with the Copper 3 preset. 11. Right Click/Duplicate this piece twice and overlap the three pieces as shown in the first illustration in this section - then Right Click/Merge As Single Object (this is important - or your broom will look very thin). 12. Again - Right Click/Duplicate this merged piece TWICE. 13. Using one of the duplicate pieces, use the Transform Tools/Perspective to narrow the top of the Duplicated piece as shown. Using the second duplicate, use the Transform/Resize and Perspective Tools to create the second shape and finally use the Transform/Resize and Rotate Tools to make the final piece and rotate it through 90 degrees. 14. Once you have all three pieces combine them to make the complete broom as illustrated - and Right Click/Merge As Single Object. If the broomhead still seems a little transparent you can always duplicate it and Merge the two pieces together for extra solidity. 15. Use the Transform Tools/Rotate & flip - to flip the broomhead 90 degrees to the left and put in place on the broom handle. Select both pieces then Right Click/Merge As Single Object. 16. Use the Transform Tools/Rotate by degree - to rotate the whole broom 25 degrees to the right and put in place over the moon. If your broomhead looks a little dull - try clicking on Effect/Blur & Sharpen/Sharpen and sharpen it a little - this can add a bit of shine/definition back. |
|
|
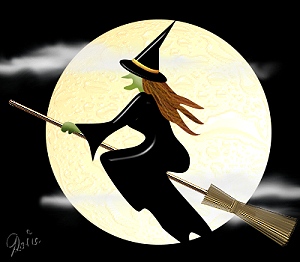
THE WITCH 17. Now open up the witch kit which you downloaded at the beginning of the tutorial. 18. Right Click/Select All Objects of the kit and drag them onto your main canvas and into place on the broom. 19. Obviously it is up to you how you colour these pieces and I'm sure you have some great ideas! I changed some of them (hat and dress) to 3D Round in order to use the light-bulb for shading and left others (such as the face and hands) 2D and used the Retouch Tools/Burn to shade them. The hair I coloured brown and then used the Paint Tools/Bristle to paint it. Enjoy making your Halloween witch! |
 |
|
|
Free Spirit Graphics If you would then like an invitation to join, please Email Me. We'd love to have you along! |
|
|
If you need any help - or want to make suggestions to improve this tutorial - or for new ones |
|
 |
This site © Rosie Hardman-Ixer 2001/2/3 |