
TRADITIONAL WHEATSHEAF PI VERSION: 6. LEVEL: Beginners MAIN TOOLS USED: Path Tools: Transform Tools: Line & Arrow/Spline Tool TERMS OF USE: Please Read - Thank You! |
 |
INSTRUCTIONS |
|
|
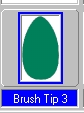
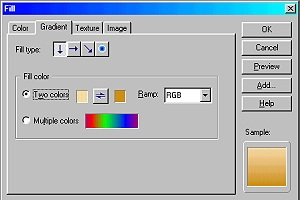
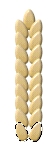
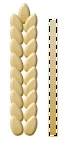
MAKING THE FIRST WHEAT EAR 1. Open a new canvas - 300W x 400H pixels. 2. Using the Path Tool/Custom Shape/Brush Tip 3 - Mode 3D Round: Border 3: Depth 30 - Draw a small shape as shown. 3. Click on Edit/Fill -then on the Gradient Tab. Check the Fill Color - Two colors button and then change the two colours to those shown opposite, with a top to bottom fill. 4. Right Click and Duplicate this shape twice. 5. Click on the first copy and, using the Transform Tool - setting the Rotate by Degree to 20 degrees as shown - rotate it 20 degrees to the right. Click on the second copy and rotate it 20 degrees to the left. 6. Put the two copies together - keep your finger on the Shift key and click to select them both and then Right Click/Merge As Single Object (shown left). 7. Right Click and Duplicate this Object 7 times. 8. Put the single, original shape at the top and then line up the duplicated copies of the shape below it as shown to make the main body of your wheat ear. 9. Now - see those gaps in the ear? We're going to get rid of those easily! Using the Path Tool/Rectangle, draw a shape the depth of your wheat ear as shown and use the same colour gradient fill on it. 10. Move this in place over the wheat ear and then Right Click/Arrange/Send to back. Voila - no more gaps! |
   |
FINISHING THE WHEAT EAR 11. Now using the Path Tools/Line & Arrow Tool/Spline Tool (be sure you are NOT using the ordinary Path Tool/Spline here!) - Mode 3D Round: Width 2: Style-Plain: Arrow- None: Border 2: Depth 30 - draw a stalk (slightly curving as shown) for your wheat. Click to start the line click occasionally to control any curve and double click to finish. Colour this with the same fill. 12. Using the same tool but changing from the Spline Tool to the Straight Line Tool and and the Width/Border to 1 draw the 'whiskers' on the wheat ear. Leave some of these 'whiskers' at the front but Right Click/Arrange on others and Send to Back. 13. Right Click/Select All Objects/Merge As Single Object 14. Your wheat ear is complete! (You might like to save this as a separate object to your Easy Palette for future use now?) |
|
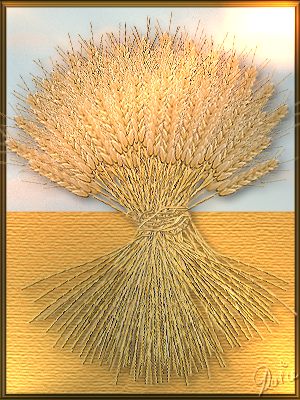
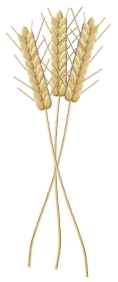
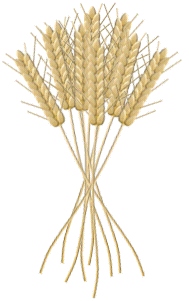
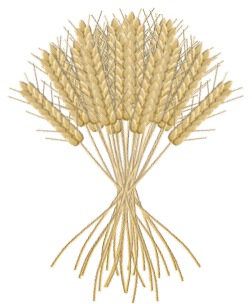
MAKING THE SHEAF 15. Using the Transform Tool/Resize, reduce the size of your wheat ear until it is approximately 250 pixels high. Right Click and Duplicate Twice. 16. Use the Transform Tool/Rotate and Flip to flip one of the copies horizontally. Then use the 'Rotate by degree' box to Rotate it 15 degrees to the right. 17. Use the Transform Tool/Rotate by degree to rotate the second copy 15 degrees to the left. Place the three ears in the position shown on the left. 18. Right Click/Select All Objects/Merge as Single Object. 19. Duplicate this group of ears Twice. 20. Using the same method as in 16 and 17 rotate the two copies. Put them in place as shown left and then Right Click/Select All Objects/Merge as Single Object. 21. Duplicate this object twice and (yep! you got it!) use the same method to produce the picture opposite. Right Click/Select All Objects and Merge As Single Object. 22. Now by copying this group a few times - stretching with the Transform/Resize Tool for a couple of the copies and sending them to the back - and reducing the size for a copy for the front of the sheaf - rotating a little to get them at different angles and maybe flipping a couple of them horizontally to give variety, you can build up your wheatsheaf and make it as big or small as you like! You should end up with a sheaf something like the one opposite. Once you are happy with the shape of the sheaf, Right Click, Select All Objects/Merge as Single Object. |
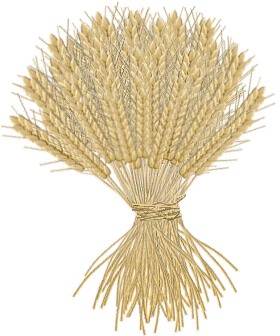 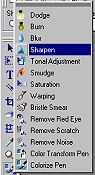 |
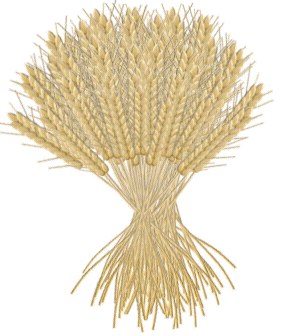
BINDING THE SHEAF 23. Now using the Path Tools/Line & Arrow Tool/Spline Tool (be sure you are NOT using the ordinary Path Tool/Spline here!) - Mode 3D Round: Width 2: Style-Plain: Arrow- None: Border 2: Depth 30 - draw a lot of lines across the 'waist' of your sheaf as binding stalks. Right Click/Select All Objects/Merge as Single Object. Tip! If your wheatsheaf seems a little blurry - use the Retouch Tools/Sharpen (left) and run this over some (but not all!) of the ears of wheat to bring out a little of the detail. I have done this in the example shown opposite. Your sheaf is complete! |
|
|
(Same method but with a simple background and a little lighting from the Easy Palette Lighting Gallery!) |
 |
|
|
Free Spirit Graphics If you would then like an invitation to join, please Email Me. We'd love to have you along! |
|
|
If you need any help - or want to make suggestions to improve this tutorial - or for new ones |
|
This site © Rosie Hardman-Ixer 2001/2/3 |