
WINDOWBOX SCENE PI VERSION: 6/7. LEVEL: Beginner MAIN TOOLS USED: Background Designer, Path Tools, Transform Tools. OPTIONAL DOWNLOADS: If you wish to use the flowers I have used - these are by Marlene - available from the PIRC site Here. The preset used for the box is from the Wood Presets - Horizontal 2 by Fr. Michael (hosted by the PIRC, these are available Here. Click on Cool Stuff #3 - Free Presets on the right-hand side) TERMS OF USE: Please Read - Thank You! |
 (Shown at 75% size) |
INSTRUCTIONS |
|
|
|
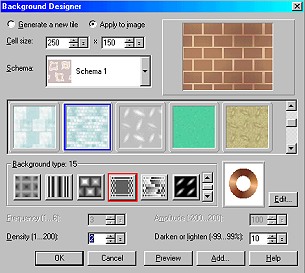
BUILD THE WALL 1. Open a new canvas, 440W x 300H pixels. 2. Click on Web/Background Designer. Apply the settings shown:Check 'Apply to Image' button Cell Size: 250 x 150 Schema 1 Choose pattern 2nd row - 2nd from left Background Type - 15 Click on Edit button to open Palette Ramp Editor and choose 007 (How did James Bond get in here?!) and OK. (In PI6 it is 7). Density - 2 Darken or Lighten - 10 Click OK 3. Right Click/Copy & Paste 4. Click on Effect/All/Emboss - accept the default setting and Click OK. 5. Click on Format/Invert. 6. Now Right Click/Properties - choose 'Luminosity Only' in the Merge pull-down box and OK. Right Click/Merge All. 7. If you think your wall could do with a bit more sunshine - click on Format/Brightness and Contrast and click on the right-hand middle and top buttons once each. That should brighten it up a little! OK - you've built your wall (wasn't that EASY?!) now onto the window! |
|
|
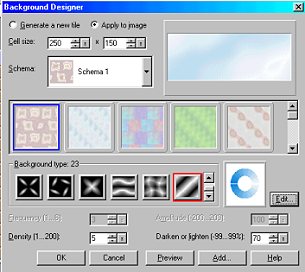
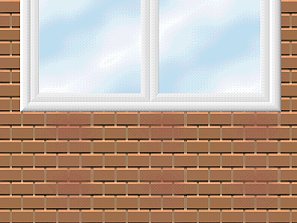
THE WINDOW Now we're going to make a window - reflecting the light from the sky. 8. Using the Path Tools - Shape - Rectangle: Mode - 2D: draw a shape 335W x 150H pixels and place this at the top of your picture. 9. Click on Web/Background Designer. Apply the settings shown: Right Click/Merge this piece with the Background. 10. Using the Outline Drawing Tool, Shape - Rectangle: Mode - 3D: (my other settings are Colour - White: Border - 6: Depth - 15: - but you might like to make your window a wooden one or another colour/size) - draw a rectangle for the outer windowframe around your window - this should be large enough for the top of the frame to be situated off the top of the picture. 11. Using the same tool - now draw two rectangles for the windows - Border - 4: Depth - 4: for the inner window-frames. Again - they should be large enough for the top of the frame to be off the picture - see illustration. Tip: I did the inner window-frames the easy way - made a rectangle, duplicated it, lined the two up and Merged them and then used the Transform Tool to make them fit the inside of the main frame! Select all parts of the windowframe and Right Click/Merge as Single Object. |
|
|
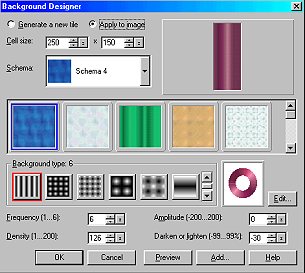
CURTAINS 12. Using the Path Tools - Shape - Rectangle: Mode - 2D: draw a shape large enough for a curtain for your window. Mine is 55W x 130H pixels. 13. Click on Web/Background Designer. Apply the settings shown: 14. Right Click Copy & Paste this piece Tip: If you would like a few more folds in your curtains - Right Click/Duplicate the pieces then use the Transform Tools/Resize to make the duplicates narrower and line them up with the other curtain pieces behind the window. I have done this in my example. I have used three pieces on either side to make my curtains (see illustration). 15. Use Right Click/Send Backwards to send the 2 pieces behind the window-frames. Once you are happy with your window - Right Click/Merge All. |
|
|
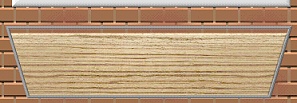
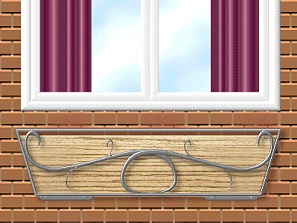
WINDOW BOX 16. Using the Path Tool - Shape - Rectangle: Colour - White: Mode - 2D: draw a rectangle 350W x 80H pixels for the planter. Now fill this shape with the colour or preset of your choice. I have used a wood preset (see downloads above) but you could have a painted or decorated box? 17. Use the Transform Tool/Perspective to narrow the bottom of the shape. 18. Right Click and Duplicate this shape and then change the mode to 3D Pipe: Colour - Dark Grey (or colour of your choice): Border - 2: Depth - 30: and put in position as shown. Click on the Material Box/Shading and check the metallic button/OK. 19. You can let your imagination run riot here and create the wrought iron holder using any shapes you like. I used the Divider 2 shape - duplicated and flipped horizontally. I then Merged the 2 pieces and used the Transform Tools/Resize to make it fit my window box. I then added a shadow to show that the wrought iron was a container for the planter inside. 20. Finally you might like to make some brackets - mine are just a rounded rectangle with two small circle shapes for the bolts fixing the window box to the wall. They are not vital - but it is detail that adds reality to the scene! |
|
|
21. Now to add some plants. Here I leave you to your own devices - I'm sure you have some plant ufos tucked away in your files somewhere! I also added a shadow to them. The ivy trails were sent to me as a tube by email and I'm not sure where they came from - if anyone can tell me I would love to add a credit! YOUR WINDOW BOX IS FINISHED |
 |
|
|
Free Spirit Graphics If you would then like an invitation to join, please Email Me. We'd love to have you along! |
|
|
If you need any help - or want to make suggestions to improve this tutorial - or for new ones |
|


This site © Rosie Hardman-Ixer 2001/2/3 |