
VICTORIAN-STYLE PHOTOGRAPH ALBUM PI VERSION: 7/8/XL (some preset names/locations may be different in PI7). LEVEL: Advanced (good working knowledge of the tools assumed). MAIN TOOLS USED: Path Drawing Tool, Path Edit, Continue Draw, EasyPalette, Transform Tools/Resize, Rotate & flip, Outline Drawing Tool, Retouch Tools/Colorize Pen, Paint Tools/Airbrush. DOWNLOADS: If you wish to use the decoration on the book as illustrated you can download some path shapes to do this with Here. TERMS OF USE: Please Read - Thank You! |
|
INSTRUCTIONS |
|
|
|
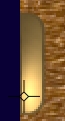
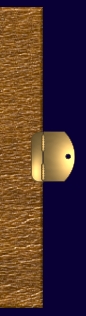
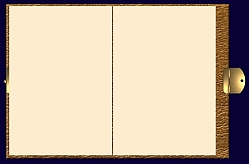
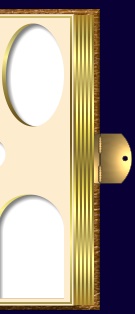
BINDING AND CLASP 1. Open a new canvas - any colour - but I would recommend a dark-ish colour such as the dark blue I've used here - Hex#090035 - 500W x 350H pixels. Clasp - left. 3. Open the EasyPalette/Material Attribute Gallery/Realistic and fill this shape with preset T26. 4. Using the Rounded Rectangle Shape: Mode - 3D Round: Border - 2: Depth - 30: draw a shape 20W x 50H pixels. 5. Open the EasyPalette/Material Attribute Gallery/Metallic and fill this shape with the Copper 4 preset. 6. Click on the Path Edit Tool. Click on the Minus sign - under Edit Point and remove the two left-hand nodes as shown. 7. Select the left-hand line and under 'Convert line' click on the straight line. Click on the Editing button to exit Path Edit mode. 8. In the Path Panel, click on the More... button next to 'Lighting' and change the light from Direct to Spot and OK. 9. Now use the light-bulb to move the cursor to the point shown. 10. Put the shape in place half-way up the left-hand side of the binding. 11. Using the Ellipse shape - draw a tiny ellipse, 8W x 6H and put in place in the centre/left of the first clasp shape - then Right Click/Arrange/Send to Back. 12. The left-hand clasp piece should now look like the illustration opposite. Clasp - right. 14. Now use the Transform Tools/Rotate & flip, to flip the shape Horizontally. 15. Put in place on the right-hand side of the binding. 16. Using the Rectangle shape, Border - 1: Depth - 30: draw a shape 22W x 50H pixels. 17. Click on the Path Edit Tool to go into Path Edit mode 18. Select the right-hand line and under 'Convert line' click on the curved line. 19. Click on the Editing button to exit Path Edit mode then use the light bulb to create the shading shown. 20. Change the Mode to Continue Draw and draw a small circle on the right hand side as shown. Return to 3D Round Mode. Hinges. 22. Use the Transform Tools/Rotate & flip to flip the shape through 90 o left and then use the Transform Tools/Resize to make the shape 5 pixels wide. Note: You may have to alter the lighting on this piece a little as well. 23. Right Click/Duplicate this piece and put the two pieces in place as hinges. |
|
|
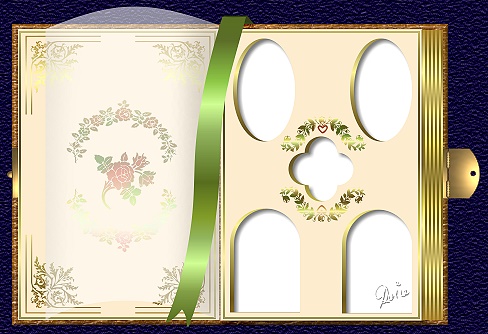
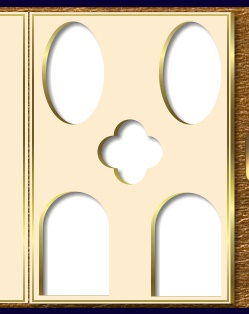
FRONTISPIECE & PAGES 24. Using the Rectangle shape, Colour - Cream (Hex#FDECCE): Mode - 2D: draw a shape 200W x 290H pixels. Put in place on the left-hand side as the frontispiece. 25. Right Click/Duplicate this piece and change the colour to white and put this piece in place on the right-hand side for the page. 26. Select the cream piece again and Right Click/Duplicate again - put this piece in place exactly on top of the white piece. 27. Select the right-hand cream rectangle and change the mode to Continue Draw. 28. You choose any shapes you like for your cut-outs but I have chosen Ellipse, Arch 3 & Flower 4. I drew one of each and then went into Path Edit mode. There I Duplicated the Arch and Ellipse and put everything in place accurately. NOTE: Leave room for the gold border around your shapes! 29. Exit Path Edit mode then Right Click/Duplicate this object. 30. Use Edit/Fill/Gradient to fill the duplicate with the gold Multiple Gradient fill - 008 in the Palette Ramp Editor (see opposite) - top to bottom fill.
Right Click/Arrange/Send Backward and put in place as shown.
31. Select both the cream and gold cut-out pages and then Right Click/Merge As Single Object.
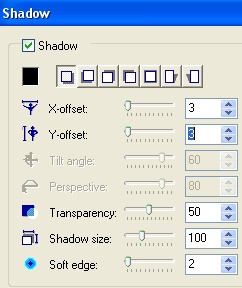
32. Apply a Shadow with the settings shown opposite.
33. Using the same gold gradient, use the Outline Drawing Tool, Shape - Rectangle: Outline Width - 1: draw a rectangle to fit around the outside of your cut-outs.
34. Put this in place then Right Click/Duplicate and put in place on the frontispiece.
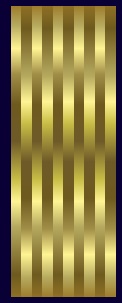
35. Using the Path Drawing Tool, Shape - Rectangle: Color - Same gold gradient: Mode - 2D: draw a shape 10W x 290H pixels.
36. Right Click/Convert Object Type/From Text/Path to Image.
37. Right Click/Duplicate this piece and then use the Transform Tools/Rotate & flip to flip the object Vertically. .38. Put the two pieces together as shown left and then Right Click/Merge As Single Object.
39. Right Click/Duplicate this object four times then line up the four objects and Right Click/Merge As Single Object.
40. Now use the Transform Tools/Resize to make the object 20W x 290H and put in place on the right of the album.
41. Click on Format/Brightness & Contrast and click on the top/right square to add a little brightness and OK. |
|
|
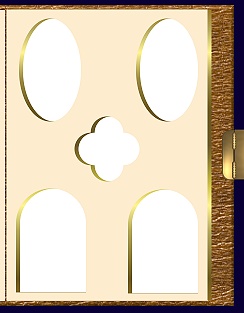
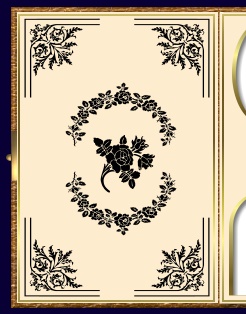
PAGE DECORATION I have provided some shapes for you to use to decorate your album but of course you may use any font or other decoration you wish for your album. 42. If you are going to use the shapes provided in the Download at the top of the tutorial, you can use these straight from the file - or, if you know how, drag them into your EasyPalette library and use them with the Path Drawing Tool. 43. For the frontispiece, I suggest the arrangement shown opposite. 44. Once you have all the shapes you need (in Black: 2D mode), select them all and Right Click/Merge As Single Object.
45. Fill this object with the same, Gold gradient.
46. If required, Click on Format/Brightness & Contrast and click on the top/right square to add a little brightness and OK.
47. Now use the garland with the heart (or decoration of your choice) to decorate the page with the cut outs and fill this with the gradient in the same way.
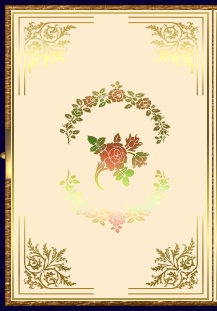
48. Select the pattern on the frontispiece and use the Retouch Tools/Colorize Pen on the settings shown to lightly colour in some of the design.
49. Do the same for the decoration on the right-hand page.
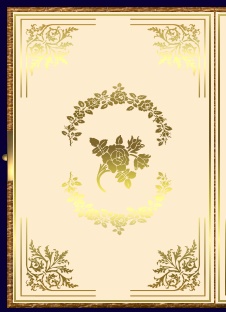
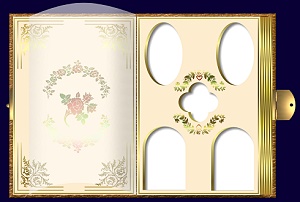
Your album should now look like the one opposite. |
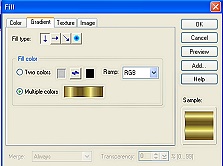
|
|
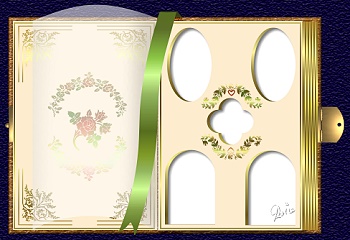
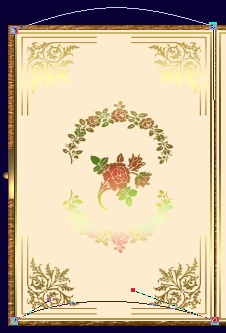
THE TISSUE-PAPER INSERT 50. Now select the white rectangle on the right and Right Click/Duplicate this. 51. Put this in place over the frontispiece and then click on the Editing button to go into Path Edit. 52. Select the top and bottom line in turn and under 'Convert line' click on the curved line to convert to Curve. 53. Use the control handles to create the curves shown then click on the Editing button to exit Path Edit mode. 54. Right Click/Properties and set the Transparency to 45% and OK. 55. Now use the Transform Tools/Resize to make your shape 175 pixels wide.
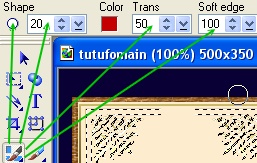
56. (Optional) Right Click/Convert Object Type/From Text/Path to Image - then use the Paint Tools/Airbrush - Color - Grey (Hex#B4B4B4): Settings: Brush Size - 80: Trans - 0: Soft Edge - 50: to shade the right hand side of the curve as shown. You can also put a little shading on the left hand side. Your album should now look like the one on the left. |
|
|
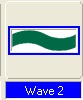
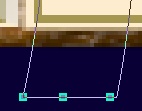
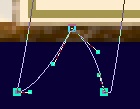
THE RIBBON MARKER 57. Using the Path Drawing Tool, Custom Shape - Wave 2: Color - any at the moment: Mode - 2D: draw a shape 110W x 40H pixels. 58. Use the Transform Tools/Rotate & flip, to flip the shape Vertically and then 90o to the right. 59. Now use the Transform Tools/Resize to make the shape 40W x 315H pixels. 60. Click back on the Path Drawing Tool and then on the editing button to go into Path Edit mode. 61. It really helps to Zoom in to about 400% here! Click on the + (Plus) sign under 'Edit Point and add two nodes to the bottom of the shape as shown. 62. Now drag the centre point upwards and then use the control handles/points to create the shape shown. 63. Click on the Editing button again to exit Path Edit mode and return to 2D Mode. 64. Fill this with a gradient of your choice - I am using a Multiple Gradient again - this time I chose 002 in the Palette Ramp Editor but I changed the Hue shift to 32 to give a more olive-green. 65. Using the Transform Tools/Rotate by degree, Rotate the shape 11o to the Right. 66. Click on the Path Drawing Tool and then on the Editing button again to go back into Path Edit. 67. Move the top nodes and use the control handles/points to get the top of the ribbon parallel with the top of the album as shown. 68. Exit Path Edit mode and then Right Click/Duplicate the shape. Shorten the duplicate as shown and then click on the Transform Tools/Rotate & flip and flip the shape Horizontally. 69. Click on Format/Brightness & Contrast and darken the shape by clicking on the bottom left square four times. 70. Put this in place as shown and then Right Click/Arrange/Send to Back. 71. (Optional) Finally I selected the leather binding of the book again and used the Retouch Tools/Burn to shade the area where the spine of the book would be. |
Finished Album (Full Size) - Pretty as a picture! |
|
 |
|
|
Free Spirit Graphics If you would then like an invitation to join, please Email Me. We'd love to have you along! |
|
|
If you need any help - or want to make suggestions to improve this tutorial - or for new ones |
|


This site © Rosie Hardman-Ixer 2001/2/3/4 |