
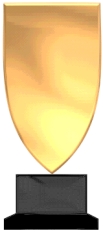
THE WINNER'S CUP PI VERSION: 6/7. LEVEL: Beginner MAIN TOOLS USED: Path & Path Edit Tools, Outline Drawing Tool, Transform Tools, EasyPalette. NECESSARY DOWNLOADS: The presets I am going to use are CarolOyl's Gold Leaf presets - the best gold presets I have found on the web. Please note that there are TWO sets of gold presets - we will be using the Partial set. TERMS OF USE: Please Read - Thank You! |
|
INSTRUCTIONS |
|
|
|
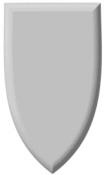
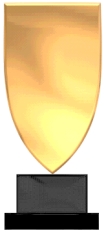
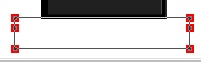
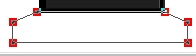
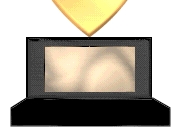
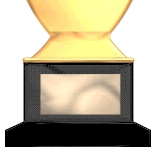
THE MAIN CUP PIECE & THE STAND If you are going to use Carol's Gold presets please download these from the link(s) aboveand install them in your Easy Palette before starting the tutorial. 1. Open a new, white canvas - 350W x 400H pixels. 2. Using the Path Drawing Tool, Custom Shape - Arch2: Colour - Grey: Mode - 3D Round: Border - 5: Depth - 30: draw a shape approximately 160W x 200H. 3. Use the Transform Tools/Rotate & flip - to flip the shape Vertically. 4. Now use the Transform Tools/Resize to stretch the shape until it is 180W x 265H (illustration 1) and fill this with the Xanthous Preset from Carols Partial Gold presets. NOTE: Some presets alter the Border and Depth settings - be sure to change these back to Border - 5 and Depth - 30 if necessary! 5. Using the Path Drawing Tool, Shape - Rectangle: Colour - Black: Mode - 3D Round: Border - 4: Depth - 30: draw a shape 110W x 60H pixels and put in place as shown. 6. Now draw a second, black rectangle - 145W x 25H pixels and put in place as shown. 7. Click on the Path Edit button. Using the Add Edit Point button (see left) - add two extra Edit Points as shown. 8. Move the top 2 Edit Point inwards until they meet the corners of the upper rectangle as shown. 9. Click out of Path Edit Mode to return to 3D Mode. At this point you might also like to use the Light bulb in the Path panel to slightly alter the shading on the bottom of the stand - to give a clearer line between the two pieces. 10. Using the Path Drawing Tool, Shape - Rectangle: Mode - 3D Round: Border - 1: Depth - 1: draw a shape approximately 80W x 40H pixels for the plaque and fill this with a contrasting gold preset. I chose Carol's Candescent - however before I applied this I went to the Material Gallery (any section) and used the Reset thumbnail to remove any formatting from previous presets. |
|
|
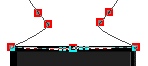
SHAPING THE CUP 11. Select the cup shape and click on the Path Edit button. Using the Add Edit Point button - add edit points as shown opposite. 12. Pull the lower two points you added out to the corners of the stand. Now use the adjustment handles of the bottom three Edit points to pull the shape into a straight line. However you need not worry to much about perfection here as this will be hidden behind the stand. 13. Click out of Path Edit Mode. 14. Using the Path Drawing Tool, Shape - Rectangle: Colour - the gold preset used for the cup: Mode 3D Round: Border - 5: Depth - 1: draw a shape 60W x 10H pixels. Put this in place as shown. 15. Using the Rounded Rectangle shape: Border - 4: Depth - 30: draw a shape 100W x 5H pixels. Put in place at the base of the cup as shown. 16. Draw another Rounded Rectangle 153W x 8H pixels for the lip of the cup and put in place. |
|
|
THE HANDLES 17. Using the Outline Drawing Tool, Shape - Heart: draw a shape approximately 200W x 190H and fill it with the gold preset. 18. In the Path Panel click on the Outline tab and change the Width to 9. 19. Put the heart in place on the cup as shown - then Right Click/Duplicate. Put the second handle in place. 20. Right Click/Arrange/Send to Back for each handle. 21. Add a sparkle and a shadow and your cup is finished! |
|
|
AWARD YOURSELF A PRIZE |
 |
|
|
Free Spirit Graphics If you would then like an invitation to join, please Email Me. We'd love to have you along! |
|
|
If you need any help - or want to make suggestions to improve this tutorial - or for new ones |
|


This site © Rosie Hardman-Ixer 2001/2/3 |