
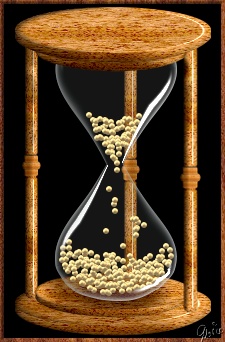
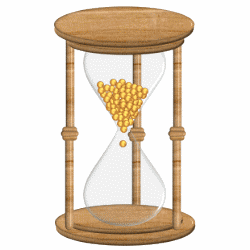
SANDS OF TIME PI VERSION: 8 (Can be achieved in 6 & 7 - though preset names may be different). LEVEL: Intermediate. MAIN TOOLS USED: Path Drawing Tool, Path Edit Tools, Trace, Transform Tools, EasyPalette, Stamp Tool, Retouch Tools/Burn (optional). TERMS OF USE: Please Read - Thank You! |
|
INSTRUCTIONS |
|
|
|
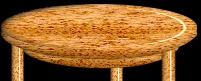
THE CASE BASE & TOP
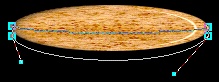
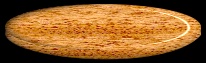
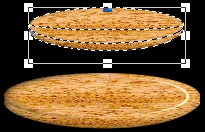
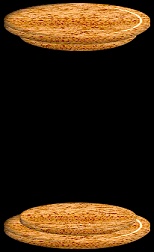
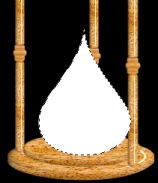
1. Open a new, black (or white if you prefer) canvas - 300W x 350H pixels. 2. Using the Path Drawing tool, Shape - Ellipse: Color - any: Mode - 3D Round: Border - 4: Depth - 30: draw a shape 195W x 45H pixels. 3. Fill this with any suitable wood or metal preset of your choice. 4. Now using the Path Drawing Tool, Custom Shape - Plaque 5: Color - same preset: Mode - 3D Round: draw a small shape and then use the Transform Tools/Rotate and flip, to flip the shape Vertically. 5. Put this shape on top of the first ellipse and stretch it, using the Transform Tools/Resize - until it is the same width - see second illustration. 6. Click on the Editing button to go into Path Edit Mode. Use the adjustment handles and form a lower line shape as shown. 7. Click out of Path Edit Mode and back into 3D Round. 8. Right Click/Arrange/Send to Back. 9. Select both these pieces and Right Click Duplicate. 10. Keep the Duplicated pieces selected and then use the Transform Tools/Resize to make these smaller. Put in place on the base of your timer. 11. Now select the first two pieces you made and Right Click Duplicate these and place at the top of your canvas - to make the top of your timer. 12. Select the two smaller pieces, Right Click/Duplicate. Right Click/Merge As Single Object then move to the top of your canvas. 13. Right Click/Arrange/Send to Back and put in place under the top of your timer. 14. Your pic should now look like the one shown. |
|
|
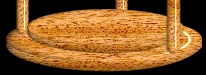
THE 'POSTS' 15. Using the Path Drawing tool, Shape - Rounded Rectangle: Color - same preset: Mode - 3D Round: Border - 5: Depth - 30: draw a shape 12W x 120H pixels. 16. Right Click/Duplicate this shape. 17. Use the same shape to make three smaller shapes for the middle of the post (you can use your imagination here and use other shapes if you want to make a different shaped post). 18. Once you have all the shapes for your post (Make sure that they stretch the height shown!) - select them all and then Right Click/Align/Center Horizontally - to make sure that they are all lined up correctly. Right Click/Merge As Single Object. 19. Right Click and Duplicate this post TWICE. 20. Select one copy and Right Click/Arrange/Send to Back. Put in place as the back, middle post. Note: This post is NOT quite in the center as we are looking at the timer turned slightly. 21. Put the third post in place as shown.
22. Select the two larger pieces of the top of the timer and Right Click/Arrange/Bring to Front. It is important that all the posts are in the correct position, relative to the top and bottom pieces - so I have shown close-ups of the top and bottom of the posts to show how these should appear. OK - that's all the case shapes done. Now onto the glass.....!. |
|
|
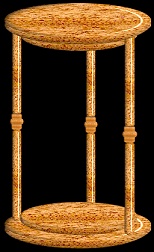
THE GLASS
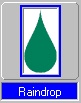
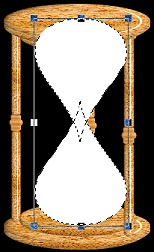
Tip! Remember - to draw on top of existing shapes without a problem, hold down the Alt key whilst drawing the shape! 23. Using the Path Drawing tool, Custom Shape - Raindrop : Color - white: Mode - 2D Round: draw a shape. Use the Transform Tools/Resize to stretch this until it is approximately 125W x 170H pixels. 24. Right Click/Duplicate this shape and use the Transform Tools/Rotate and flip - to flip the duplicate Vertically. 25. Put to two raindrops shapes together as shown.
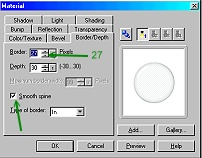
Select them both and then Right Click/Merge As Single Object. 26. Drag this shape to a new, white canvas. Click on Edit/Fill and fill it with black. See opposite (shown at 50% reduction). 27. Click on Edit/Trace/Image - accept the defaults and OK. 28. Change the Mode back to 3D Round. 29. Open the EasyPalette/Material Attribute Gallery/Glass and fill the shape with G23. To get the correct appearance for the glass it may now be necessary to click on Material/Border Depth and set the maximum border to approximately 27 and check the 'Smooth Spine' box. 30. Move the glass to your main canvas and put in place. 31. Select ALL the 3 top pieces of your timer case + the right-hand post and Right Click/Arrange/Bring to Front. 32. Your timer should now look like the bottom picture in this section.
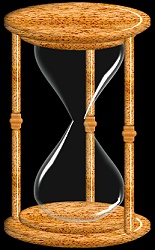
Nearly there! All we need now is some 'sand' for the timer! |
|
|
THE 'SAND' The 'sand' for your timer can be made a number of ways. You can paint it in... but I've found the best way is to use the Stamp Tool and I've chosen a little shiny gold bead for a little luxury touch! 33. First of all we need a very small, gold bead to use as a stamp. If you already have one of these, you can go onto instruction 35. 34. If you don't have a bead - open a new canvas and make a very small 3D Round Path Shape. Fill this with any gold preset and Save it in .ufo format to the Stamps folder inside PI8 on your hard-drive. 35. Click on the Stamp Tool and select the bead you just made (it will be the last thumbnail). 36. Now we need to stamp the bead as often as necessary to make the 'sand'. 37. Once you have all your 'sand' done, select the top pieces of the timer + the glass + the right-hand post and Right Click/Arrange/Bring to Front. |
|
|
FINISHING TOUCHES Now all that remains is to put some finishing touches to your timer. 38. In my example I have selected the wooden pieces and used the Retouch Tools/Burn to add shading. To do this I had to select each shape first, then Right Click/Convert Object Type/From Text/Path to Image. 39. The back post can be shaded a little darker than the side ones to give added realism. Your timer is done! |
|
|
ACADIE'S ANIMATED TIMER A super little version of the timer by Thanks for this Acadie! |
 |
|
|
Free Spirit Graphics If you would then like an invitation to join, please Email Me. We'd love to have you along! |
|
|
If you need any help - or want to make suggestions to improve this tutorial - or for new ones |
|


This site © Rosie Hardman-Ixer 2001/2/3 |