
THERMOMETER PI VERSION: 6/7. LEVEL: Beginner MAIN TOOLS USED: NOTE: TERMS OF USE: Please Read - Thank You! |
|
INSTRUCTIONS |
|
|
|
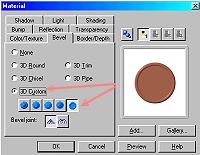
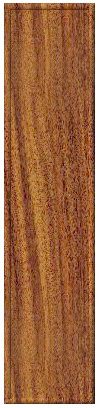
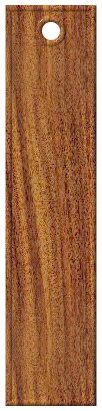
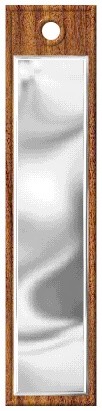
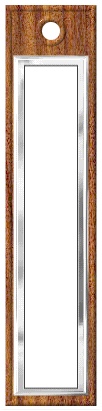
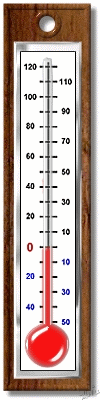
THE BACKING PLATES 1. Open a new white canvas 300W x 410H pixels (this will give you plenty of working room!). 2. Using the Path Tool, Shape - Rectangle: Mode - 3D: Border - 7: Depth - 30: draw a shape 90W x 400H pixels. 3. Fill this rectangle with a wood preset of your choice. I am using my favourite Wood Preset - Vertical 12 by Fr. Michael (hosted by the PIRC, these are available Here. Click on Cool Stuff #3 - Free Presets on the right-hand side). If you use these presets you will need to reset the Border and Depth settings after applying. 4. Click on the Material button/Bevel and use the setting shown (Custom Bevel - the last one in the row). Your pic should now look like the first one opposite. 5. Change the Mode to Continue Draw and, using the Path Tool, Shape - Circle: draw a small circle in the centre of your rectangle (not too high - or you will cut into the bevelled edge). If you need to centre this, click on the Path Edit Tool and select both the circle and the rectangle (second pic) and click on the Align button/Align Center then return to 3D Path Mode (third pic). 6. Now draw another rectangle, Border - 5: Depth - 30: 75W x 340H pixels. Open the EasyPalette/Material Attribute Gallery/Metallic, fill this with preset Silver 1and then put this in place on your wooden frame. 7. Now draw a final rectangle in white - Mode - 2D: 55W x 325H pixels. Click on the Paint Tools/Paintbrush, change the Size to 2 and the colour to black and then click on Effect/Paint on Edges. Put this piece in place on your frame. OK that's the first part finished! |
|
|
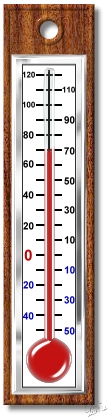
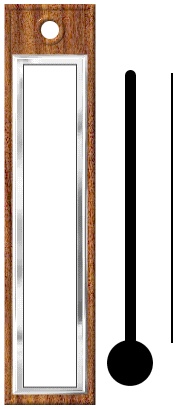
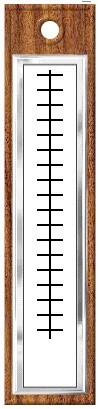
THE SCALE & GLASS 8. Using the Path Tool, Shape - Circle: Colour - Black: Mode - 2D: draw a circle 45W x 45H pixels. You can open a new canvas to do this bit if you wish but you should have plenty of working room. 9. Using the Path Tool, Shape - Rounded Rectangle: draw a tall shape 10W x 275H pixels. Shift/Click on this shape and the circle you just made and then Right Click/Align/Center Horizontally, then Right Click/Merge As Single Object to form the shape shown left. 10. Now, using the Line and Arrow Tool, Border - 1: draw a vertical straight line the height of the stem of the thermometer as shown. TIP! Remember that holding down the Shift key while you draw the line constrains it to a straight line! 11. Draw a horizontal line to cross this one - 25 pixels wide. Place this at the top of the vertical line. Right Click/Duplicate this and place at the bottom of the 'stem'. 12. Now make 16 more duplicates of this line and place them between the two on the vertical line. Don't worry about placing them perfectly spaced or lined up with one another - we'll let PI do that! 13. Now select all the little lines you just drew (probably easiest in the Layer Manager) and then Right Click/Align/Center Horizontally. Then Right Click/Space Evenly - when the box comes up choose Vertically and make sure 'Even (fix objects on both ends)' is checked. Click OK. 14. Right Click/Merge As Single Object. Put in place so that the vertical line is centred and then Shift/Click this as Well and Right Click/Merge As Single Object again. 15. Put the scale in place on your frame. 16. Now use the Text Tool to put in your figures on the scale as shown. Not far to go now! |
|
|
THE BULB & STEM 17. OK - last bit! Move the black bulb and stem shape to a new canvas. Right Click/Merge. 18. Click on Edit/Trace/Image. Accept the defaults and click OK. 19. Change the Mode to 2D and Colour to Red. 20. Right Click/Duplicate this piece. Change the duplicated piece to 3D Mode. Open the EasyPalette/Material Attribute Gallery/Glass and fill this with grey glass G23. In the Path Panel change the Border of this piece to about 10. (I also added a second light by clicking on the Material button/Light and then played around with the light bulb in the Path Panel until I got a nice shine on the stem of the thermometer). 21. Now move the pieces you have just made over to the main canvas and put in place. 22. In the Layer Manager, select the red piece and Right Click/Convert Image Type/From Text/Path to Image and use the Object Paint Eraser to make this the temperature you wish. If you are making an animated image you would cut the red down in sections - saving the separate frames for your animation as you go. 23. Once you have the image as you want it, Right Click/Select all Object and then Right Click/Merge As Single Object. 24. Apply a Shadow to your Thermometer if you wish and you are done! |
|
|
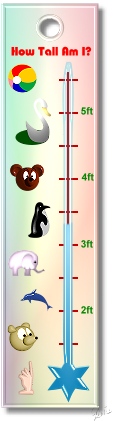
You could also adapt this to use as a growth chart for your child or to publicise how well a fund-raising effort is doing! |
 |
|
|
Free Spirit Graphics If you would then like an invitation to join, please Email Me. We'd love to have you along! |
|
|
If you need any help - or want to make suggestions to improve this tutorial - or for new ones |
|


This site © Rosie Hardman-Ixer 2001/2/3 |