
SUNRISE & SUNSET ANIMATIONS PI VERSION: 8 + Gif Animator 5. LEVEL: Beginner MAIN TOOLS USED: TERMS OF USE: Please Read - Thank You! |
 From the simplest sunrise to a more complex sunset 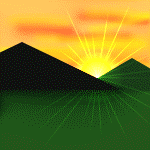 |
INSTRUCTIONS |
|
|
|
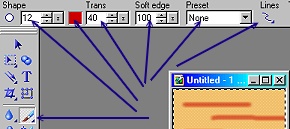
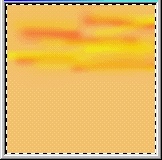
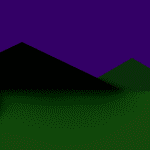
CREATING THE UFO FILE. 1. Open a new canvas, Color - Dark Blue (I used Hex#330066), 150W x 150H pixels. 2. Right Click/Copy. Right Click/Paste. This makes a copy of your blue background. 3. Click on Edit/Fill and fill it with a gold colour - I have used Hex#F7BC5B. 4. Using the Paint Tools/Paintbrush on the settings shown opposite, paint some red and yellow lines on the gold square - to resemble the ones opposite.
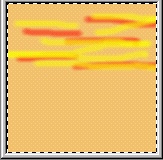
5. Now use the Retouch Tools/Blur, on the settings shown opposite, to blur the lines into the background as illustrated.
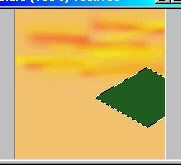
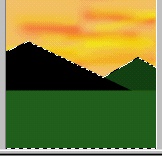
6. Hit the Enter key on your keyboard to deselect the square. NOTE: If you are talented at painting in PI you might like to paint some more realistically-shaped mountains at this point. If you do, be sure to use 'Paint in Object' mode to keep the mountains and anything you paint in the foreground a separate object. I am using basic shapes to make this easier for beginners. 7. Use the Path Drawing Tool, Shape - Diamond: Color - very dark green (I used Hex #0A2E0A): Mode - 2D: draw a shape approximately 105W x 60 H pixels and put in position as shown.
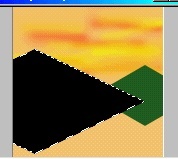
8. Using the same shape but this time Color - Black, draw another diamond 220W x 105H and put in place.
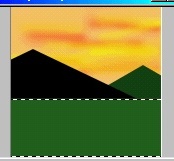
NOTE: To draw on top of another Path Shape, hold down the ALT key on your keyboard whilst drawing - this will deactivate the Pick Tool. 9. Using the Rectangle shape - Color - dark green (I have used Hex#144B0E) draw a shape to cover the lower half of the picture.
10. Hold the Shift key down and then click on the three path shapes (NOT the sky background) and then Right Click/Merge As Single Object.
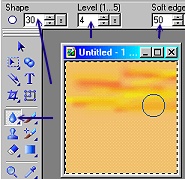
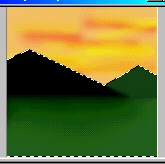
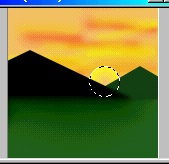
11. Now use the Retouch Tools/Blur again to blur the join of the mountains and foreground as illustrated.
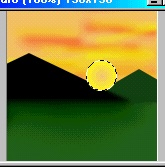
12. Using the Path Drawing Tool, Shape - Circle: Mode - 2D: Border - 15: draw a small circle 30W x 30H pixels.
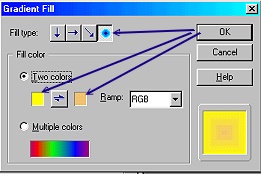
13. Click on Color/Gradient Fill and use a two-colour gradient from yellow to gold with a circular fill as shown. 14. Right Click/Arrange/Send Backwards and put in place as shown.
15. Save your work as a ufo by clicking on File/Save As. Under 'Save as type' choose UFO - and save to your hard drive somewhere you can easily find the file (I usually save to my desktop). I called mine sunrise.ufo. OK - that's all we need to do for the ufo - let's animate! |
|
|
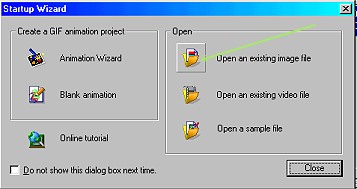
IN GIF ANIMATOR 16. Either close down PI and open Gif Animator - or click on the Switch button at the right-hand top corner of the PI screen and open it from there. 17. When the Startup Wizard opens click on 'Open an existing image file'. Browse to the ufo you just saved, select it and click on Open.
18. Click on the Duplicate Frame button at the bottom of the screen.
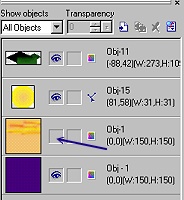
19. Select Frame 1 at the bottom left of the screen and, in the Object Manager Panel on the right hand side of the screen, select the gold & red sky object and click on the eye icon to close it.
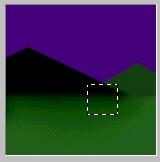
20. Again in the Object Manager Panel, click on the sun object to select it. 21. In the Edit Pane to the left move the sun down behind the hills as shown.
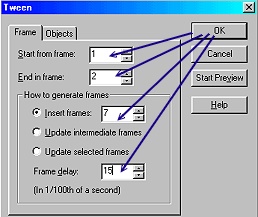
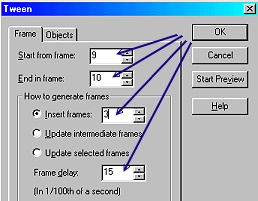
22. Now click on the Tween button at the bottom of the screen. 23. Put in the settings shown and click OK.... wwwooowwweee!!! 24. Select Frame 1 - Right Click/Frame Properties and, in the box that appears, change the Delay to 200 & OK. 25. Select Frame 9 - Right Click/Frame Properties and change the Delay to 250 & OK. 24. OK - let's click on either the Preview Tab or the Play button (Arrow - bottom left of the screen) to see what we have so far.... Not bad eh? But there are a few other little things we can do with this animation to make it even better! Come with me to the next part if you'd like to find out more... |
|
|
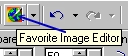
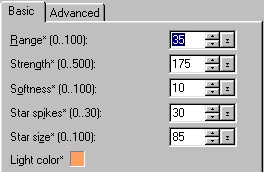
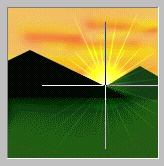
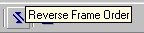
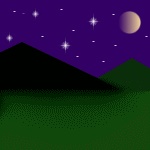
SUN RAYS & STARSHINE! 25. First of all, click on the Optimise Tab. Under 'Preset' choose Photo 256 (we can afford to be generous on a small animation like this!) and Save as sunrise1.gif. 26. Now click on File/Open Image - browse to the sunrise1.gif and open it. (Click 'No' in the box that pops up asking if you wish to save again). Let's add a a few rays and a little glow to our sunrise! 27. Click on Frame 9 and then on the Favourite Image Editor button. This will open the Frame in PI. 28. Click on the pic to select it then open the EasyPalette/Lighting Gallery/Light Bulb/Light Bulb 1. Right Click/Modify Properties and Apply. 29. Move the Ambient Light slider up to 100%. 30. Change the settings to those shown. 31. In the Preview pane, move the light to the point shown (at the join of the mountains). 32. Click OK. 33. Now click on the Save button. This will return you to Gif Animator. 34. In the 'Update from Favourite Image Editor' box that pops up click on Yes. 35. OK - now let's see what that looks like.... click on the Play button or the Preview tab again.... Very nice! 36. If you wish to keep this version of the animation - click on the Optimise Tab. Under 'Preset' choose Photo 256 again and Save as sunrise2.gif. 37. Feeling sleepy? How about turning this into a sunset LOL!? 38. Click on the 'Reverse Frame Order' button at the bottom of the screen - make sure that the 'Reverse the order of the entire animation' is checked and OK. 39. OK! - Nice sunset! Now here's a thought.... how about bringing the moon & stars out? 40. First of all - select Frame 9 in the list at the bottom of the screen and Right Click/Duplicate. 41. Select Frame 10 and click on the 'Favourite Image Editor button again to go into PI. 42. Select the picture, then add a few stars (the Paintbrush on white, size 3 will do this - or maybe you have sparkle stamp you can use?) or a moon? 43. Once you have made your changes, click on the Save button again to return to Gif Animator. 44. Click Yes in the box that pops up. 45. Select Frame 9 in the list at the bottom of the screen. Right Click/Frame Properties. Change the Delay to 15 and OK. 46. Now click on the Tween button again. 47. Change the settings to those shown and OK. 48. Now play your animation! Sun goes down and the stars come out! if you are happy with the animation, click on the Optimise tab and save. I think you can leave the Preset at Photo 256 as this animation is still only about 30 kbs! NOTE: Of course the stars and moon could have been added to the blue background when we first made the ufo... but I have done things this way to show how you can play with, and add to, animations you have already made. Now sit back with a cup of coffee/glass of wine and watch the sun go down! |
 |
|
|
Free Spirit Graphics If you would then like an invitation to join, please Email Me. We'd love to have you along! |
|
|
If you need any help - or want to make suggestions to improve this tutorial - or for new ones |
|

This site © Rosie Hardman-Ixer 2001/2/3 |