
STAGECOACH PI VERSION: 8 (but also suitable for versions 6 & 7). LEVEL: Intermediate MAIN TOOLS USED: Path/Path Edit Tools, Transform Tools, Outline Drawing Tool, Line & Arrow Tool. TERMS OF USE: Please Read - Thank You! |
|
INSTRUCTIONS |
|
|
|
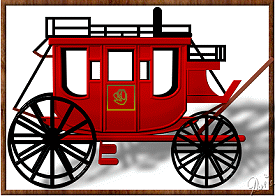
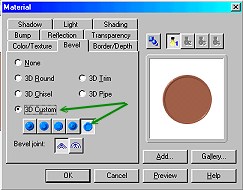
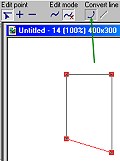
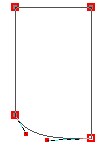
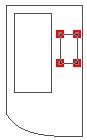
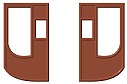
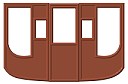
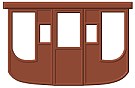
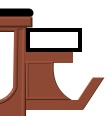
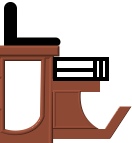
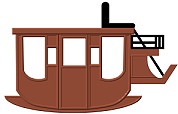
MAIN BODY OF THE COACH 1. Open a new, white canvas, 400W x 350H pixels. 2. Using the Path Drawing Tool, Shape - Rectangle: Color - dark brown: Mode - 3D: Border - 5: Depth - 30: draw a shape 75W x 130H pixels. 3. Click on the Material button/Bevel, use the Custom Bevel shown and OK. 4. Now click on the Editing button to go into Path Edit mode. 5. Move the bottom left edit point upwards and then select the bottom line (move the cursor over the line until it becomes a little hand and then click) and Convert to Curve. 6. Using the adjustment handles create a curve with a flatter base as illustrated. Once you have the shape correct, click out of Path Edit Mode and back into 3D Custom mode. 7. Now change the Mode to Continue Draw and, using the rectangle shape again, draw the window shapes shown. 8. Click away from the shapes to deselect them then select the larger window rectangle and using exactly the same method as you used for the main shape in 5, create the window shape shown. Once you have the shape correct, click out of Path Edit Mode and back into 3D Custom mode again. 9. Right Click/Duplicate this shape. 10. Using the Transform Tools/Rotate and flip - flip the shape Horizontally. Put in place on the canvas as illustrated. 11. Now draw a rectangle to fit between the two pieces you've already made - this will be the door of the coach. (This shape will be approximately 50W x 130H pixels). 12. Change the Mode to Continue Draw and draw a window in the shape as shown. Come out of Path Edit Mode and back into 3D Custom Mode. Your three pieces should now look like those in the picture opposite. 13. Using the Path Drawing Tool, Shape - Rectangle: Color - dark brown: Mode - 3D: Border - 4: Depth - 30: draw a shape 215W x 10H pixels. Put this in place for the roof of the coach. |
|
|
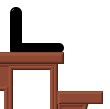
DRIVER'S SEAT 14. Using the Path Drawing Tool, Shape - Rectangle: Color - dark brown: Mode - 3D: Border - 3: Depth - 30: draw a shape 45W x 12H pixels and put in place. 15. Now draw a second rectangle 45W x 45H and put in place below the first. 16. Finally draw a third rectangle 60W x 10H pixels and put in place as shown. 17. Select the middle of the three rectangles and change the bevel to the same one as used in 3. above. 18. Click on the Editing button again. 19. Move the top right-hand edit point to the left as shown, then select the right-hand line and Convert to Curve. Use the adjustment handles to create the shape illustrated. 20. Now draw a rectangle - Mode 3D Round: Border - 3: Depth - 30: 10W x 35H pixels for the foot rest. 21. Use the Transform Tools/Slant to create the shape illustrated. 20. Using the Path Drawing Tool, Shape - Rounded Rectangle: Color - black: Mode - 3D: Border - 3: Depth - 30: draw two shapes for the drivers seat and put in place on the roof of the coach. 21. Select both these shapes - then Right Click/Arrange/Send to Back. 22. Using the Outline Drawing Tool, Shape - Rectangle: Colour - black: Mode - 3D Round: Border - 2: Depth - 30: draw a shape and put in place on the front of the coach. 23. Now use the Line & Arrow tool, Outline width - 2: to draw in the lines shown. 24. Finally add the strut illustrated. |
|
|
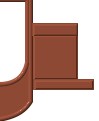
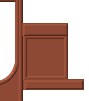
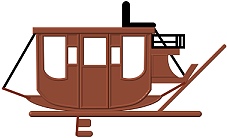
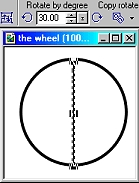
UNDERCARRIAGE & WHEELS 25. Using the Path Drawing tool, Shape - Half-Circle: Mode 3D Custom (same Bevel as before): Border - 5: Depth - 30: draw a shape and then use the Transform tools/Rotate & flip - to flip the shape Vertically. 26. Use the Transform Tool/Resize to stretch the shape until it is approximately 230W x 30H as shown. 27. Right Click/Arrange/Send to Back and put in place. 28. Using the Path Drawing Tool, Shape - Rounded Rectangle: Mode 3D Round: Border - 4: Depth - 30: draw a shape 290W x 10H pixels and put in place. 29. Now use the Line & Arrow Tool to draw a line for the side of the steps and the Path Drawing Tool (Rounded Rectangle) to draw two steps and put in place. 30. Now Use the Path Drawing Tool: Shape - Rounded Rectangle, to draw a shape 5W x 150H pixels. 31. Use the Transform Tools/Rotate by Degree - to rotate this shape 45 degrees to the right to make the brake. Put in place as shown. 32. Use the Line & Arrow tool to draw the three lines illustrated. 33. OK - now for the wheels! Open a new, white canvas - 175W x 175H pixels. 34. Using the Outline Drawing Tool, Shape - Circle: Color - Black: Mode - 2D: Border width - 2: draw a circle. Right Click/Merge. 35. Now using the Line & Arrow Tool - again, Color - Black: Outline width - 2, draw a vertical line across the centre of the circle. 36. In the Transform Tool/Rotate by Degree, change the degrees to 30 degrees. Now click on Copy Rotate 5 times and then Right Click/Merge All. 37. Click on Edit/Trace/Image/OK. Change the Mode to 3D Round and drag the resulting shape to your stagecoach canvas. You can now close down the wheel canvas unless you wish to save it for future use. 38. Right Click/Duplicate the wheel shape and then use the Transform Tools/Resize to make the duplicate shape 112W x 112H pixels for the smaller, front wheel. Put wheels in place on your stagecoach. |
|
|
LUGGAGE RACKS 39. Using the Outline Drawing Tool, Shape - Rectangle, draw three rectangles on the roof of the coach as shown. 40. Use the Line & Arrow Tool to draw in the remaining lines for the luggage racks. 41. Finally, to give a little more 'depth' to your coach you might like to select the three main pieces of the coach body, Right Click/Duplicate - then Right Click/Merge As Single Object. Click on Edit/Fill and fill with black. Now use the Transform Tools/Resize to make this piece slightly smaller (about 175W x 115H should be about right) and then Right Click/Arrange/Send to Back and put in place as shown. 42. You can also duplicate the two wheel pieces and treat those in a similar manner. 43. Colour your stagecoach and add some horses, luggage, people.... turn it into a wild west coach or a Christmas scene - it's all up to you.... |
|
|
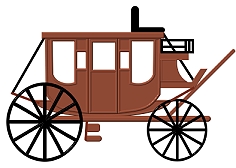
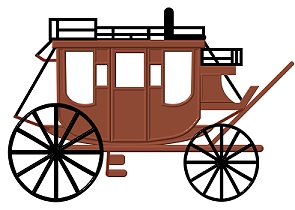
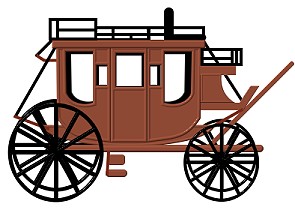
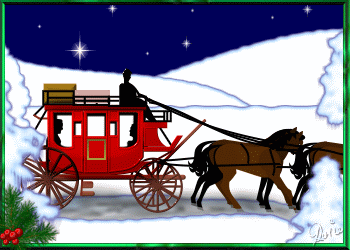
Here's my Christmas stagecoach scene...
|
 |
|
|
Free Spirit Graphics If you would then like an invitation to join, please Email Me. We'd love to have you along! |
|
|
If you need any help - or want to make suggestions to improve this tutorial - or for new ones |
|


This site © Rosie Hardman-Ixer 2001/2/3 |