
CRUMPLED SILK BACKGROUND PI VERSION: 8. LEVEL: Intermediate MAIN TOOLS USED: Paint Tools/Paintbrush, Retouch Tools/Smudge, EasyPalette/Effect Gallery/Texture, Effect/Blur, Format (Brightness & Contrast, Color Balance). NOTE: This tutorial is inspired by one written for PSP by Lady Gem (who in turn had based the beginning of her tutorial on one by Tom Vallombroso ) and she asked me if I could turn it into a version for PI. For another way to make a satin background using the Eye Candy filter you might also like to try this lovely one for PI7 by Tena Williams. NECESSARY DOWNLOADS: The tutorial requires the download and installation of Sandy Blair's 'Quick Tile' Filter which is available Here. TERMS OF USE: Please Read - Thank You! |
|
INSTRUCTIONS |
|
|
|
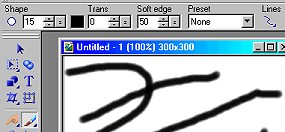
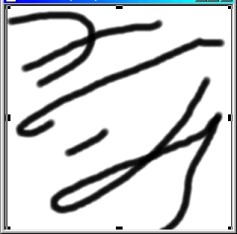
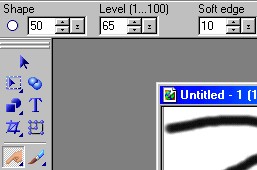
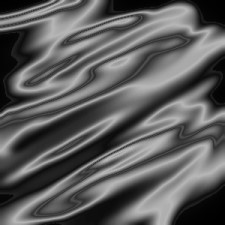
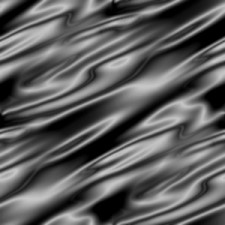
CRUMPLED SILK BACKGROUND Before you start this tutorial please have Sandy Blair's Quick Tile filter installed in PI on your computer. 1. Open a new, white canvas 300W x 300H pixels. 2. Use the Paintbrush on the settings shown: Shape - circle (size 15) Trans - 0 Soft Edge - 50 Lines - Freehand Draw some lines across the canvas as illustrated. These do not have to be copies of mine - make yours individual! 3. Use the Retouch tools/Smudge on the settings shown: Shape - circle (size 50) Level - 65 Soft Edge - 10 Blend the black lines into the background as illustrated, using diagonal movements across the canvas. Try NOT to leave any large areas of black - streaks like those shown are best. Larger areas of white are fine but will mean less folds in the the silk. Please note - the random nature of this part meant that I had to do a number of these blends before I got exactly the effect I wanted in the final silk. So don't worry if you don't get a perfect result first time... the whole tutorial is so short you can Undo as far as your painted streaks and experiment until you succeed - that's part of the fun! 4. Now open the EasyPalette/Effect/Texture/Metal 1 - Right Click/Modify Properties & Apply. 5. Change the settings to those shown opposite: NOTE: If you are going to make a few silk backgrounds, it might be a good idea to click on the Add button at this stage and add these settings to a gallery in your EasyPalette for future use. All you will have to do then is click on the thumbnail generated. :-)
Click OK
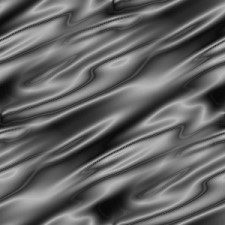
6. Click on Effect/Simple/Quick Tile.
7. (Optional) At this stage I sometimes find some unnatural sharp lines in the silk - if this happens click on Effect/Blur/Blur. Use the default setting - or the right-hand preset for an even softer look - and OK.
8. Now, to give a bit more shine to the silk, click on Format/Brightness & Contrast, and click on the right-hand square in the centre row about three times. |
|
|
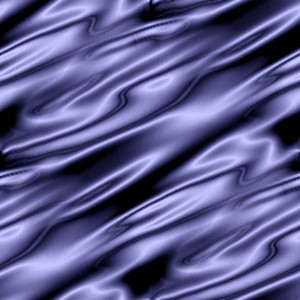
9. To colour your satin, click on Format/Color Balance and click away on the squares until you have achieved the colour of your choice (I have also slightly sharpened the finished picture using Effect/Sharpen). There's your silk! Use as a tiling background or to show off some of your other creations as I have at the top of this tutorial. Have fun! |
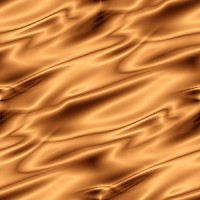 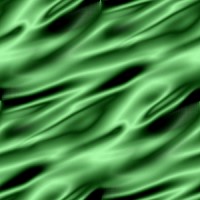  Some more examples of backgrounds produced by this method. |
|
|
|
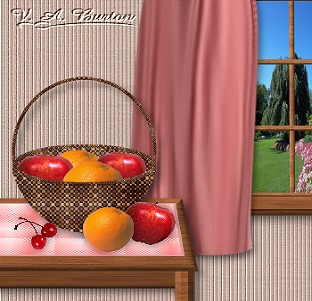
An imaginative adaptation of this tutorial to make drapes by |
 |
|
|
If you need any help - or want to make suggestions to improve this tutorial - or for new ones |
|


This site © Rosie Hardman-Ixer 2001/2/3 |