
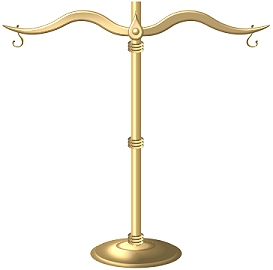
THE SCALES PI VERSION: 7/8/XL. LEVEL: Intermediate. MAIN TOOLS USED: Path Drawing Tool, Path Edit, Wrap Gallery/Text Wrap, Outline Drawing Tool, Text Tool, Object Paint Eraser, Stamp Tool, Transform Tools, Path Panel/Lightbulb feature. TERMS OF USE: Please Read - Thank You! |
|
INSTRUCTIONS |
|
|
|
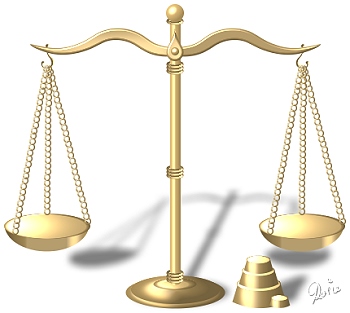
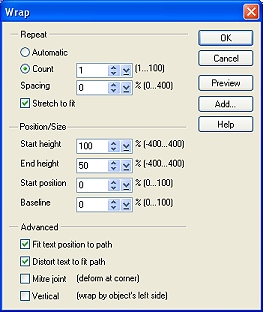
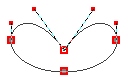
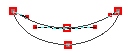
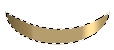
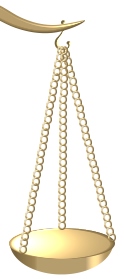
BALANCE ARM & HOOKS 1. Open a new, white canvas, 550W x 400H pixels. 2. Using the Path Drawing Tool, Shape - Circle: Color - Gold (Hex#F7BC5B) or any of your choice: Mode - 3D Round: Border - 3: Depth - 30: draw a shape 15W x 15H pixels. In the Material box/Shading tab, change the shading to Metallic and OK. 3. Open the EasyPalette/Wrap Gallery/Text Wrap and on Text Wrap 3, Right Click/Modify Properties and Apply. 4. Put in the settings shown left and OK. 5. Use the Transform Tools/Rotate & flip to flip the shape Vertically. 6. Use the Transform Tools/Resize to make the shape 205W x 35H pixels. 7. Right Click/Duplicate this object and then use the Transform Tools/Rotate & flip to flip the shape Horizontally. 8. Put the two pieces together, overlapping as shown - with the 1st piece on the right and the 2nd piece on the left. 9. Select the left hand piece and in the Path Panel/3D tab, click on the 'More...' button under Lighting to open the Material Dialog Box. Change the number of lights to 2 and make the 2nd light a Spot rather than Direct light and OK. 10. In the Path Panel/3D tab, select Light 2 and then click on the lightbulb icon beneath. Move your cursor over the shape until you create the lighting shown. 11. Right Click/Convert Object Type/From Text/Path to Image and then use the Object Paint Eraser (settings shown left) on the shape to blend it into the right-hand one as shown. 12. Select both pieces of the arm and then Right Click/Merge As Single Object. 13. Using the Custom Shape - Raindrop: Color - same: Mode - 3D Round: Border - 3: Depth - 30: draw a shape approximately 20W x 40H pixels and put in place in the centre of the arm. 14. Using the Circle shape again, draw a small shape, Border - 5: Depth - 30: in the centre of the pivot point. 15. The hooks for the chains are simpler than you can imagine! Using the Text Tool: Color - Gold (Hex#F7BC5B) or any of your choice: Mode - 3D Round: Border - 15: Depth - 30: type a question mark. The size you use will depend on the font you choose - my font was called Batang and the size was 40 - but you may have another one that you prefer. 16. In the Material box/Shading tab, change the shading to Metallic and OK. In the Path Panel use lightbulb icon to create the lighting shown. 17. Use the Transform Tools/Rotate & flip to flip the shape Vertically. 18. Right Click/Arrange/Send to Back. Put in place on the left-hand side of the arm. 19. Right click/Duplicate this piece and use the Transform Tools/Rotate & flip to flip the shape Horizontally. 20. Right Click/Arrange/Send to Back. Put in place on the right-hand side of the arm. 21. Select all parts of the balance arm and Right Click/Group - and that's the balance arm finished! |
|
|
CENTRAL POST/PIVOT 21. Now we'll make the base for the post. Using the Path Drawing Tool, Shape - Ellipse: Color - same gold metallic as before: Mode - 3D Round: Border - 7: Depth - 30: draw a shape 122W x 39H pixels. 22. If necessary use the lightbulb icon in the Path Panel again to create the lighting shown. 23. Now create another Ellipse: Color - same: Mode - 3D Round: Border - 17: Depth - 30: 108W x 34H pixels. - then once again use the lightbulb icon in the Path Panel again to create the lighting shown. Put in place on top of the previous ellipse in the position shown. 24. Now create another Ellipse: Color - same: Mode - 3D Round: Border - 4: Depth - 30: 53W x 14H pixels - then once again use the lightbulb icon in the Path Panel again to create the lighting shown. Put in place on top of the previous ellipse in the position shown. Make sure that they are aligned correctly - they are NOT centred on one another! 25. Using the Rectangle shape, Color - same: Mode - 3D Trim draw a shape 12W x 323H pixels. 26. Click on the Editing button to go into Path Edit. Click anywhere in the white to deselect the object and then select the bottom line and convert the line to a curve. 27. Click on the Editing button again to exit Path Edit and return to 3D Trim. Your shape should now look like the first one on the left. 28. Use the Transform Tools/Rotate & flip to flip the shape to the left 90 o. 29. Right Click/Convert Object Type/Reset Text/Path Object - then flip the shape back to the right 90 o. Ta-da! - the shading has now changed to the correct one for the post! Your shape should now look like the second one on the left.
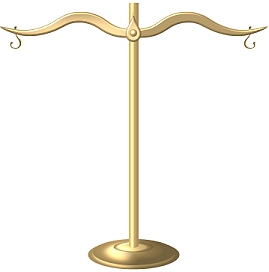
30. Put the post in place on the base and then select the balance arm group and Right Click/Arrange/Bring to Front. Your scales should now look something like the ones on the left.
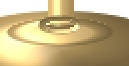
31. These little ellipse decorations are optional - if you are not going to include them go to Instruction 37 now and just make the little ball for the top of the post. It helps to Zoom in to at least 200% for this bit. Using the Outline Drawing Tool, Shape - Ellipse: Mode - 3D Round: Border Width - 2: Depth - 30: draw a small shape 17W x 5H pixels. In the Material box, change the Shading to Metallic once again and then use the lightbulb to create the lighting shown. 32. Right Click/Convert Object Type/From Text/Path to Image. 33. Now use the Object Paint Eraser to erase the upper part of the ellipse as shown - so that it looks as if the ellipse is encircling the post. 34. Right Click/Duplicate this shape three times. Put one copy to one side for the moment. 35. Put three of the ellipses in place on the post as shown. (This would also be a good moment to select all the pieces of your base and post and ensure that they are aligned properly by using Right Click/Align/Centre Horizontally).
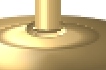
36. Select the three tiny, partially erased ellipses and Right Click/Merge As Single Object. 37. Right Click/Duplicate this object twice. 38. Put the other two sets of ellipses in place on the post as shown. 39. Put the remaining small ellipse in place at the top of the post and then finish the post with a small golden ball using the Circle shape, 21W x 21H pixels. That's the post done - now onto my favourite bit - the pans! |
|
|
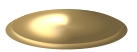
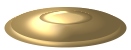
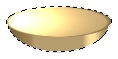
THE PANS 40. Using the Path Drawing Tool, Shape - Ellipse: Color - same gold metallic as before: Mode - 3D Trim: draw a shape 105W x 62H pixels. 41. Click on the Editing button to go into Path Edit. Drag the top,centre node downwards and then use the control handles to create the top curve as illustrated. 42. Click on the Editing button again to exit Path Edit and return to 3D Trim. 43. Use the Transform Tools/Rotate & flip to flip the shape to the left 90 o. 44. Right Click/Convert Object Type/Reset Text/Path Object - then flip the shape back to the right 90 o. 45. Now draw another Ellipse, Color - same: Mode - 3D Round: Border - 2: Depth 30. 46. In the Path Panel/3D tab/Lighting - select Light No. 2 and the click on the light-bulb button underneath. Move the cursor to the left of the object until you obtain the lighting shown. 47. Place this shape on top of the previous (edited) shape to make the first pan. 48. Select both pieces of the pan and Right Click/Merge As Single Object. 49. Now we have to make a chain stamp. Using the Outline Drawing Tool, Shape - Ellipse: Color - same metallic gold: Border Width -1: Depth - 30: draw a tiny shape 8W x 10H pixels. 50. Drag this shape to its own canvas and save it as scalechain.ufo in the Stamps folder, inside the PI folder on your hard-drive. 51. Select the Stamp Tool and then select the stamp you just made (it should be the last one in the thumbnails). 52. Using the settings shown left, stamp three chains from the right hook to the edges of the pan as shown.
Your first pan should now look like the one opposite. 53. Select the pan and three chains and Right Click/Merge As Single Object. 54. Right Click/Duplicate and put in place on the opposite hook.
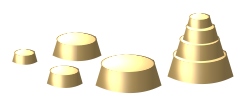
55. Opposite you can see some weights that I have made. These are made from a rectangle, narrowed at the top with the Transform Tools/Perspective. I then edited the bottom line into a curve. The mode is 3D Trim - and this has to be turned in the same way that we turned the trim for the post and the first pan piece. The top of the weight was made in exactly the same way as the top piece of the pans. If you then Merge the two pieces and Duplicate these - using the Transform Tools/Resize, you can made a series of different sized stacking weights.
|
 |
|
|
Free Spirit Graphics If you would then like an invitation to join, please Email Me. We'd love to have you along! |
|
|
If you need any help - or want to make suggestions to improve this tutorial - or for new ones |
|


This site © Rosie Hardman-Ixer 2001/2/3/4 |