
RUSSIAN (MATRYOSHKA) NESTING DOLLS PI VERSION: 7. LEVEL: Intermediate - some knowledge of tools is assumed. MAIN TOOLS USED: NECESSARY DOWNLOAD: TERMS OF USE: Please Read - Thank You! |
|
INSTRUCTIONS |
|
|
|
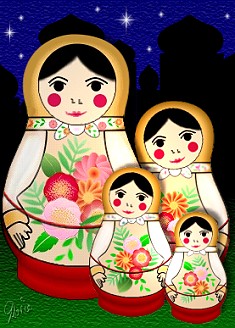
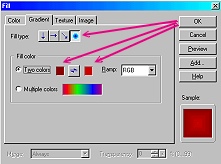
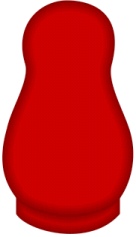
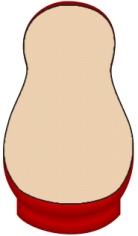
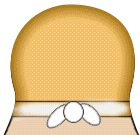
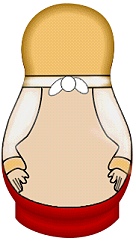
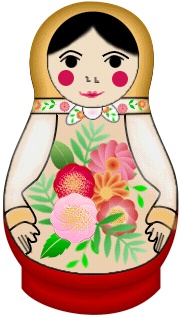
PAINTING THE DOLL - PART 1 1. Open the rosiedoll.ufo in PI. 2. Decide what background colour you wish to use for your doll. Use a gradient with two shades of this colour to fill the two doll pieces (Circular Fill Type). I have chosen a deep red and opposite are the gradient settings I have used to fill the pieces. This gives a nice 3D effect to the doll. 3. Select the top piece of the doll and Right Click/Duplicate this piece. 4. Fill this with a flesh colour (I used #EACAA5) - and then use the Transform Tools/Resize to shorten this piece as shown. 5. Keep this piece selected and then, using the Paint Tools/Paintbrush on the settings shown, click on Effect/Paint on Edges to edge this piece in black. 6. Now select the red top of the doll again and Right Click/Duplicate this piece. 7. Pick the colour you wish to use for the doll's headscarf/shawl and change the colours of this piece using the same circular gradient that you used in 2 above but this time using 2 shades of your scarf colour. I am using gold. 8. Right Click/Convert Object Type/From Text/Path to Image. 9. Now use your Object Paint Eraser to remove all the lower part of the piece you just coloured - up to just below the neck of the doll - as shown. Make sure this piece is lined up with the red piece below. 10. Right Click/Select All Objects - then Right Click/Merge As Single Object. 11. Keep the piece selected and using the Paint Tools/Paintbrush - Size - 4: Colour - Black: paint two straight lines across the doll neck. Use the Paint Tools/Airbrush, Colour - White: to paint between these lines. Don't worry about making this precise - a little shading left around the edge looks nice! 12. Use the Path Drawing Tool, Shape - Ellipse: Colour - White: Mode - 2D: to draw three shapes as shown, Change to the Paintbrush (Size - 4) and use Effect/Paint on Edges again to edge these in black. 13. Use the Transform Tools/Rotate Freely to turn the first two of these ellipses to the angles shown and put in place on the neck. 14. Right Click/Select All Objects and then Right Click/Merge As Single Object. 15. Keep the doll selected and now use either the Paintbrush or the Line & Arrow Tools (Spline or Freehand - I used Freehand) to draw in the details of the arms and hands in black. 16. Use the Paintbrush to colour the sleeves and cuffs - in any colours you wish. When you have finished painting - your doll should look something like the one opposite. If you used the Line and Arrow Tools, be sure to Right Click/Select All Objects then Right Click/Merge As Single Object. 17. Click on Edit/Duplicate/Base Image with Objects. 18. Using the Duplicate image, click on Format/Image Size - make sure that 'Image and Object' is checked - and reduce to 75% of both Width and Height. 19. Using this smaller doll - repeat stage 18 to make a third, even smaller doll. 20. Using this doll repeat 18 once more to make a fourth, tiny doll. 21. Save each of these doll ufos separately now for safety! |
|
|
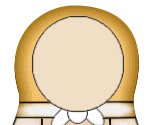
THE FACE Now it is possible to make a separate face for each doll if you wish - but I would recommended this method: 22. Using the Path Drawing Tool, Shape - Ellipse: Colour - Flesh colour, #EACAA5: Mode - 2D: draw a shape approximately 93W x 97H pixels. 23. Change to the Paintbrush, Size - 4: Colour - Black: and click on Effect/Paint on Edges to edge the face piece in black. 25. Keep the face ellipse selected and use the Paintbrush to paint the hair in as shown. 26. Use the Paintbrush or Line & Arrow Tool to draw in the eyebrows, eyes, cheeks, nostrils and mouth as shown. The Path Drawing Tool set on circle can be used to make the eye and cheek shapes. 27. Once you have all your features drawn, Shift/Click to select them all + the face ellipse (NOT the body of the doll yet!) and Right Click/Merge As Single Object. 28. Keeping the face section selected, Right Click Duplicate then click on Format/Image Size - make sure that 'Selected Object' is checked - and reduce to 75% of both Width and Height. Repeat this method twice more (using each of the successively smaller faces to duplicate) to make a total of 3 smaller faces. 29. Put each face piece with the appropriate size doll ufo that you made earlier and then use the Transform Tools/Rotate Freely to rotate each of the faces to slightly different angles. If necessary use Effect/Blur and Sharpen/Sharpen to sharpen up each face if it has become a little blurred through duplication and turning. |
|
|
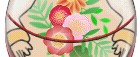
FLOWER DECORATIONS ETC. Many of the real dolls have brightly hand-painted flowers and leaves on - so I am going to show you how to achieve this look one way in PI but you might like to experiment with your own methods here - or even use some flowers you already have in your collection? 30. First of all - open a new canvas. 200W x 200H should be plenty big enough. 31. Using the Path Drawing Tool, Shape - Ellipse: Colour - a pink/red gradient fill: Mode - 2D: draw a shape approximately 15W x 30H pixels. Right Click/Convert Object Type/From Text Path to Image. 32. Using the Transform Tools - click on Rotate Freely and move the rotation point to the bottom of the ellipse as shown. 33. Change the Rotate by Degree to 30 degrees and then click on Copy Rotate until you have a full flower. 34. Keep the last petal selected and use the Object Paint Eraser to remove the excess part of the petal. 35. Use the Path Drawing Tool, Shape - Circle: to draw a nice colourful centre for your flower. Right Click/Select All Objects - Right Click/Merge As Single Object. All the flowers opposite were made this way - using slightly different shape petals to start with. I finished three of them with the Paint Tools/Bristle in the centre. 36. For the leaves you can use any leaf shape in the Path Drawing Tool/Custom Shapes. Fill them with a light-to-dark green gradient and use the Transform Tools/Rotate Freely to turn them to various angles. 37. I think this is where you do have to play with your leaf and flower decorations to suit the size of each doll. Use the Transform Tool/Resize and then Rotate Freely to change the size and direction of the flowers for each one and decorate the front of the doll and the scarf as shown. Use the Object Paint Eraser to erase any flowers that go behind the arms. Opposite is the largest doll complete with flower decoration. You might find it easier to paint some little flowers and leaves on the scarves of the smaller dolls as they are too small to show detail. 38. These dolls pull apart at the middle (to reveal the smaller ones inside) - so now we need to draw this division. Using the Outline Drawing Tool, Shape - Ellipse: Colour - Black: Mode - 2D: Width - 1: draw an ellipse 185W x 120H as shown. 39. Right Click/Duplicate this ellipse and fill it with a dark shade of your body colour. 40. Overlap the two ellipses as shown, select them both and then Right Click/Merge As Single Object. 41. Use the Object Paint Eraser to remove the excess from the ellipses. 42. Put this in place on your doll and then make copies for your smaller dolls - reducing each one successively in size by 75% as before. Add them to the smaller dolls. Once you have done this for each doll, Right Click/Select All Objects and Right Click/Merge As Single Object. Combine all your dolls in one picture and you are finished! |
|
|
|
 |
|
|
Free Spirit Graphics If you would then like an invitation to join, please Email Me. We'd love to have you along! |
|
|
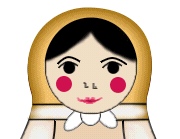
If you need any help - or want to make suggestions to improve this tutorial - or for new ones |
|


This site © Rosie Hardman-Ixer 2001/2/3 |