
ROSETTE PI VERSION: 8 (also suitable for 7). LEVEL: Intermediate (some knowledge of the tools is assumed) MAIN TOOLS USED: Path Drawing Tool, Path Edit Tools, Transform Tools/Copy Rotate, Palette Ramp Editor, Outline Drawing Tool, Text Tool, Shadow, Adobe Texturizer Filter (Optional). TERMS OF USE: Please Read - Thank You! |
|
INSTRUCTIONS |
|
|
|
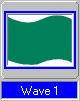
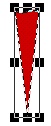
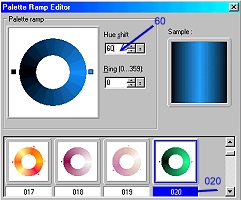
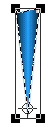
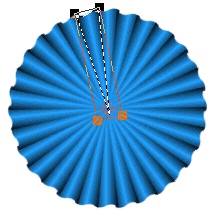
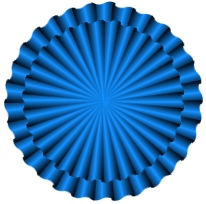
THE ROSETTE 1. Open a new, white canvas, 300W x 400H pixels. 2. Using the Path Drawing Tool, Custom Shape - Wave 1: Color - any for now: Mode - 2D: draw a shape 25W x 22H pixels. 3. Click on the Editing button on the Attribute toolbar to enter Path Edit mode. 4. Click on the - (Minus) button under 'Edit point' on the Attribute toolbar and remove the two nodes shown by clicking on the them. 5. Click on the left button (Pick point) under 'Edit point' then select the curved line (move your cursor over it until it become a little hand, then click on the line so it turns red). 6. Click on the straight line under 'Convert line'. 7. Now drag the lower node downwards to form the shape shown. 8. Click on the Editing button once more to return to 2D mode. 9. Using the Transform tools/Resize, check the width and height of your shape - it should be 25W x 110H - if it isn't, resize it now. 10. Click on Color/Gradient and select the 'left - to - right' fill. 11. Choose 'Multiple Colors' - and click on the colour swatch to open the Palette Ramp Editor (opposite). 12. Choose colour 020, then change the Hue number to 60 (this is for blue - but you may choose another colour if you wish). 13. Click on Add to add this preset to the Palette Ramp Editor if you wish to keep it for future use - then click OK. Click OK again in the Fill box. 14. Right Click/Convert Object Type/From Text/Path to Image. 15. Click on the Transform tool and under 'Rotate method' click on the 'Rotate freely' button. Now move the little cross-hair (the circle with two lines through it) down to the point shown opposite. 16. Under 'Rotate by degree' change the number of degrees to 12. 17. Now click on the 'Copy Rotate' button as many times as you need to complete the circle. 18. Right Click/Select All Objects - then Right Click/Merge As Single Object. 19. Right Click/Duplicate this object. 20. Now us the Transform tools/Resize to make this copy smaller (keep your finger on the Shift key whilst doing this to keep your object in proportion). 21. Change the 'Rotate by degree' number to 6 degrees and rotate this smaller object once either right or left. 22. Select both ribbon circles and Right Click/Align/Center Both. That's the two main parts of the ribbon rosette done - now for the ribbons and label. |
|
|
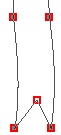
THE RIBBONS 23. Using the Path Drawing Tool, Custom Shape - Wave 1 again: Color - any for now: Mode - 2D: draw a shape 45W x 40H pixels. 24. Use the Transform tools/Rotate & flip - to flip the shape 90 degrees right or left. 25. Click on Edit/Fill this with the same gradient as before but this time with a top - to - bottom fill. 26. Use the Transform tools/Resize to make the shape 45W x 200H pixels. 27. Click on the Editing button to go into Path Edit mode. 28. Click on the + (Plus) button under 'Edit point' on the Attribute toolbar and add a node to the centre of the bottom line. 29. Click on the left button (Pick point) under 'Edit point' then drag the added node upwards to form the shape shown. 30. Click on the Editing button again to leave Path Edit mode and return to 2D mode. 31. (Optional gold border - if you don't wish to include this go straight to instruction 35 ). Right Click/Duplicate this ribbon and then change the mode to 3D Pipe.
32. In the Path Panel change the Border to 2 & the Depth to 1. 33. Click on Color/Gradient. Select 'Multiple colors' and click on the color swatch to open the Palette Ramp Editor. Select the gold 008 color and OK. 34. Select the two parts of the ribbon and align them - then Right Click/Merge As Single Object. 35. Use the Transform tools/Rotate freely - to rotate the ribbon to the desired position. Right Click/Arrange/Send to Back. 36. Right Click/Duplicate this ribbon and repeat instruction 35 once more. OK - only the label to go! |
|
|
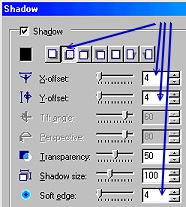
THE LABEL I opened a new canvas to work on here - 300W x 300H is fine. 37. Using the Path Drawing Tool, Shape - Circle: Color - black or a a very dark shade of your ribbon colour: Mode - 2D: draw a shape 105W x 105H pixels. 38. Right Click/Duplicate this shape and fill it with the similar gradient to your ribbons (I recommend a slightly lighter shade of the same colour) - with a 'left - to - right' fill. 39. (Optional) I added a slight texture to the lighter circle at this point, using the Adobe Texturizer Filter - but this is not vital if you don't have it. 40. Put the two pieces together, with the darker one slightly offset to the left as shown and then, selecting them both, Right Click/Merge As Single Object. 41. Now using the Outline Drawing Tool, Shape - Circle: Color - any: Mode - 2D: draw a shape 90W x 90H pixels. 42. Inside it put any text (using the Text tool) or decoration you wish.... this could be '1st Prize' 'Winner', the name of a club or organisation, event and any further decoration or underlining of your choice. It does not matter what colour you use at this stage as we are going to make all the decoration for the label gold in a moment. 43. Once you have all the decorative elements for your label, Shift/Click to select them all and then Right Click/Merge As Single Object. 44. Click on Edit/Fill/Gradient and select a 'left - to - right' fill. Select 'Multiple colors' and click on the color swatch to open the Palette Ramp Editor. Select the gold 008 color and OK. 45. Put the decoration on your label - select both parts and Right Click/Merge As Single Object. 46. Put the label on your rosette. 47. Finally, to add some real depth to all the pieces I am going to add some shadows. For each of the 5 pieces (two circles of ribbon, label and two streamer ribbons) add shadows (see opposite). ...and what do we have?... |
|
|
THE FINISHED ROSETTE! Award it to yourself - you deserve it! |
 |
|
|
Free Spirit Graphics If you would then like an invitation to join, please Email Me. We'd love to have you along! |
|
|
If you need any help - or want to make suggestions to improve this tutorial - or for new ones |
|


This site © Rosie Hardman-Ixer 2001/2/3 |