
ROCKING-HORSE PI VERSION: 6/7. LEVEL: Intermediate (with good knowledge of Path Edit tools) MAIN TOOLS USED: Path Drawing Tool, Outline Drawing Tools, Line & Arrow Tools, Transform Tools, EasyPalette, (Optional) Retouch Tools (Burn), Trace, Format/Brightness & Contrast. NECESSARY DOWNLOADS: Joined-Circles Shape (for PI6 Users only!) OPTIONAL DOWNLOADS:Wood Presets by Fr. Michael, are hosted by the PIRC (click on Cool Stuff #3 - Free Presets on the right-hand side. TERMS OF USE: Please Read - Thank You! |
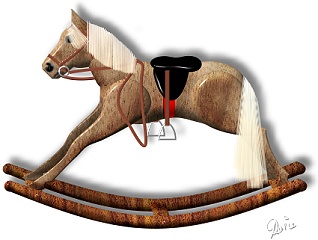
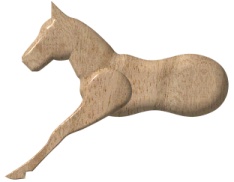
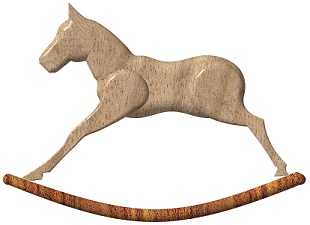
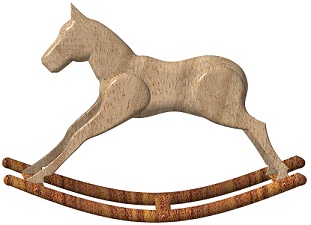
Finished rocking horse shown at 75% of true size. |
INSTRUCTIONS |
|
|
|
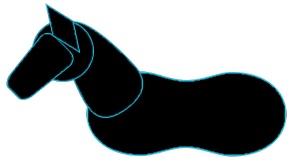
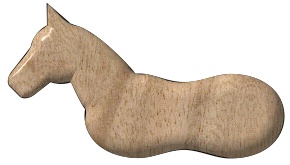
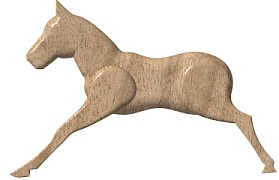
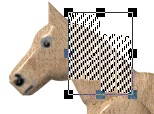
BODY AND NECK 1. Open a new, white canvas - 450W x 350H pixels. The body and neck shape for the horse is made from five shapes using the Path Drawing Tool set at Color - Black and Mode -2D. These will be put together to form the shape which we will then Trace to form a new Path Shape. The illustration shown opposite shows the five shapes combined to make the complete body & head of the horse. I have outlined them in blue but you, of course, will leave them in solid black. Shape 1 (Body). Using Custom Shape - Joined Circles: draw a shape and then use the Transform Tools/Resize to make the shape 200W x 85H pixels. Shape 2 (Neck). Using Custom Shape - Rounded Edges 3: draw a shape and then use the Transform Tools/Resize to make the shape 65W x 105H pixels. Use the Transform Tools/Rotate & flip to flip the shape Vertically and then use the Transform Tools/Rotate by degree to rotate this shape 35 degrees to the left. Shape 3 (Cheek). Using Shape - Circle: draw a shape 62W x 62H pixels. Shape 4 (Nose). Using Shape - Rounded Rectangle: draw a shape 45W x 70H pixels and then use the Transform Tools/Perspective to narrow the base for the nose. Use the Transform Tools/Rotate by degree to rotate this shape 45 degrees to the right. Shape 5 (Ear) Using Shape - Diamond: draw a shape 25W x 60H pixels and then use the Transform Tools/Rotate by degree to rotate this shape 35 degrees to the left. 2. Put all these pieces together as shown in the first illustration opposite and then Right Click/Merge All. 3. Click on Edit/Trace/Image, accept the default settings and OK. 4. Change the Mode to 3D Round and fill the resulting shape with a suitable preset. I am using a Wood Preset - Vertical 14 by Fr. Michael (hosted by the PIRC, these are available Here. Click on Cool Stuff #3 - Free Presets on the right-hand side). 5. In order to get a smoother finish click on the Material Box/Border/Depth and checked the Smooth Spine box & then OK. Then change the Border setting to 50. 6. Drag the 3D shape to a new canvas (preferably the same size as the original) for now. (It's a good idea to save this as a separate ufo now - in case of accidents!). |
|
|
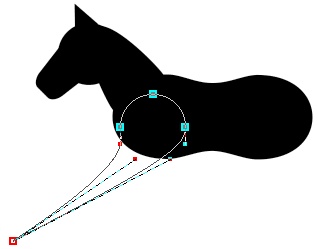
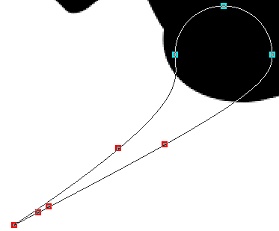
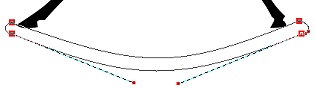
FRONT LEG 7. Back on the original canvas, using the Path Drawing Tool, Shape - Circle: Color - Black: Mode 2D: draw a shape 65W x 65H pixels.
8. Change to Path Edit mode and drag the bottom red square to the point shown. 9. (It helps to zoom in to 200% for this bit!). Add Edit points as shown in the illustration and use these (and the adjustment handles) to pull the shape into the one shown.
10. Once you are happy with the shape, click out of Path Edit Mode and back into 2D.
11. Hold down the Ctrl button and drag a copy of the new black, 2D shape to the canvas with the 3D path shape of the horse's body.
12. Change the Mode to 3D Round and fill the resulting shape with the same preset as the body.
13. Again - in order to get a smoother finish click on the Material Box/Border/Depth and check the Smooth Spine box. I then changed the Border setting to 30 but this will depend on the preset you're using and the effect you prefer. Some rocking horses are made flat pieces of wood rather than carved and rounded - play with the Border and Depth settings to get a look you like.
Remember to keep saving your work! |
|
|
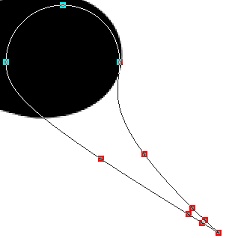
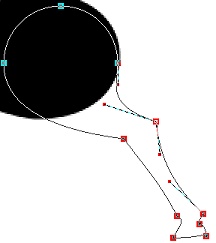
HIND LEG 14. Back on the original canvas again - Right Click/Merge All - then using the Path Drawing Tool, Shape - Circle: Color - Black: Mode 2D: draw a shape 75W x 75H pixels.
15. Following the same method as for the front leg - add the points shown opposite and pull them into the shape shown.
16. Once you are happy with the shape, click out of Path Edit Mode and back into 2D.
17. Hold down the Ctrl button and drag a copy of the new black, 2D shape to the canvas with the 3D shapes.
18. Change the Mode to 3D Round and fill the resulting shape with a new wooden preset.
19. Again - in order to get a smoother finish I clicked on the Material Box/Border/Depth and checked the Smooth Spine box.
And save again.......! |
|
|
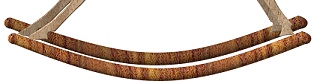
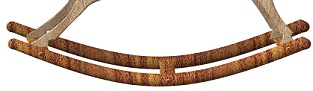
ROCKER BASE 20. Back on the original canvas - using the Path Drawing Tool, Shape - Rounded Rectangle: Color - Black: Mode - 2D: draw a shape 405W x 15H pixels. 21. Click on the Path Edit Tool. Click on the top and bottom lines of the rectangle in turn and use the Convert Line/to Curve button to convert each to a curve. 22. Use the adjustment handles to pull the lines into the shape shown. Once you are happy with the shape, click out of Path Edit Mode and back into 2D. 23. Hold down Ctrl and drag a copy of this piece to the canvas with the 3D shapes. You can now close down the canvas with the black shapes. 24. Change the Mode of the rocker shape to 3D Round and fill it with a new wood colour. I am using a Wood Preset - Vertical 12 from Fr. Michael's set. 25. Select the two legs of the horse and Right Click/Duplicate these. Keeping the Duplicate set selected, Right Click/Arrange/Send to Back and slightly offset as shown. 26. Still keeping them selected, click on Format/Brightness and Contrast and click on the bottom left square several times to darken the colour. 27. Now select the rocker shape and Right Click/Duplicate. Right Click/Arrange/Send to Back and put the duplicate legs in place. Repeat the method in instruction 26 to darken this piece. 28. Using the Path Drawing Tool, Shape - Rectangle: Mode - 3D Round: Border - 30: Depth - 30: draw a shape 20W x 30H pixels for the support between the rockers. Right Click and Duplicate this shape TWICE. 29. Use the Transform Tools/Slant to slant two of these copies so that they form a support for your horse's feet and then use Right Click/Arrange/Send Backward (or the Alt key + the Down Arrow key) to place the support beneath the horses feet and between the rockers. NOTE: You can always reposition your horse's legs slightly here - but do keep an eye on perspective! 30. Put the central strut in place as shown. 31. The addition of three wood peg-heads at the front of the rocker - in line with the supports - finishes the rockers. For these use the Path Drawing Tool using a Circle Shape in 3D. Time to save again? |
|
|
FACE, MANE & TAIL 32. Using the Paint Tools/Paintbrush - Size - 5: Transparency - about 50%: Soft Edge - 50: paint a face on your horse. It doesn't have to be a work of art - we're making a child's toy - not trying to compete with the old masters! I used simple lines in grey and black. 33. For the mane - use the Path Drawing Tool - Custom Shape - Vertical Lines: Color - creamy-gold (I used Hex #FCE4BC) - or whatever you wish. Draw a Shape approximately 35W x 50H pixels and then use the Transform Tools/Resize to narrow this to just 25 pixels wide. 34. Right Click/Duplicate this shape and put the two side by side. Select them both then Right Click/merge As Single Object. Again - use the Transform Tools/Resize to narrow the combined shapes to 30 pixels wide. Right Click/Duplicate this shape twice. 35. Put two copies of this in place on your horses neck and then select the two and Right Click/Merge As Single Object. Now use the Object Paint Eraser to remove the excess mane. 36. Take the last copy of the this shape and use the Transform Tools/Perspective to narrow the top of the shape. Use the Transform Tool/Rotate freely to rotate the piece to the left a little. Put in place on the horse's forehead and then use the Object Paint Eraser again to remove the excess to make the forelock. To make the mane thicker - select the mane and forelock pieces and Duplicate them. Put them in place over the first pieces but slightly offset for a good effect (see illustration). 37. The tail was made in the same way as the mane pieces - using Custom Shape - Vertical Lines. I simply created a taller piece. I use three copies of the final piece to give the tail more solidity - then selected all three pieces, Merged As Single Object again and used the Object Paint Eraser to shape the tail.
Another save point! |
|
|
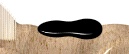
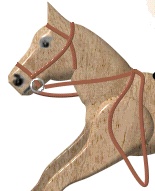
SADDLE & BRIDLE 38. Using the Path Drawing Tool, Custom Shape - Joined Circles: Color - Black: Mode - 3D Round: draw a small shape and then use the Transform Tools/Resize to make this 65W x 15H pixels. Use the Transform Tools/Perspective to make the back of the saddle higher as shown. 39. Now use Custom Shape - Rounded Edges 3 - to make the saddle-flap. Use Right Click/Arrange/Send Backward to send behind the top part of the saddle. 40. Use the Rounded Rectangle shape and a red colour for the girth (again - make sure to send this behind the saddle-flap). Keep the Border setting low for this piece and the next... 41. Use a Rectangle shape for the stirrup-leather in brown. 42. Use the Outline Drawing Tool - Shape 4 for the stirrup and fill this with a suitable silver preset from the Material Gallery in the EasyPalette. Select the stirrup leather and stirrup and Right Click/Merge As Single Object. Right Click/Duplicate this and then Right Click/Arrange/Send to Back. Put the second stirrup in place. 43. The Bridle can either be painted on or you could use the Line and Arrow Tool/Freehand or Spline to make the straps. I chose the Freehand Tool and found it was easiest to move the mane pieces out of the way until I had drawn the bridle - which is why it doesn't show on the pic opposite. The reins are definitely best done with the Freehand or Spline Tools. The ideal settings for these tools appear to be about Border - 2: Depth - 12. 44. A silver ring drawn with the Outline Drawing Tool for the bit completes the bridle. Select the mane pieces - then Right Click/Arrange/bring to Front and put in place again. Almost done! |
|
|
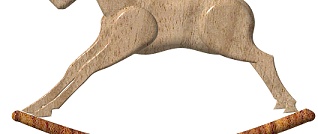
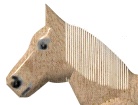
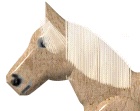
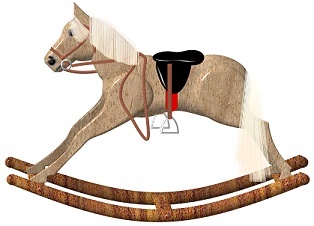
FINISHING TOUCHES 45. Lastly - because I like to make things looks as authentic as possible I have used the Retouch Tools/Burn to shade a lot of the pieces of my rocking-horse. Any Path Shapes will need to be converted to images before this tool can be used (Right Click/Convert Image Type/From Text/Path to Image). It is well worth persevering with this tool because it can make a huge difference to the finished graphic (compare the finished pic opposite with the one above). |
|
|
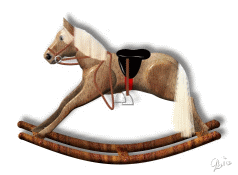
And here's the little guy really rockin' ! |
 |
|
|
Free Spirit Graphics If you would then like an invitation to join, please Email Me. We'd love to have you along! |
|
|
If you need any help - or want to make suggestions to improve this tutorial - or for new ones |
|


This site © Rosie Hardman-Ixer 2001/2/3 |