
THE YACHT PI VERSION: The tutorial is written and illustrated in PI XL but is suitable for most other versions LEVEL: Reflet and Animation for Beginners MAIN TOOLS USED: EasyPalette/Painting Gallery/Dab, Effect/Blur/Motion Blur, Effect/Sharpen, Reflet (stand-alone program), Crop Tool, Object Paint Eraser (optional), Gif Animator (Tween command). NECESSARY DOWNLOADS: You will need to download and install a small French program called Reflet (click first on the Language of your choice and then on the Telechargements (Downloads) link at the site) in order to use this tutorial. Download Yacht Path-Shapes-Kit here. TERMS OF USE: Please Read - Thank You! |
|
INSTRUCTIONS |
|
|
|
PREPARING THE SEA SECTION FOR REFLET
1. In PhotoImpact, open a new canvas, 250W x 132H pixels.
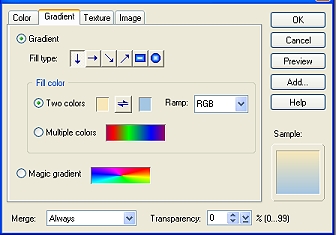
2. Click on Edit/Fill/Gradient and use a Two-color Gradient using the colors Hex#F8E8B9 to Hex#A4C6E3 to fill the canvas.
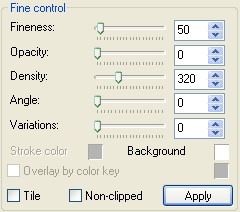
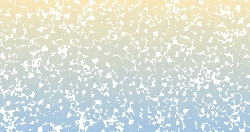
3. PI 7 - XL (PI 10 go to 4a below) In the EasyPalette/Painting Gallery/Dab, Right Click/Modify Properties and Apply. 4. Using the settings shown opposite (changing the Background colour to WHITE if necessary) - click on the Apply button and then OK. 4a. PI 10 ONLY. In the EasyPalette/Special Effects Gallery/Artistic - select Smear 3 - Right Click/Modify Properties and Apply. Change the Stroke Size to 37 and OK.
The result should look like something like the one opposite, depending on your PI version (this is the one from PI XL).
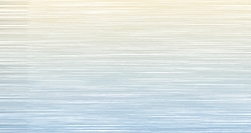
5. Click on Effect/Blur/Motion Blur (PI 10 click on Photo/Blur/Motion Blur) and then on the Options button. 6. Using the settings shown opposite, click OK.
Your canvas should now look like the picture opposite.
7. (PI 7 - XL) Click on Effect/Sharpen (using the Default setting) - (PI 10) Click on Photo/Sharpen/Sharpen and click on the 5th [strongest] thumbnail) and OK. 8. Save this as sea.jpg somewhere on your hard-drive that you can easily find it. OK - now we're ready for Reflet! |
|
|
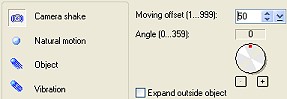
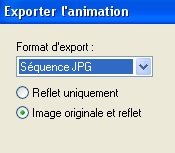
PREPARING THE SEA ANIMATION FRAMES IN REFLET Reflet is a little stand-alone program for making water animations. It is written in French but don't let that put you off - it is very easy to use as you will see. So - download and install the program and we're ready to roll! 9. Open the Reflet program - click on the yellow folder icon on the left-hand side, browse to your picture, select it and Open. 10. Enter the settings opposite. If you want to see the Animation working - click on the clapperboard icon in the centre of the 3 icons. 11. Now click on the Save icon (the right-hand one of the 3). In the Export dialog box that appears, select Sequence JPG as the Format (see left) - then Save. This should save a sequence of 5 frames called sea00, sea01, sea02, sea03 and sea04 to your computer.
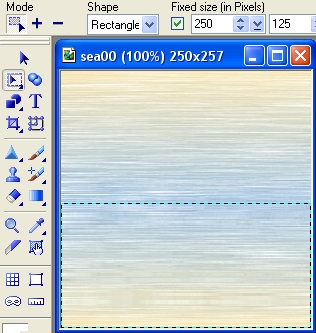
12. Now open PhotoImpact and Open the five sea frames. 13. Using the Standard Selection Tool, Shape - Rectangle, Check the 'Fixed size (in Pixels)' Box, Width - 250: Height - 125, select the bottom half of sea.00 as shown. Be sure to do this ACCURATELY so that the selection marquee fits EXACTLY in the lower half of the picture (see left). 14. Click on the Crop Tool and Save. 15. Do the same with each of the other four frames. Keep these frames open in PI.
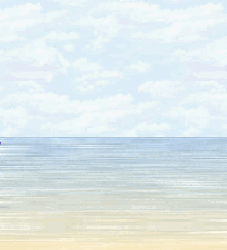
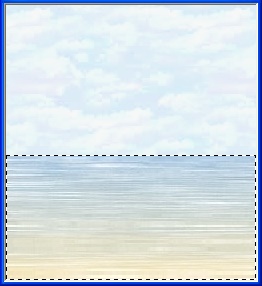
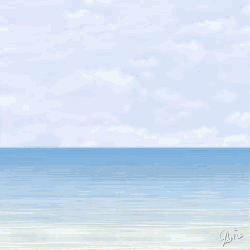
16. Now open a new canvas 250W x 275H pixels with a pale blue background (suggested Color - Hex#DDEDF7). 17. You can create the sky any way you wish - with Stamps, Painting Tools or - if you wish, you can Save the picture opposite to your hard drive and use it to Fill the canvas by clicking on Edit/Fill/Image - and browsing to the sky background. 18. Now - starting with sea00 - Click on the Copy button. Select the sky canvas and click on the Paste to copy it into the sky canvas. Repeat with sea01, sea02, sea03 and sea04. Be sure to get these in the correct order or your animation will NOT work! This should leave you with a stack of five sea pictures on top of the sky canvas. 19. Close all 5 small sea pictures. 20. On your sky canvas - Right Click/Select All Objects. Right Click/Align/Centre Both... and then move the stack of sea pictures to the bottom of the canvas. Now we're ready for the yacht! |
|
|
THE YACHT
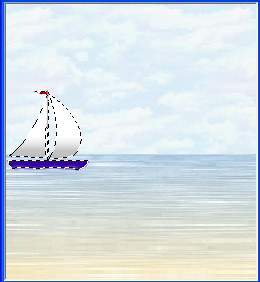
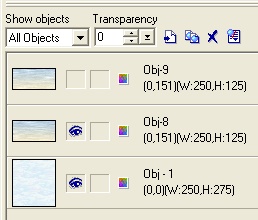
21. You are welcome to use any boats, water-skiers, parasailers or other suitable items here - but if you are using the yacht.ufo provided in the download above, open this now in PI. Feel free to re-color and shade this or add to it in any way you wish. I have Merged the whole yacht into a single object, Resized it and then used the Object Paint Eraser on a high Transparency setting to make a softer line along the water line at the bottom of the keel.
22. Place the yacht on the water and then, in the Layer Manager, select all the sea objects and click on the Eye icon to make them invisible (see left). Save your work as yacht-anim.ufo to your hard-drive where you can easily find it. |
|
|
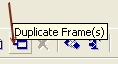
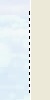
ANIMATION 23. Close the ufo in PI but leave the program open. 24. Click on the Switch button (top right of your screen) to open Gif Animator 5. 25. In the Startup Wizard click on 'Open an existing image file', browse to the yacht ufo and Open. 26. Click on the Duplicate frames button at the bottom of the screen. 27. Select Frame 1 and, in the Edit Pane above, click on the yacht object to select it. Now use the Arrow keys on your keyboard to move the yacht just off canvas to the left (you should just see the right-hand edge of the selection marquee - see pic left)... 28. Select Frame 2 and, in the Edit Pane above, click on the yacht object to select it again. Now use the Arrow keys on your keyboard to move the yacht just off canvas to the right (you should just see the left-hand edge of the selection marquee - see pic left)... 29. Now hold down the Ctrl key and Select Frames 1 and 2. Right Click/Properties and change the Delay to 20.
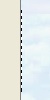
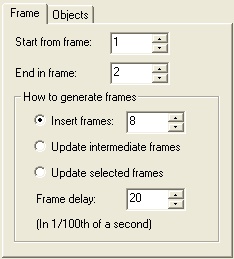
30. Click on the Tweening button (left). 31. We now have to decide how many frames to have in our animation to make it run smoothly. The Reflet animation works in 5 (or multiples of 5) frames. So this time we will choose 10 frames. We already have two frames so we will add another 8 frames between them. So - using the settings left, click OK.
32. Now reselect Frame 1 only and, in the Object Manager on the right, click on the bottom (5th sea object in the list) sea object.
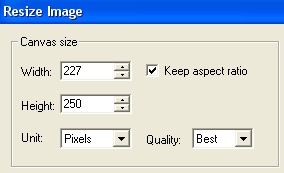
33. Now reselect Frame 2 only and, in the Object Manager on the right, click on the bottom (4th sea object in the list) sea object. 34. Now reselect Frame 3 only and, in the Object Manager on the right, click on the bottom (3th sea object in the list) sea object. 35. Now reselect Frame 4 only and, in the Object Manager on the right, click on the bottom (2th sea object in the list) sea object. 36. Now reselect Frame 5 only and, in the Object Manager on the right, click on the bottom (1st sea object in the list) sea object. 37. Now it would be possible to Save this animation as it is - however at this size and preserving the colours as much as possible the file size produced would be a whopping 190kbs or so.... so we have two choices - either to optimise further or to reduce size. In this particular case I think reducing size is probably the better option! So - click on Edit/Resize Image and using the settings shown opposite, click OK. 38. Click on the Optimize tab and select the Line Art 128 preset. You can now click on the Preview tab if you wish to see your final animation). 39. Save your animation and you're done!
Opposite is another version of the tutorial using a parasailer and power-boat instead of a yacht. |
 |
|
|
Free Spirit Graphics If you would then like an invitation to join, please Email Me. We'd love to have you along! |
|
|
If you need any help - or want to make suggestions to improve this tutorial - or for new ones |
|


This site © Rosie Hardman-Ixer 2001/2/3/4/5 |