
RAINY DAY WINDOW PI VERSION: 8 (also suitable for 7). LEVEL: Beginner MAIN TOOLS USED: Grid & Partition, Trace, EasyPalette (Presets & Particle Gallery), Gif Animator 5. NOTE: For this tutorial you can either use the illustration provided Here (use Right Click/Save Picture As to save to your hard drive) or you can use one of your own which needs to be in jpg format (don't make this TOO big or your final file size can be huge. I usually keep my dimensions to 200 pixels one way by 250 pixels the other MAXIMUM). TERMS OF USE: Please Read - Thank You! |
|
INSTRUCTIONS |
|
|
|
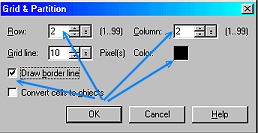
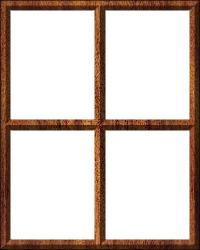
THE WINDOW FRAME 1. In PI, open the picture supplied in the download above or your own jpg. 2. Click the New Image button and under 'Image size' check the 'Active image' button and OK. 3. Now click on Web/Grid & Partition and use the settings shown opposite & OK (if you are using a picture that is a very different size to mine you may need to change the Grid line number accordingly to get a frame of a realistic size). You should now have a picture which looks like the one opposite. 4. Now click on Edit/Trace/Image, accept the defaults and OK. 5. Change the Mode to 3D Round. 6. Fill the result with any wood preset of your choice (or just change the Color to brown if you wish). There's your window frame! Now wasn't that easy? 7. Drag the window frame to your picture canvas (Right Click/Align/Center Both to ensure perfect positioning) and close the black and white one. Now we're ready for some rain! |
|
|
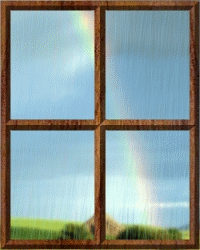
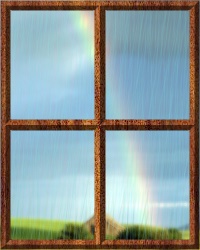
CREATING THE FRAMES 8. Click on the background picture to deselect the window frame. 9. Hold the Ctrl button down and press D twice. This will produce two copies of your picture, complete with the window frame object. 10. Select the first canvas. Open the EasyPalette/Particle Galley/Rain. Double click on Rain 7 to apply to your picture (which should now look like the picture opposite). NOTE: If you find that Rain 7 does not show well on your choice of picture, first Undo then, on the Rain 7 thumbnail, try Right Click/Modify Properties & Apply - click on the colour swatch under 'Particle Parameters' and change it to a lighter colour (remember to do this for all three frames!). 11. Save this picture (somewhere you can find it easily - I always use the Desktop) as 1.jpg. 12. Select the second canvas. This time on Rain 7, Right Click/Modify Properties & Apply. Now click on the Random button a few times and then OK/Apply current frame effect to image. 13. Save this canvas as 2.jpg 14. Repeat Instruction 12 with the third canvas and save it as 3.jpg. OK - that's the frames made now onto the animation! |
|
ANIMATING THE PICTURE
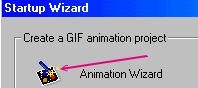
15. Now open Gif Animator 5 (you can either quit PI and open this up independently or click on the Switch button at the top right of the PI screen. When the Startup Wizard opens click on Animation Wizard.
16. Enter the appropriate width and height for your picture (for the tutorial picture this is 200W x 250H pixels). Click Next.
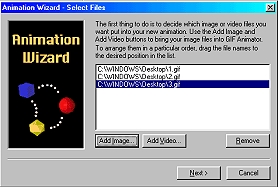
17. Click on Add Image.
18. Browse to the folder where you saved the three images, hold down the Ctrl button and click on each one to select - then click on Open.
19. Click on Next.
20. Change Delay to 20.
21. Click on Next - then Finish.
22. If you wish you can now click on Preview to view your animation. Click on the Optimise Tab and save your animation. That's it - you're done!
NOTE: By using a snowy picture and the Snow section of the Particle Gallery you can also make nice snow animations using the same method - nice for Christmas (see opposite)! If, like me, you are not keen on the transparency of the snow in PI using the default settings, use Right Click/Modify Properties & Apply, then change the Body setting to 0 and the Opacity to 85 -100%. That will whiten it nicely! HAVE FUN! |
 |
|
|
Free Spirit Graphics If you would then like an invitation to join, please Email Me. We'd love to have you along! |
|
|
If you need any help - or want to make suggestions to improve this tutorial - or for new ones |
|


This site © Rosie Hardman-Ixer 2001/2/3 |