
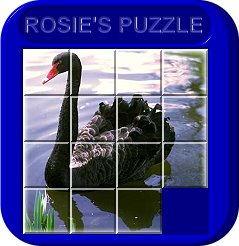
SLIDING BLOCKS PUZZLE ANIMATION PI VERSION: 8 (also suitable for 7) LEVEL: Intermediate (some experience of the tools is assumed). MAIN TOOLS USED: Path Drawing Tool, Continue Draw, Text Tool, Grid & Partition, Web Button Designer, Gif Animator 5. NOTE: For this tutorial you can either use the illustration provided Here (use Right Click/Save Picture As to save to your hard drive) or you can use one of your own which needs to be exactly 185W x 185H pixels (jpg format). THANKS: To Sue Owens for her input on this tutorial - which made it even easier & faster... thanks Sue!. TERMS OF USE: Please Read - Thank You! |
 |
INSTRUCTIONS |
|
|
|
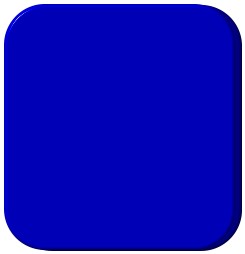
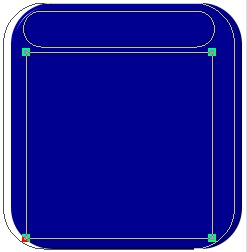
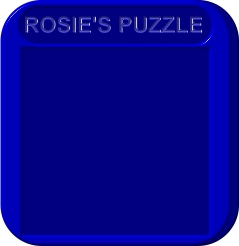
THE PLASTIC CASE 1. Open a new, white canvas, 255W x 270H pixels. 2. Using the Path Drawing Tool, Shape - Rounded Rectangle, Color - any of your choice: Mode - 3D Round: Border - 4: Depth - 30: draw a shape 230W x 255H pixels. 3. Right Click/Duplicate this shape and make it a lighter version of the same colour (or even something completely different if you wish). 4. Put the two pieces in position as shown in the first illustration. 5. Keep the top piece selected and change the mode to Continue Draw. 6. Now draw a rounded rectangle shape 190W x 35H pixels at the top of the large rectangle as shown. 7. Now change to the square shape and draw a square, 185W x 185H pixels. 8. Click back into 3D Round mode. NOTE: If you need to reposition any of the shapes, click on the Editing button on the Attributes Toolbar to go into Path Edit mode. Click somewhere on the background to deselect the shapes and then you can select them one at a time and move them to a new position. Use the Toggle button to check your results and once you are happy with these, click on the Editing button once more to return to 3D Round mode. 9. Now use the Text Tool - Mode - 3D Round - to add any text you wish in the centre of the cut-out rectangle at the top of the puzzle. I am using a slightly lighter shade of the main part of the case but you may like to use a different colour or even a metallic preset here. Feel free to add any other decoration you like to the plastic case too! 10. Once you have the case complete, Right Click/Merge As Single Object - then drag your case to a new canvas and save it. OK - that's the case done - now onto the puzzle pieces. |
|
|
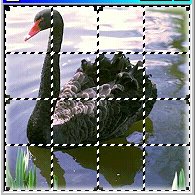
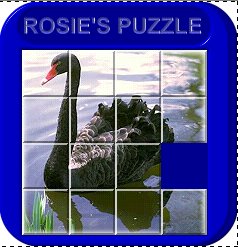
THE PUZZLE PIECES 11. Either open the supplied picture - or any picture of your own that is 185W x 185H pixels (this will need to be in .jpg format). NOTE: The bottom right-hand corner of the picture is going to be removed - so don't use a picture where this section is vital to the overall subject.
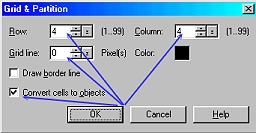
12. Now click on Web/Grid & Partition and use the settings shown opposite (Row & Column = 4, Grid Line = 0: Color - any: Check the 'Convert cells to objects' box). Click OK.
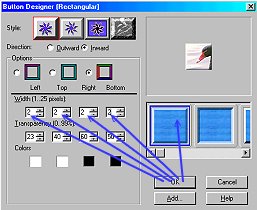
13. Keeping all the pieces selected, click on Web/Button Designer/Rectangular.
14. Select the first example on the right (indicated in the illustration left) and change all the Width settings to 2. Click OK
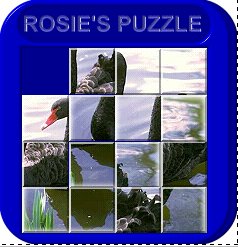
15. Right Click/Properties/Position & Size tab - UNcheck the Lock box and OK. 16. Drag the puzzle pieces to your puzzle (you can now close the original pic you used). 17. Press the Enter key to deselect all objects and then delete the bottom, right-hand square. 18. Now we have all the pieces for the puzzle. Save this as a .ufo file somewhere you can easily locate it - and let's animate! |
|
|
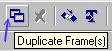
THE ANIMATION 19. Open up Gif Animator 5 and when the Startup Wizard box appears click on 'Open an exisiting image file'. Browse to your saved ufo and Open. 20. Click on the Duplicate Frame(s) button at the bottom of the screen.
21. Click on one of the pieces of the puzzle next to the open space and use the arrow buttons on your keyboard to move it into the space (make sure it is lined up perfectly on all sides - see left).
WARNING!!! Always Duplicate the last frame you've made immediately after ensuring that the piece you have been moving is in the correct place! It's easy to get carried away moving pieces and forget all about the duplication of frames. Believe me - I learned this lesson the HARD way LOL!! 22. Repeat Instructions 21 and 22 (i.e. Duplicate the last frame you made, move a piece) until you have thoroughly mixed up the picture (it took 17 frames for me to do this). OK - so it's easy to see that if we ran the animation as it is at the moment we would actually be starting with a finished puzzle and mixing it up! We want it to run the other way. This is easy to accomplish. 23. Click on the 'Reverse Frame Order' button at the bottom of the screen and in the box that appears, click OK. That's all there is to it! 24. Now Right Click/Frame Properties on the FIRST frame in the list at the bottom left of the screen and in the box that pops up change the delay to 150 and OK. 25. Right Click/Frame Properties on the LAST frame in the list (mine was 17), and change the delay to 350. 26. Select all the remaining frames and change the Delay to 20. NOTE: You can see your animation either by clicking on the Preview tab or by clicking on the arrow button at the bottom left of your screen (click on the little square to stop the animation running). 27. If you are happy with the animation, click on the Optimize tab and Save! Sit back and watch your puzzle solve itself! |
 |
|
|
Free Spirit Graphics If you would then like an invitation to join, please Email Me. We'd love to have you along! |
|
|
If you need any help - or want to make suggestions to improve this tutorial - or for new ones |
|
This site © Rosie Hardman-Ixer 2001/2/3 |