
SWIMMING POOL PI VERSION: 6/7. LEVEL: Beginner (with some knowledge of basic tools). MAIN TOOLS USED: Path Drawing Tool, Trace, Web Background Designer, EasyPalette/Painting Gallery, Transform Tools, Object Paint Eraser, Effect/Motion Blur (optional), Retouch Tools/Blur (optional), Outline Drawing Tool. NOTE: If you wish to use my water presets for the water - instead of the method used in the tutorial, you can get the presets Here. TERMS OF USE: Please Read - Thank You! |
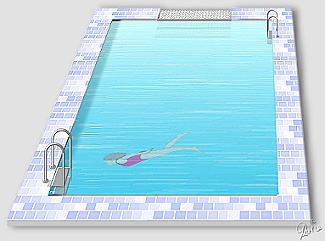
Swimmer NOT included in the tutorial |
||||||||||
INSTRUCTIONS |
|||||||||||
|
|
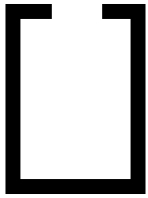
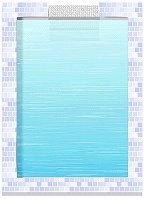
THE POOL SHAPE 1. Open a new canvas, 500W x 415H pixels. 2. Using the Path Drawing Tool, Shape - Rectangle: Colour - Black: Mode - 2D: draw a shape 280W x 380H pixels. 3. Now draw a second rectangle - this time coloured white - 220W x 320H pixels. 4. Right Click/Select All Objects. Right Click/Align/Center Both. 5. Now draw a small white rectangle, 100W x 35H pixels and put in place at the top of the black rectangle to make a gap for the steps. You should now have the shape opposite. Right Click/Merge All. 6. Click on Edit/Trace/Image - accept the defaults and OK. 7. Change the Mode to 2D and colour your shape a pale grey. 8. Open another new canvas the same size as the first (you will need the extra room later!) and drag the shape to it. You can now close the original canvas. |
||||||||||
|
|
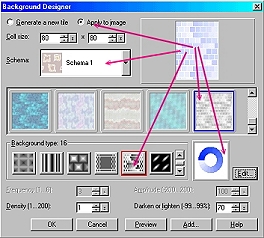
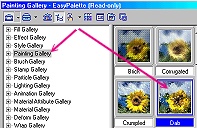
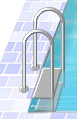
STEPS 9. Right Click/Duplicate the grey shape. 10. Using the Duplicate, click on Web/Background Designer and use the settings shown: Make sure 'Apply to Image' is checked. Schema 1. Click on the Edit button and, in the Palette Ramp Editor, choose blue gradient No. 083.11. Place the tiled shape slightly above the grey shape as shown. 12. Now draw another rectangle in grey 100W x 25H pixels and put in place for the step. Open the EasyPalette/Painting Gallery and click on Stone Washed to give a textured effect. 13. Now draw another rectangle - Medium Grey - below the step as shown. 14. Shift/Click to select both pieces of the step and then Right Click/Merge As Single Object. 15. Right Click/Duplicate this piece TWICE. 16. Use the Transform Tools/Resize to make the height of these two pieces 22 pixels. 17. Right Click on the middle step, click on Properties and change the Transparency to 35 - OK. 18. Right Click on the lowest of the three steps click on Properties and change the Transparency to 70 - OK. Now your steps should look like those opposite. |
||||||||||
|
|
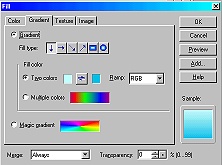
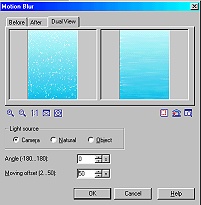
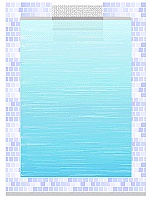
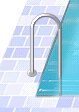
WATER There are a number of ways to make the water for the pool. Some of you might like to use the Almathera Puddle Filter if you are familiar with its use... or I have some water presets available on Here. (These presets must be used in 3D Mode (Border - 1) to get the full effect required for the tutorial). If you use either of the above methods for the water, go straight to Instruction 22 afterwards. Here is a new suggestion for making lightly rippled water if you don't wish to use those methods: 19. Draw a rectangle big enough to fill the centre of the pool. 20. Click on Edit/Fill and fill this with a gradient such as that shown (my colours are #BBFFFF and #00B8E6) then open the EasyPalette/Painting Gallery and click on Dab. 20. Now click on Effect/All/Motion Blur/Options and use the settings shown. Angle - 0. Moving Offset - 50. Light Source - Camera. This gives a very gentle wave effect. 21. If you now click on Effect/Blur & Sharpen/Sharpen and OK - you can increase the definition of the waves! Use the Retouch Tools/Blur to smooth out any bits that are too white - I had a number on the left hand side. 22. Now Right Click/Properties and make the Transparency 30. Now you can see the steps! |
||||||||||
|
|
SHADOW ON THE WATER 23. Select the main (blue-tiled) piece of the pool. Right ClickShadow and apply the settings shown - i.e change the X-offset, the Y-offset and the soft-edge to 6. 24. Right Click/Split Shadow. Select the shadow and move it until it is in the position shown - to give a soft reflection in the left side of the pool water. 25. Now use the Object Paint Eraser to remove all the excess shadow from the picture. TIP! 26. Now Right Click/Select All Objects. Right Click/Merge As Single Object. |
||||||||||
|
|
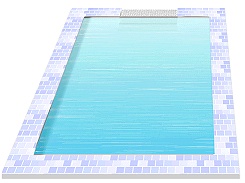
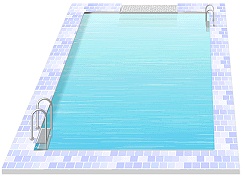
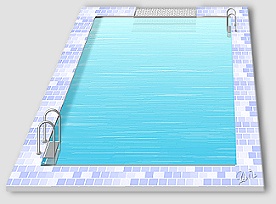
GETTING IT INTO PERSPECTIVE 24. Using the Transform Tools/Perspective and Resize to change the shape of your pool as shown, narrowing the upper side and widening the lower side of the pool. I also used the Transform Tools/Slant to make it look as if I was viewing the pool a little more from the right hand side than the left. I did this by pulling over the top side of the pool to the right slightly. 25. When you have exactly the perspective you want you might find that your pic is a little blurry. If so - click on Effect/Blur & Sharpen/Sharpen and sharpen it up a little. 26. You will also need to use the Object Paint Eraser to crop off the one or both edges of the grey part at the front as they will no longer be vertical.
|
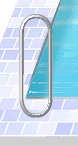
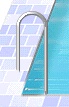
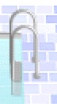
LADDERS 27. Using the Outline Drawing Tool, Shape - Rounded Rectangle: Colour - Grey: Mode - 3D: draw a shape as shown. The size will vary depending on how you reshaped your pool - so this bit you will have to do by eye! (However - for reference - I made my shape 30W x 105H pixels). In the Material Box/Shading - change the shading to Metallic/Silver. 28. Right Click/Convert Object Type/From Text/Path to Image - then use the Object Paint Eraser to take off the excess rail. 29. Change the Transparency of the Object Paint Eraser to 70 and then gradually erase the bottom part of the rail - until it looks as if it is underwater. 30. Using the Path Drawing Tool, draw a small, metallic silver, 3D ellipse and place it where the rail meets the tiles. Select both parts of the ladder and Right Click/Merge As Single Object. 31. Right Click/Duplicate this piece. Put the two pieces in place as shown. 32. Using the Path Drawing Tool, Shape - Rectangle: Colour - Grey: Mode - 3D: Border - 2: Depth - 30: draw a small shape for a ladder-step. 33. Click on Path Edit to edit the shape as shown. 34. Right Click/Duplicate to make a second step and put this below the first. 35. Right Click/Send Backward to put this below the first step and then Right Click/Properties and change the Transparency so it looks as if it is underwater (about 35 should be good). Make a second ladder for the far side of your pool using the same techniques. Now it's up to you to add anything that you wish to your pool. You could put a swimmer into it (as I've done in the main pic above)... or how about trying to create a diving board and diver? Maybe some tables with parasols, sun-loungers, towels, pool toys around the edges?... the list is endless!
|
NOW DOESN'T THAT LOOK INVITING?
|
|
|
Free Spirit Graphics If you would then like an invitation to join, please Email Me. We'd love to have you along!
|
If you need any help - or want to make suggestions to improve this tutorial - or for new ones | ||||


This site © Rosie Hardman-Ixer 2001/2/3 |