
COMBINATION PADLOCK (Animated or Still) PI VERSION: 7/8/XL. LEVEL: Intermediate MAIN TOOLS USED: Path Drawing Tool, Line & Arrow Tool, Outline Drawing Tool, Path Edit, Transform Tools, Select on Objects command, EasyPalette, Object Paint Eraser, Crop Tool, Gif Animator 5 TERMS OF USE: Please Read - Thank You! |
|
INSTRUCTIONS |
|
|
|
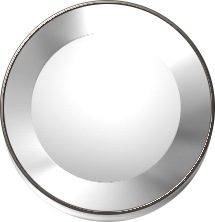
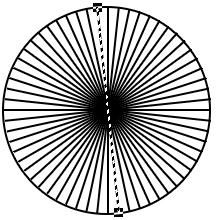
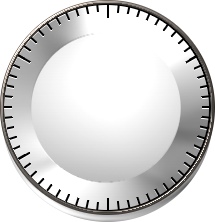
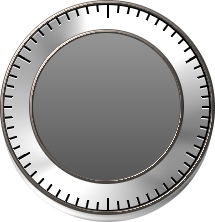
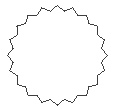
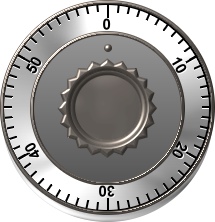
COMBINATION DIAL 1. Open a new, white canvas, 250W x 400H pixels. We are going to make the object much larger than we need for ease of working and then resize when making the animation. 2. Using the Path Drawing Tool, Shape - Circle: Color - any for now: Mode - 2D: draw a shape 210W x 210H pixels. 3. Right Click/Duplicate this twice. 4. Using the original circle, change the mode to 3D Round. Open the EasyPalette/Material Attribute Gallery/Metallic and apply preset Silver 2. In the Path Panel, use the settings Border - 14: Depth - 30. 5. Using the first duplicated circle, change the mode to 3D Chisel and apply the Silver 2 preset again. In the Path Panel, use the settings Border - 32: Depth - 30. 6. Using the second duplicated circle, change the mode to 3D Pipe and from the EasyPalette/Material Attribute Gallery/Metallic apply the Steel 3 preset. In the Path Panel, use the settings Border - 2: Depth - 30. 7. Put the three pieces together to form the object as shown on the left. 8. Now open a new canvas 220W x 220H pixels. 9. Now draw another circle, Color - Black: Mode - 3D Pipe: Border - 1: Depth - 1: 206W x 206H pixels. 10. Using the Line & Arrow tool, Shape - Straight line: Color - Black: Mode - 2D: Outline/Border - 1: draw a line from top to bottom of the circle (hold down the Shift key to constrain to a straight line). 11. Using the Transform Tools/Rotate by Degree, first set the degrees to 6o and then click on the Copy/Rotate button until you have filled the circle as shown opposite. 12. Now Right Click/Select All Objects and Right Click/Merge As Single Object. 13. Keep the object selected and using the Standard Selection Tool, Shape - Circle: Check 'Fixed size (in Pixels)' and use 190 x 190 pixels, Soft edge - 0: make a selection in the centre of the object (use the Arrow keys on your keyboard to move the selection to the exact centre if necessary) - then hit the Delete key. 14. Right Click/None to remove the selection line. 15. You should now be left with the object shown left. 16. Now redraw in your original line from top to bottom of the circle. 17. In the Transform Tools, set the Rotate by Degree to 60o this time and click on the Copy/Rotate button twice. 18. Make sure that these lines lie exactly over the ones beneath them and then select all three lines and Right Click/Merge As Single Object. 19. Keep the object selected and using the Standard Selection Tool, Shape - Circle: 'Fixed size (in Pixels)' - 180 x 180 pixels, Soft edge - 0: make a selection in the centre of the object - then hit the Delete key. 20. Right Click/None to remove the selection line. You should now be left with the object shown left. 21. Hold the Ctrl key down & select both objects - Right Click/Merge As Single Object. 22. Move this object to the original canvas and Right Click/Duplicate. Close the second canvas (you do not need to Save this). 23. Select the original black scale object and then click on Edit/Fill and fill with white. 23. Put in place with the white scale slightly offset as shown - to give the impression of being impressed in the metal. 24. Select the dark, outer rim that you made and Right Click/Arrange/Bring to Front. Your padlock should now look like the illustration left. 25. Now using the Path Drawing Tool, Shape - Circle: Color - any for now: Mode - 2D: draw a shape 150W x 150H pixels. 26. Open the EasyPalette/Material Attribute Gallery/Metallic and apply preset Silver 2. 27. Right Click/Duplicate this piece and then change the mode of the duplicate to 3D Pipe: Border - 2: Depth - 30. 28. From the EasyPalette/Material Attribute Gallery/Metallic apply the Steel 3 preset. Put the two pieces in place (see left). 29. Using the Path Drawing Tool, Custom Shape - Shape Edges (PI 10 - Fr18): Color - Steel 3 again: Mode - 3D Round: draw a shape 100W x 100H pixels. 30. Click on the Editing button to go into Path Edit mode. Click anywhere in the white to deselect the shape. 31. (It may help to Zoom into 200% for this bit). Now select each of the inner two paths in turn and hit the Delete key each time - leaving you with just the outside path illustrated opposite. Click on the Editing button again to leave Path Edit and return to 3D Round mode. 32. Using the Circle shape again draw a shape 82W x 82H pixels: Color - Steel 3 again: Mode - 3D Round: Border - 10: Depth - (Minus) - 30. 33. Click on the Material button/Bevel tab and add the Custom Bevel shown opposite. 34. Put the two pieces in place as shown along with a very small, 3D Round shape for the indicator. 35. Select the 5 pieces of the inner dial that you just made and Right Click/Merge As Single Object. 36. Now you need to make the numbers for the scale. I used Arial, size 15, Bold. Use the Transform Tools/Rotate by Degree to turn these to the correct angles. Put these in place accurately between the scale and the inner dial. 37. Once you have all the numbers, select them all and Right Click/Merge As Single Object. 38. Right Click/Duplicate this piece. Select the original set of numbers and fill them with white. 39. Put the black numbers in place, slightly offset - as you did with the scale. 40. Select ALL pieces of the padlock except the inner dial (best done in the Layer Manager) and Right Click/Merge As Single Object. Right Click/Arrange/Send to Back. You should now have two pieces - the outer case of the padlock with the scale on and the darker, inner turning section. |
|
|
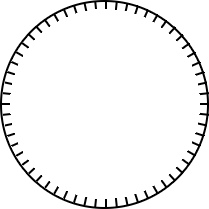
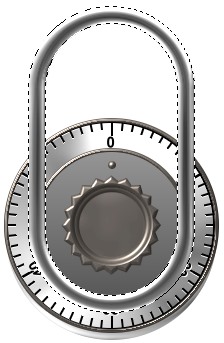
LOCKING BAR 41. Using the Outline Drawing Tool, Shape - Rounded Rectangle: Color - any at the moment: Mode - 3D Round draw a shape 150W x 290H pixels. 42. In the Path Panel, under the Outline tab set the Width to 9; under the Shape tab set the Roundness to 99 - then open the EasyPalette/Material Attribute Gallery/Metallic and fill the shape with preset Silver 3. 43. Put in place as shown and then Right Click/Convert Object Type/From Text/Path to Image.
44. Now use the Object Paint Eraser to erase the part of the locking bar as shown. 45. Right Click/Arrange/Send to Back. OK - that's the padlock made. You can leave your object like that (or with the locking bar raised) or you can work on and do the animation! |
|
|
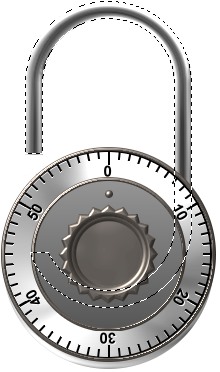
MAKING THE FRAMES 46. Before we do anything else, let's cut down the amount of background to the minimum needed for the animation. Raise the locking bar to the point shown on the left by using the Up Arrow key on your keyboard. Right Click/Select All Objects. 47. Click on the Crop Tool to crop the object. 48. Now lower the locking bar back down to its original position. Now there are a number of ways to make animation frames, for instance taking the ufo into GA5 with lots of duplicated pieces and manipulating them there - and for a lot of animations that is the easiest route to go - but I've found that with this particular animation it is best to make the frames in PI as it is such an easy process. I give instructions for my own combination - but if you wish to change the numbers to something special like a birthdate - feel free! 49. First of all save your picture - as it is as frame 1.jpg - somewhere you can find it easily - I use my Desktop. 50. Now use the Transform Tools/Rotate by degree (set at 30 51. Rotate 30 52. Rotate the dial back left 30 53. Rotate the dial left again 30 54. Rotate the dial left again 30 55. Rotate the dial left again 30 56. Rotate the dial left again 30 57. Rotate the dial left again 30 58. Rotate the dial left again 30 59. Rotate the dial left again 30 |
|
|
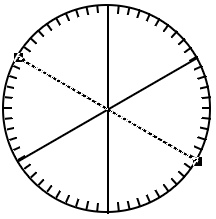
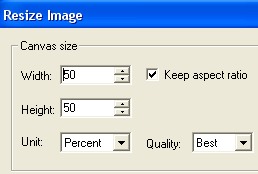
THE ANIMATION 61. Make a note of the dimensions of your picture and open Gif Animator 5 using the Switch button. 62. Click on Animation Wizard, enter the dimensions of your frames and click Next. 63. Click on Add image, browse to where you saved the frames and, holding down the Ctrl button click on them in the reverse order and click Open. 64. Click Next twice and then Finish. NOTE: For those people who wish to use their own numbers - briefly... You need timing Delay of 150 on the first Frame (padlock closed).... 250 on the Last Frame (the only one on which the padlock is open).... 75 at all the Frames where the combination stops at a number and 5 for all the other Frames. If you are using the tutorial frames - continue with Instruction 65 now... 65. At the bottom of the screen, select Frame 1 (Closed Padlock) and Right Click/Frame Properties. Change the Delay to 150 and OK. 66. Hold the Ctrl button down and select Frames 3 and 7 (pauses at chosen numbers) and Right Click/Frame Properties. Change the Delay to 75 and OK. 67. Hold the Ctrl button down and select Frames 2, 4, 5, 6, 8, 9 and 10 (movement between numbers) and Right Click/Frame Properties. Change the Delay to 5 and OK. 68. Select Frame 11 (Open Padlock) and Right Click/Frame Properties. Change the Delay to 250 and OK. 69. Now this would be WAY too big an image in terms of file size, were we to animate it at this size.... so click on Edit/Resize Image. In the box that comes up, change the Unit to Percent, the Width and Height to 50 and OK. 70. Click on the Optimize tab and set the Preset to Photo 64. Test your animation if you wish and if it's OK..... 71. Click on the Save button and save your animated padlock! Hope you enjoyed this tutorial! :-) |
 |
|
|
Free Spirit Graphics If you would then like an invitation to join, please Email Me. We'd love to have you along! |
|
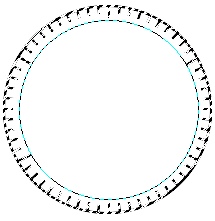
|
If you need any help - or want to make suggestions to improve this tutorial - or for new ones |
|
This site © Rosie Hardman-Ixer 2001/2/3/4 |