
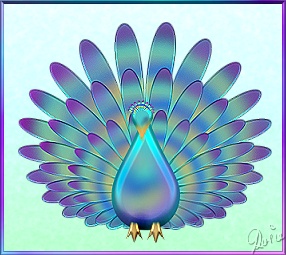
PROUD PEACOCK PI VERSION: 6/7. LEVEL: Beginners MAIN TOOLS USED: TERMS OF USE: Please Read - Thank You! |
 |
INSTRUCTIONS |
|
|
IMPORTANT NOTE - PLEASE READ! When drawing shapes which are later to be used in the Wrap Galleries it is essential that these shapes are drawn to size - i.e. you draw them to the size specified with the Path Drawing Tool. Drawing them approximately to size and then using the Transform Tools to resize them is NOT the same thing and the Wrap Galleries will not work properly if you do this. You will end up with a tiny little shape that does not look like the one in the tutorial. If, for any reason, you cannot draw the shape to size using the numbers at the bottom left of the PI workspace for reference (inexperience with the mouse, shaking hands etc), and HAVE to use other tools to correct the size of your path shape - then you will need to Right Click/Convert Object Type/Reset Text/Path Object before you continue. |
|
|
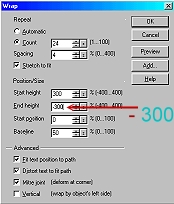
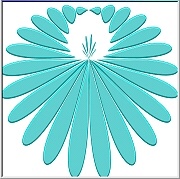
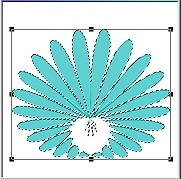
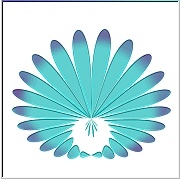
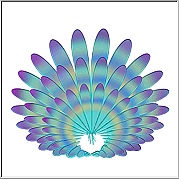
PEACOCK TAIL - FIRST PIECE 1. Open a new canvas - 350 x 350 pixels. 2. Using the Path Tools, Shape - Ellipse: Colour - light peacock blue: Mode - 3D Round: draw a shape 25W x 100H pixels. 3. Click on Material/Shading tab and check the Metallic button. In the Light tab change the number of lights to 2 (both Direct) and OK. 4. In the Path Panel set the Border to 3. 5. In the EasyPalette/Wrap Gallery/Path Wrap/Path Wrap 16 - Right Click/Modify Properties and Apply - change the settings to those shown - Count - 24 Your pic should now look like the one opposite. 6. Right Click/Convert Object Type - From Text/Path to Image. 7. Now using the Transform Tools/Rotate and flip - Flip the Image Vertically. Using the Transform Tools/Resize - resize the image until it looks like the picture opposite. 8. Now, keeping the tail piece selected and using the Paint Tools/Airbrush - Shape - size 50: Colour - deep purple: Trans - 0: Soft Edge - 50: Preset-None: - sweep the Airbrush around the edges of the tail piece until you are satisfied with the colour. 9. Using gold and deep blue -use the same method to colour the tail piece as shown opposite. Note: don't be afraid to play with the colour and overlap in places - this can be VERY effective! |
|
FINISHING THE PEACOCK TAIL
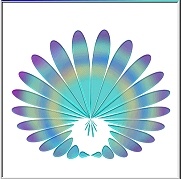
10. Right Click and Duplicate the tail piece.
11. Use the Transform Tools/Resize to make this piece smaller and put in place as shown.
12. Repeat this last stage once more to give you the completed tail as shown.
Now make a copy of your smallest tail piece and move to a separate canvas.
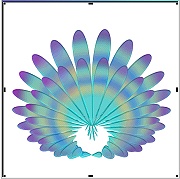
13. Right Click/Select All Objects. Right Click/Merge As Single Object.
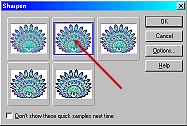
Note: If the tail seems a little blurry, Click on Effect/Blur and Sharpen and click on the second box as shown - this will brighten up the tail a little! (See sharpened version opposite). |
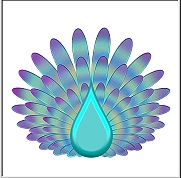 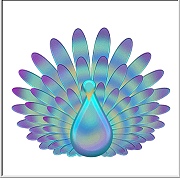  |
THE BODY 14. Using the Path Tools - Custom Shape - Raindrop - draw a shape for the body as shown. 15. Using the same shape draw a smaller piece and use the Transform Tools/Rotate and Flip to flip this piece vertically. Put in place to form the peacock's head as shown. 16. Use the Paint Tools/Airbrush to colour the beak gold and the body as shown. You will need to Right Click and Convert Object Type/From Text/Path to Image for each piece before you can colour it. It will also help if you make the brush size smaller to do the beak. 17. Now drag the extra tail piece that you made back to the main canvas (you can close the second canvas now) - and use the Transform Tools/Resize to make this very small. 18. Place this at the top of the peacock's head and use the Object Paint Eraser Tool to erase the bottom part of the piece leaving a 'crown of feathers' for your peacock's head as shown. Again it may help to use Effect/Blur and Sharpen/Sharpen to brighten this piece. |
  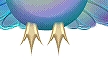 |
THE FEET 19. Using the Path Tools: Custom Shape - Crown 2: Colour - gold: Mode 3D: - draw a shape and use the Transform Tools/Resize and Rotate and Flip/Flip Vertically to make the shape shown. 20. Duplicate this piece and put the two feet in place as shown. 20. Select both feet and Right Click/Merge As Single Object. 21. Now use the Object Paint Eraser, with a Trans setting of 85, to gently erase the tops of the feet so that they blend into the body. 22. Right Click/Select All Objects/Merge As Single Object. Now make any additions to you picture that you wish - paint a little eye onto the peacock, give him a nice setting.... the limit is only in your imagination! |
|
|
|
 |
|
|
Free Spirit Graphics If you would then like an invitation to join, please Email Me. We'd love to have you along! |
|
|
If you need any help - or want to make suggestions to improve this tutorial - or for new ones |
|
This site © Rosie Hardman-Ixer 2001/2/3 |