
NEEDLE & THREAD PI VERSION: XL/8. LEVEL: Intermediate MAIN TOOLS USED: Path Drawing Tool, Path Edit, Continue Draw, Outline Drawing Tool, Line & Arrow Tool, Text Tool, Retouch Tools (Blur, Burn & Dodge), Object Paint Eraser. NOTE: The font used in the tutorial is Signet Roundhand but other Script-type fonts may be suitable - see Section 3 - Thread Signature. DOWNLOAD: The single wood preset used for the tutorial is available here. TERMS OF USE: Please Read - Thank You! |
|
INSTRUCTIONS |
|
|
|
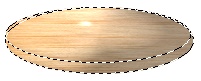
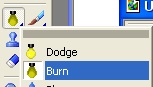
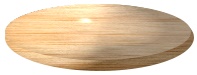
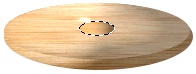
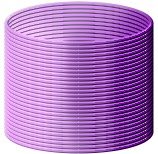
THREAD If you wish to use the same wood preset as the tutorial, you will need to have my Wood Presets - Set 4 (Larch preset) or you will need to download and install the wood preset supplied in the link at the top of the tutorial. You may use your own wood presets but I cannot guarantee that the effects will be the same. 1. Open a new, white canvas, 400W x 400H pixels. 2. Using the Path Drawing Tool, Shape - Ellipse: Color - the wood preset supplied: Mode - 3D Round: Border - 33: Depth - 30: draw a shape 188W x 66H pixels. 3. Now draw a second ellipse 185W x 55H pixels and put the two ellipses together as shown in the first illustration opposite. 4. Select the bottom of the two ellipses and Right Click/Convert Object Type/From Text/Path to Image. 5. Using the Retouch Tools/Burn (Level - 50) - shade the right-hand side of the shape as shown. 6. Select both ellipses and Right Click/Duplicate. 7. Now draw another ellipse - 35W x 13H pixels in 3D Trim mode. 8. In order to make the shading in 3D Trim go from left to right instead of top to bottom: 9. Right Click/Convert Object Type/From Text/Path to Image. 10. Use the Retouch Tools/Burn (Level - 50) again to darken this piece as shown. Select the two wooden pieces of the base and Right Click/Merge As Single Object. Select the three wooden pieces of the top and Right Click/Merge As Single Object. 11. Using the Outline Drawing Tool, Shape - Ellipse: Color - your choice (make a note of your colour because you will need to match this for the thread passing through the needle and the text): Border - 2: Depth - 30: draw a shape 145W x 40H pixels. 12. Right Click/Duplicate this shape and put in place above the first one as shown. 13. Select both pieces and Right Click/Align/Left. 14. Right Click/Merge As Single Object. 15. Right Click/Duplicate this double thread and, as in instructions 12, 13 & 14, Align and Merge them with the first thread object (it should now be four ellipses high). 16. Right Click Duplicate this piece and put in place above the previous one - and repeat this 5 MORE times in all - making a stack of 7 groups of 4 ellipses. 17. Ensure that these are all aligned nicely then Right Click/Merge As Single Object. 18. Using the Retouch Tools/Burn on the settings shown opposite, shade the right-hand side of the thread for extra depth. 19. Using the Retouch Tools/Dodge on the settings shown opposite, shade the left-hand side of the thread for extra shine. 20. Put the thread in place - then select the wooden top piece and use Right Click/Arrange/Bring to Front. Once the two wooden pieces and the thread are correctly positioned, select them all and Right Click/Align/Center Horizontally to make sure they are perfectly aligned. 21. Select all objects and then Right Click/Align/Center Horizontally. 22. Right Click/Merge As Single Object. |
|
|
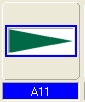
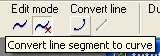
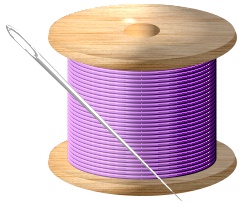
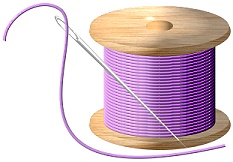
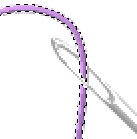
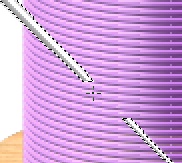
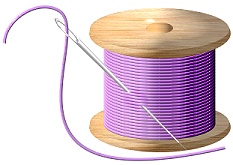
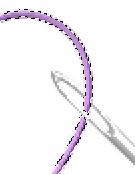
NEEDLE 23. Using the Path Drawing Tool, Custom Shape - A11: Color - Grey (Hex#B0B0B0): draw a shape 60W x 22H pixels. Click on the Material box/Shading tab - check 'Metallic'. Click on the Border/Depth tab and check 'Smooth spine'. Click OK. 24. Use the Transform Tools/Resize to stretch the shape until it is 350 pixels wide (we are making it bigger than needed originally, in order to make the following steps easier). 25. Click on the Editing button to go into Path Edit. 26. Select the left-hand short line and click on Convert line/Convert line segment to curve. 27. Use the Control Handles to pull the top of the needle into a curve as shown. 28. Click on the Editing button to exit Path Edit and return to 3D Round. 29. Change the mode to Continue Draw and using the Ellipse shape draw a small ellipse as shown. 30. Return to 3D Round mode and then use the Transform Tools/Resize to make the needle approximately 270W x 9H pixels. 31. Set the Transform Tools/Rotate by degree to 45o, then rotate the needle shape to the right and put in place on the thread as shown. 32. Use the Light bulb in the Path Panel/3D tab/Lighting (it's the lower of the two little buttons!) - to move the cursor over the needle to get the correct lighting. If you just wish to make a needle and thread - then continue with instructions 33 - 37. If you are going to make a thread signature - move on to Instructions 38 - 45 now. 33. Using the Line and Arrow Tool/Freehand, Color - same as the thread: draw a curving line through the eye of the needle and round the front of the wooden base as shown (in the Path Panel/Shape, leave the Accuracy on 6 - this will help smooth out any bumps in your line but do remember - you can always use Path Edit to edit the line too!). 34. Once you have the line correct, Right Click/Convert Object Type/From Text/Path to Image. 35. (It helps to Zoom in to 200% here) Now use the Object Paint Eraser on a small size to remove the small section of thread to make it look as if it is passing through the eye of the needle as shown. 36. Now select the needle shape and Right Click/Convert Object Type/From Text/Path to Image. Use the Object Paint Eraser again to erase a section where it is piercing the coils of thread as shown left. 37. Select the spool of thread and use the Retouch Tools/Burn (Shape - 10: Level - 35: Soft Edge - 40 this time) to lightly shade a small area either side of the erased part of the needle to give the impression of the thread curving outwords as illustrated. |
|
|
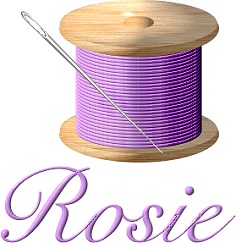
THREAD SIGNATURE To create a thread signature you are going to need a suitable font. I am using one called Signet Roundhand but you can use any font of your choice that has a suitable capital letter - one with a swirl of a suitable thickness to join your thread to. 38. First of all you will need to Type your name or other wording in 3D Mode, Color - same as thread: Border - 6: Depth - 13: (though this may vary from font to font to get a smooth effect - if necessary open the Material Box/Border/Depth tab and check smooth spine to help achieve this). The size of font varies with the typeface - I had to set the font size of mine to 125 for Signet Roundhand. 39. There are some rough joins in the letters in this signature. To get rid of these, Right Click/Convert Object Type/From Text/Path to Image and then use the Retouch Tools/Blur to smooth these out a little. 40. Now (and here's the trickiest bit in the whole tutorial!) you need to use the Line & Arrow Tool, Color - same as the thread/signature: Mode - 3D Round: Border - 2: Depth - 30: to draw a curving line down through the needle eye to join up with a curl in the capital letter - even overdrawing part of the curl - as you can always erase this or edit it later. If you have a graphics tablet this will be a much easier job... with the mouse it might take several goes! I would advise that in the Path Panel/Outline tab you leave the Acccuracy at 6 or below as this will help to smooth out any bumps in the line... but don't forget that you can use Path Edit to edit the line (getting better curves and smoothing out bumps) too! 41. Once you have the thread drawn to your satisfaction, select it and the text and Right Click/Merge As Single Object. 42. (It helps to Zoom in to 200% here) Now use the Object Paint Eraser on a small size to remove the small section of thread to make it look as if it is passing through the eye of the needle as shown. 43. Use the Object Paint Eraser and the Retouch Tools/Blur to smooth the join between the thread and the signature capital. 44. Now select the needle shape and Right Click/Convert Object Type/From Text/Path to Image. Use the Object Paint Eraser again to erase a section where it is piercing the coils of thread as shown left. 45. Select the spool of thread and use the Retouch Tools/Burn (Shape - 10: Level - 35: Soft Edge - 40 this time) to shade a small area either side of the erased part of the needle to give the impression of the thread curving outwords as illustrated. Once you have all the pieces made you can merge them or save them as separate items to use in the future. |
 |
|
|
Free Spirit Graphics If you would then like an invitation to join, please Email Me. We'd love to have you along! |
|
|
If you need any help - or want to make suggestions to improve this tutorial - or for new ones |
|


This site © Rosie Hardman-Ixer 2001/2/3/4 |