
STAINED GLASS TIFFANY LAMP PI VERSION: 8. LEVEL: Intermediate. MAIN TOOLS USED: Trace, Edit/Paste Into Selection, Path Tools, Path Edit Tools, EasyPalette, Transform Tools, Object Paint Eraser, (Retouch Tools, Paint Tools etc - all optional). NECESSARY DOWNLOADS: Download the pattern for the shade before starting the tutorial - Here (use Right Click/Save Picture As - to save to your hard drive). OPTIONAL DOWNLOADS: If you wish to use the glass samples used in the tutorial you can download them Here. PLEASE NOTE! There are a number of ways of making stained glass graphics. This tutorial uses the 'Paste Into Selection' method. It is NOT necessary to put your glass samples into the EasyPalette for this and NO .smp file has been provided. TERMS OF USE: Please Read - Thank You! |
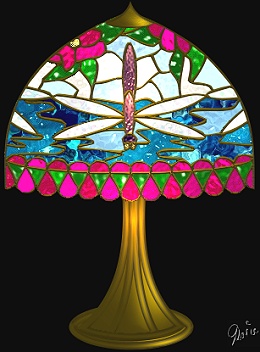
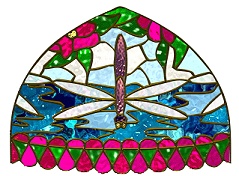
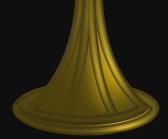
Shown at 85% true size. |
INSTRUCTIONS |
|
|
|
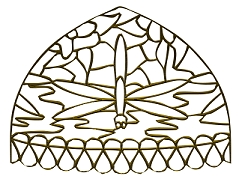
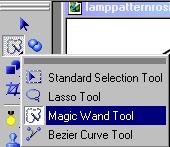
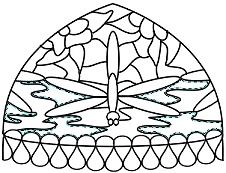
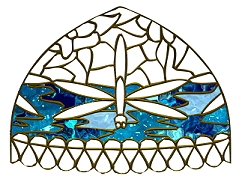
Before you start this section, download the pattern (see above) for the lampshade and any glass samples you intend to use in the tutorial and put them into any folder on your hard-drive where you can easily find them when necessary. (I put all my glass samples in a folder called 'Stained Glass', inside a 'PI' folder on my desktop). THE SHADE 1. Open the black and white lamp pattern jpg in PI. 2. Click on Edit/Trace/Image, accept the defaults and OK. 3. Change the Mode from Horizontal Deform to 3D Round. 4. Apply any preset you wish for the leading. Gold and Silver are both effective but for the purpose of the tutorial I am going to use the EasyPalette/Material Attribute Gallery/Copper 10. I particularly like this preset for lamps because it has a 'glow' in the centre and if you play with the Light Bulb in the Path Panel/Lighting you can emphasise this glow even more. 5. Drag the leading to a new canvas. 6. Click on Open and browse to the folder where you put the glass samples (you may of course choose to use your own glass samples here instead of the ones in the tutorial). Open blue1.jpg and Copy (Ctrl + C). Close the sample. 7. On your black and white pattern, using the Magic Wand Tool, select the areas shown. 8. Right Click/Expand/Shrink - and Expand by 1 pixel. 9. Now Click on Edit/Paste/Into Selection. Do NOT click yet! You can move the glass around to get the best possible colours for your picture until you click the mouse button, when it will be fixed. NOTE! 10. Once you have the glass piece correct, drag it to your leading canvas and put in place. Right Click/Arrange/Send to Back to send it behind the leading. Use the arrow-keys to make fine adjustments to the placing of the glass. 11. Repeat instructions 6 -10 - to colour in all the glass sections using your chosen glass samples. TIPS! Don't be afraid to turn the glass, lighten it, resize, sharpen, change the colour a little with Format/Color Balance etc - before you copy & paste it. This can give you lots of different effects from one piece of glass! Once you have the glass in place you can also use the Retouch Tools - Burn or Dodge - to shade/darken or highlight bits of glass. If you have any tiny gaps between the glass and the leading, sample a bit of the glass with the Eye-dropper tool and then use this colour with the Paintbrush in Paint As Object mode to paint over the gaps. Then return to the Pick Tool, choose Yes when it asks if you wish to continue and then Right Click/Arrange/Send to Back. This will seamlessly fill in any little gaps you've left! Lastly - before you save the whole shade - try filling the background with black.... you will sometimes be surprised to find how many bits of glass that looked great against a white background, need adjusting against a dark one! 12. After checking out the tips above, once you have finished your glass, Right Click/Select All Objects - then Right Click/Merge As Single Object. |
|
| THE TOP & STAND
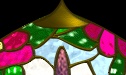
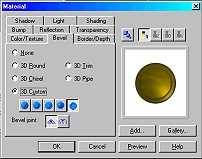
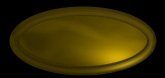
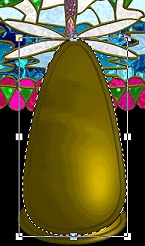
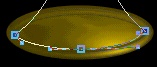
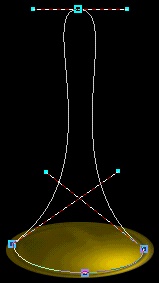
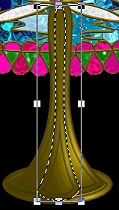
13. Close the black and white pattern and open a new canvas - 325W x 415H pixels. I have chosen a black canvas as this will show the colours in the lamp most effectively. 14. Move the lampshade to the new canvas. 15. Using the Path Drawing Tool, Shape - Ellipse: Color - Copper 10 from the EasyPalette/Material Attribute Gallery: Border - 5: Depth - 30: draw a shape 55W x 10H pixels. 16. Click on the Path Edit Tool. Raise the top Edit point and then use the adjustment handles to form the shape shown. 17. Click out of Path Edit Mode and back into 3D Round. Put in place at the top of your lamp and then adjust the lighting (using the Light Bulb in the Path Panel) to give the effect illustrated. 18. Now draw another Ellipse - Border - 6: Depth - 30: approximately 147W x 55H pixels for the base of the lamp. 19. Click on Material/Bump and take off the bump by unchecking the box. 20. Click on the Bevel tab and choose the bevel shown and OK. Your base should now look like the one shown. 21. Now, using the Path Drawing Tool, Custom Shape - Round Edges 3: draw a shape. (PLEASE NOTE: In some versions of PI there are 2 shapes with this name! Please check that you use the correct one!). Use the Transform Tools/Rotate and flip - to flip the shape Vertically and then use Resize to stretch this into a shape 145W x 265H pixels as illustrated. 22. Click on the Path Edit Tool and drag the two side Edit Points downwards until they 'sit in' the base - then use the adjustment handles to make the bottom line parallel to the base as shown. 23. Click on the TOP adjustment handle and use the side handles to create the shape of the 'stem' of the stand by pulling the adjustment handle for each node across the shape into an X as shown in the illustration opposite. 24. Click out of Path Edit Mode and back into 3D Round. 25. Right Click/Duplicate this piece and then use the Transform Tools/Resize, to reduce the size to approximately 60W pixels (the side, bevelled edges should come down to the bottom edge of the first upright piece you made). 26. Right Click/Convert Object Type/From Text/Path to Image. 27. Using the Object Paint Eraser (Transparency - 50) carefully erase the bottom of the piece until it looks like the illustration and all the bevelled edges fan out and meet the base edge. 28. Now select all parts of the base/stand and Right Click/Merge As Single Object. 29. Right Click/Arrange/Send to Back. 30. When you are happy with your lamp, select all parts of it and Right Click/Merge As Single Object.
Now is a good time to save the lamp as an object for future use! |
|
|
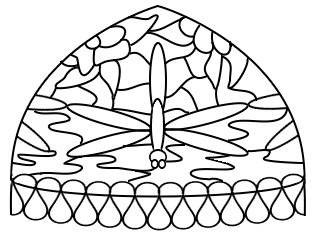
SHINE YOUR LIGHT! Finally - you can add a little lighting from the Lighting Gallery in the EasyPalette.... 31. First of all - add your signature or background if you're using one and Right Click/Merge All. 32. Open the EasyPalette/Lighting/Light Bulb 2 - Right Click/Modify Properties and Apply. 32. Move the Ambient Light slider back up to 100%. 34. Move Light Bulb 1 to a point near to the top of the stand (almost where it meets the shade). 35. Move Light Bulb 2 to a point halfway up the dragonfly's body. Click OK. |
 |
|
|
Free Spirit Graphics If you would then like an invitation to join, please Email Me. We'd love to have you along! |
|
If you need any help - or want to make suggestions to improve this tutorial - or for new ones |
|


This site © Rosie Hardman-Ixer 2001/2/3 |