
PHOTO KEY TAG PI VERSION: 8 (also suitable for 7). LEVEL: Intermediate (some knowledge of tools is assumed) MAIN TOOLS USED: Path Drawing Tool, Continue Draw, Path Edit Tool, EasyPalette, Transform Tools, Stamp Tool. TERMS OF USE: Please Read - Thank You! |
|
INSTRUCTIONS |
|
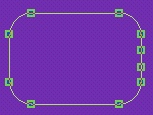
|
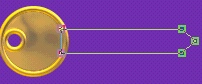
|
THE TAG 1. Open up a new canvas with a medium to dark background of any colour - 400W x 150H pixels. 2. Using the Path Drawing Tool, Shape - Rounded Rectangle: Color - any at this time: Mode - 3D Round: Border - 8: Depth -20: draw a shape 130W x 90H pixels. 3. Open the EasyPalette/Material Attribute Gallery/Glass and fill this with the G23 preset. 4. Now click on the Editing button on the Attribute toolbar to go into Path Edit mode. 5. Click on the + (plus) sign under Edit Point and add two edit points to the right hand side of the shape as shown. Now click back on the Pick point (left hand button of the three under 'Edit point') and drag these outwards to form the shape in the next illustration. If you want to check your shape you can use the Toggle button - this allows you to stay in Path Edit mode but check your shape in 3D Round. 6. Once you are satisfied with the shape, click on the Editing button again to exit Path Edit Mode and return to 3D Round. 7. Under 'Mode' change the mode to Continue Draw. 8. Using a Circle shape draw and small circle in the tag as illustrated and then return to 3D Round mode. If you need to adjust the position of the circle, go back into Path Edit Mode, click away from the shapes to deselect and then move the circle into position. Return to 3D Round mode. 9. Using the Path Drawing Tool, Shape - Rounded Rectangle: Color - same: Mode - 3D Round: Border - 4: Depth -20: draw a shape 118W x 80H pixels. Put in place on the tag. Do not merge the pieces yet.
That's the tag bit done apart from the photo |
|
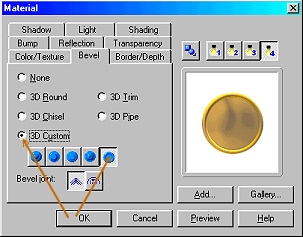
| THE KEY 10. Using the Path Drawing Tool, Shape - Circle: Color - gold: Mode - 3D Round: Border - 6: Depth -30: draw a shape 70W x 70H pixels. 11. Using the EasyPalette/Material Attribute Gallery/Metallic - fill this with the Gold 5 preset. 12. Click on the Material button on the Attribute Toolbar/Bevel tab and apply the bevel illustrated. 13. Under 'Mode' click on Continue Draw and using the same method you used for the tag, draw a small hole in the circle. Remember to return to 3D Custom or you will lose the bevel! 14. Using the Path Drawing Tool, Shape - Rectangle: Color - same preset: Mode - 3D Round: Border - 4: Depth -30: draw a shape 120W x 23H pixels. 15. Right Click/Arrange/Send to Back to hide the left hand side behind the circle. 16. Click on the editing button to go into Path Edit mode. 17. Add an edit point to the right hand side of the rectangle and pull this into the shape shown. 18. Add a number of points along the bottom line of the rectangle and pull those into uneven shapes to form the lower edge of the key. Keep checking your shape with the Toggle key. Once you have a good key shape, go back to 3D Round mode by clicking on the Edit button once more. 19. Using the Path Drawing Tool, Shape - Rectangle: Color - same preset: Mode - 3D Round: Border - 3: Depth -30: draw a shape 120W x 5H pixels and put in place at the top of the previous shape. Right Click/Arrange/Send Backwards to put this behind the circle shape as shown. 20. Finally - if you wish you can use a Path Shape or some text, using the same preset, to add a little motif to your key. I have added a little heart. 21. Once your key is finished, Shift/Click to select all parts of it and then Right Click/Merge As Single Object. 22. OK - that's the key... not far to go! |
|
|
THE PHOTO & CHAIN 23. The picture you use for the tag needs to be approximately the same size as the centre rectangle on the tag - i.e 118W x 80H pixels. Once you have a picture of this size, Copy this to the clipboard (Ctrl + C). 24. Select the smaller rounded rectangle from the tag and Right Click/Duplicate this - then change the mode to Selection. 25. Click on Edit/Paste/Into Selection (don't click the mouse button until you are sure the pic is in the correct position!). 26. Put the picture in place on the tag and then Right Click/Arrange/Send to Back. 27. Shift/Click to select all parts of your tag and then Right Click/Merge As Single Object. 28. Now use the Transform Tools/Rotate freely - to rotate the tag and key to the angles you wish. 29. Click on the Stamp Tool and then select the silver ball stamp. 30. Using the settings shown stamp the first row of silver balls illustrated. 31. Next stamp the second lot of silver balls and then Right Click/Arrange/Send to Back. 32. Add a shadow or anything else you wish (I added an extra line to my key with the Line & Arrow Tool using the same preset, Border - 2: Depth - 6:). There's your tag finished! |
|
|
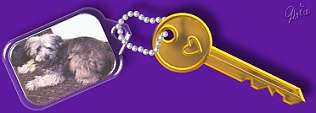
You can see who has the key to my heart.... ;-) |
 |
|
|
Free Spirit Graphics If you would then like an invitation to join, please Email Me. We'd love to have you along! |
|
|
If you need any help - or want to make suggestions to improve this tutorial - or for new ones |
|


This site © Rosie Hardman-Ixer 2001/2/3 |