
JUMPING KANGAROO PI VERSION: 10/XL LEVEL: Animation for Beginners MAIN TOOLS USED: Path Drawing Tool, Stamp Tool, Texturizer Filter (Third Party Filter - Optional), EasyPalette/Animation Gallery/Animation Studio, Gif Animator (for optimization purposes only). NECESSARY DOWNLOADS: Download kangaroo path kit HERE. TERMS OF USE: Please Read - Thank You! |
|
INSTRUCTIONS |
|
|
TOOL ICONS FOR BEGINNERS
|
|
|
|
BACKGROUND & KANGAROO Before starting this tutorial download the kangaroo path-shapes kit from the link provided above. 1. Open the kangaroo kit provided and colour it however you wish. My suggestion is shown opposite. It is coloured in various shades of greyish brown Hex#8A7D71, shaded with the Burn & Dodge Tools; I then used the Blur tool to blend various sharp lines. Once you have it coloured, Right Click/Merge as Single Object. Use the Transform Tools/Resize to make it 165W x 180W pixels. I then also put my kangaroo through the Texturizer filter to give the coat a little surface texture but you don't need to do this if you don't have the filter. I also use the Sharpen Effect to bring back some of the detail lost in resizing. 2. Open a new canvas 300W x 260H pixels - background color - Hex#E1E8FF. 3. Using the Stamp Tool to stamp some clouds on your picture or, if like me you have a seamless cloud background available you could also fill the background with this by clicking on Edit/Fill/Image - checking the File button and then browsing to your cloud background. 4. Using the Path Drawing Tool, Color - Two Color Gradient - Hex#E9F47B to Hex#005300 : Mode - 2D: draw a shape 300W x 30H for the ground. Right Click/Merge. 5. Move the kangaroo to the bottom/right of the sky/ground canvas and leave it selected. ...Now on to the Animation which is VERY easy!... |
|
|
ANIMATION 6. Open the EasyPalette/Animation Gallery/Animation Studio (PI 10 - EP/Image Enhancements/Animation Gallery/Animation Studio) and on 'Ripple' - Right Click/Modify Properties & Apply.
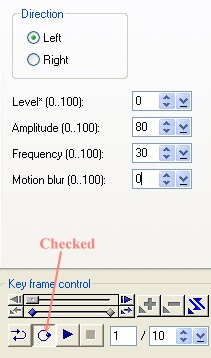
7. Select the Jump Effect (shown right - which is the right-hand picture in the second row down under 'Effect') and the settings shown in the graphic opposite.
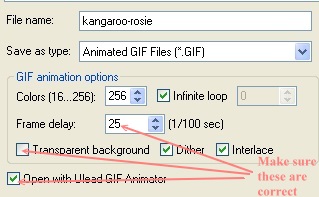
8. Click on Save and use the settings shown opposite. 9. Gif Animator will now open. 10. Click on the Optimize tab and select the preset which gives you the best file size/optimization result possible. Mine was Line Art 64.
11. Click on SAVE and your animation is finished!
You might also like to try this same method for other objects - say a beach ball bouncing on the sand or a butterfly fluttering around flowers? |
 |
|
|
Free Spirit Graphics If you would then like an invitation to join, please Email Me. We'd love to have you along! |
|
|
If you need any help - or want to make suggestions to improve this tutorial - or for new ones |
|
 - Path Drawing Tool
 - Easy Palette
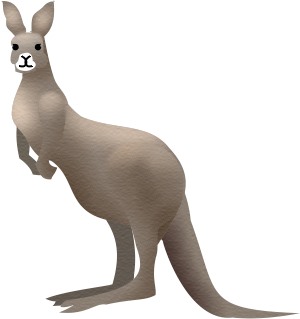


This site © Rosie Hardman-Ixer 2001/2/3/4/5 |