
HEARTS & ARROW PIN PI VERSION: 8 (but suitable for 6 & 7). LEVEL: Beginner MAIN TOOLS USED: Path Drawing Tool, Path Edit Tools, Object Paint Eraser, Transform Tools, EasyPalette. NOTE: TERMS OF USE: Please Read - Thank You! |
|
INSTRUCTIONS |
|
|
|
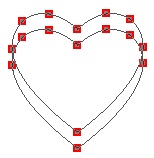
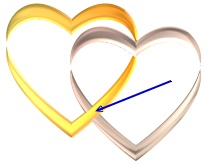
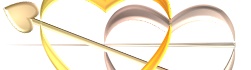
THE HEARTS 1. Open a new, white canvas, 350W x 250H pixels. 2. Using the Path Drawing Tool, Custom Shape - Heart: Color - any at this stage: Mode - 3D Round: Border - 6: Depth - 30: draw a shape 130W x 120H pixels. 3. Now click on the Editing button on the Attribute Toolbar to go into Path Edit mode. 4. Click on the Duplicate button on the Attribute Toolbar. 5. Move the Duplicate shape so that it is in the position shown. In order to move the shape - move your cursor over the line of the shape until it becomes a little hand - then click and hold down the mouse button whilst you move the shape. 6. In order to make sure that the two shapes are aligned correctly, hold down the Shift key and select BOTH shapes - then click on Align/Align Center on the Attribute Toolbar. 7. Click out of Path Edit mode and back into 3D Round mode. 8. Open your EasyPalette and fill this shape with "goldcup" from my Goldstrike presets - or your own choice of preset. 9. Right Click/Duplicate this shape and fill the duplicate with the "rosegold" preset - or a second preset of your choice. 10. Put the two hearts in place as shown. 11. Select the right-hand heart and Right Click/Convert Object Type/From Text/Path to Image. 12. Use the Object Paint Eraser to erase the part of the heart indicated to give the appearance of entwined hearts. OK - that's the hearts - easy wasn't it? :-) |
|
|
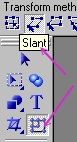
THE ARROW & PIN 13. Using the Path Drawing Tool, Shape - Rectangle: Border - 3: Depth - 15: draw a shape 250W x 5H pixels and fill this with my "buttergold" preset - or a third preset of your choice. 14. Now using the same preset but a Rectangle shape, Border - 2: Depth - 15: draw a rectangle, 45W x 12H and put in place on the arrow-shaft as shown. 15. Open the EasyPalette/Material Attribute Gallery/Bump and click on M13 to add the vertical-line bump. Close the EasyPalette. 16. Right Click/Convert Object Type/From Text/Path to Image. NOTE: I do this so that the Bump will be slanted too - otherwise it will not look right. 17. Click on the Transform Tools/Slant and use this to reshape the piece as shown by dragging the top line to the right. 18. Right Click/Duplicate this shape - then use the Transform Tools/Rotate & flip - to flip the shape Vertically. Put the two pieces in place. 19. Using the Custom Shape - Heart again, draw a heart approximately 32W x 30H pixels - Border - 4: Depth - 1 - and then use the Transform Tools/Rotate & flip - to rotate the shape 90 degrees to the right. 20. Once you have all the 4 pieces for your arrow, hold down the Shift key and select them all and then Right Click/Merge as Single Object. 21. Now use the Transform Tools/Rotate freely - to rotate the arrow so that it lies in the correct alignment with the hearts as shown. 22. Use the Object Paint Eraser once again - to remove the part of the arrow indicated. 23. Using the Path Drawing Tool, Custom Shape - A11: Color - : Mode - 3D Round: Border - 2: Depth - 15: draw a small shape. 24. Now use the Transform Tools/Resize to stretch this shape until it is 250W x 5H pixels. 25. Fill the shape with my "klondike" preset or other of your choice. 26. Use the Transform Tools/Rotate & flip - to flip the shape Horizontally. 27. Right Click/Arrange/Send to Back. 28. Using the same preset but this time using Custom Shape - Plastic Tube: Mode - 3D Round: Border - 3: Depth - 14: draw a small shape and then use the Transform Tools/Resize to make it approximately 19W x 7H pixels. 29. Use the Transform Tools/Rotate & flip - to rotate the shape 90 degrees to the left or right. 30. Put in place for the pin hinge. 31. Right Click/Select All Objects - then Right Click/Merge as Single Object. There's your pin - all ready to give to a loved one :-) |
|
|
...some suggestions for the finished pin! |
 |
|
|
Free Spirit Graphics If you would then like an invitation to join, please Email Me. We'd love to have you along! |
|
|
If you need any help - or want to make suggestions to improve this tutorial - or for new ones |
|


This site © Rosie Hardman-Ixer 2001/2/3 |