
ST PATRICK'S DAY HAT PI VERSION: 8. LEVEL: Beginner MAIN TOOLS USED: Path Drawing Tool, Path Edit, Transform Tools, Retouch Tools/Burn, Object Paint Eraser, EasyPalette. TERMS OF USE: Please Read - Thank You! |
|
INSTRUCTIONS |
|
|
|
GREEN HAT
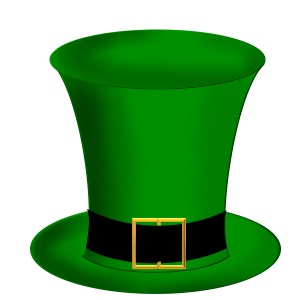
1. Open a new, white canvas 300W x 300H pixels.
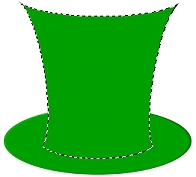
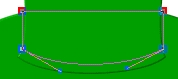
2. Using the Path Drawing Tool, Shape - Ellipse: Colour - Green (I used Hex #007900): Mode - 3D Round: Border - 1: Depth - 30: draw a shape 250W x 90H pixels.
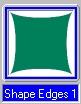
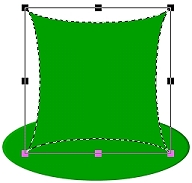
3. Now using Custom Shape - Shape Edges 1 (same settings) - draw a shape 195W x 195H pixels (see second picture opposite - shown smaller than true size).
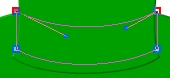
4. Using the Transform Tools/Perspective, narrow the lower edge of the shape and widen the top to give the shape shown.
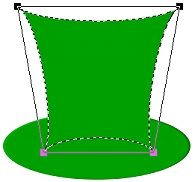
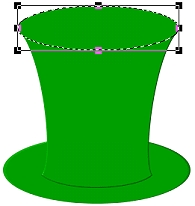
5. Click back on the Path Drawing Tool and then on the Editing button on the Attribute Toolbar to go into Path Edit Mode.
6. Click on each of the bottom edit points (nodes) in turn and use the Control Handles to pull the bottom line into the shape shown (this should run parallel to the edge of the hat brim).
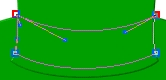
7. Check your shape by clicking on the Toggle button and, if you are happy with it, click out of Path Edit Mode again to return to 3D Round Mode.
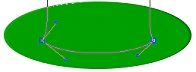
8. Using the Path Drawing Tool, Shape - Ellipse (same settings as in instruction 2. above) - draw an ellipse the width of the top of the hat x 60H pixels.
That's the main parts of your hat made - now for a little decoration.... first the hat-band... |
|
|
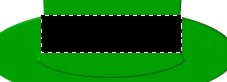
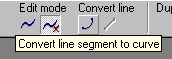
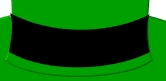
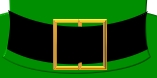
HAT-BAND & BUCKLE 9. Using the Path Drawing Tool, Shape - Rectangle: Color - Black: Mode - 3D Round: Border - 1: Depth - 30: draw a shape as shown (mine was 140W x 38H pixels). 10. Click on the Editing button to go into Path Edit Mode. 11. Click on the bottom line of the shape and then on the Convert Line/Convert Line Segment to Curve button on the Attribute Toolbar. 12. Click on each of the bottom edit points (nodes) in turn and use the Control Handles to pull the bottom line into the shape shown. 13. Click on the top line of the shape and, using the same method as above, convert to curve and use the Control Handles to create a curve in the top of the shape as shown. 14. Now convert the two side-lines of the shape to a curve and use the Control Handles to put the hat-band into the same shape as the hat-piece beneath.
15. Click out of Path Edit Mode and return to 3D Round Mode.
16. Using the Outline Drawing Tool, Shape - Rectangle: Color - Gold: Mode - 3D Round: Border - 2: Depth - 30; draw a shape approximately 25W x 50H (if you have drawn a wider hat-band you may have to adjust the height here...). 17. Open the EasyPalette/Material Attribute Gallery/Metallic and apply the Gold 5 preset. 18. Right Click/Duplicate this piece, put the two pieces together as shown. 19. Now Shift/Click to select both pieces of the buckle and Right Click/Merge As Single Object. 20. Put the buckle in place on the hat band (adjust the size of it using the Transform Tools/Resize if necessary) and then use the Object Paint Eraser to erase the part of the centre piece of the buckle where it goes behind the hat-band. |
|
|
SHADING AND SHAMROCK 21. Select the brim of the hat and Right Click/Convert Object Type/From Text/Path to Image.
22. Using the Retouch Tools/Burn on the settings shown (Shape size - 40: Level - 40: Soft Edge - 100), shade the brim.
23. Using the same method, shade the other two green pieces of the hat. For the tall piece your shape size would probably be best at about 75, Level and Soft Edge as before). TIP: When using the Burn Tool make a few passes over the object, releasing the mouse button between each one - then you can always use Undo on your shading to go back to a point where you were happy, should it get too dark. 24. To make your shamrock: use the Path Drawing Tool, Custom Shape - Heart: Color - dark green (I used Hex #002F00): Mode - 3D Round: Border - 1: Depth - 30: draw a shape 18W x 18H pixels. 25. Duplicate this piece three times. 26. Use the Transform tools/Rotate and flip - to rotate one piece 90 degrees to the left, another 90 degrees to the right, and finally flip one piece Vertically. 27. Put the four pieces together as shown and then use the Line and Arrow Tool/Freehand to draw a little, curving stem as shown (Border - 1). 28. Shift/Click to select all the pieces of your shamrock and Right Click/Merge As Single Object. 29. I have now Duplicated this shamrock a few times and use the Transform Tools to rotate and flip some of them to make a small bunch of shamrocks. I then selected all these and Merged As Single Object. 30. I then used the Transform Tools/Resixe to reduce the size of the bunch and put this behind the hat-band/buckle by holding down the Alt key on the keyboard and pressing the Down Arrow key until they were in place.
31. Once you are happy with your hat, Right Click/Select All Objects - then Right Click/Merge As Single Object.
32. Add a shadow and maybe turn to a jaunty angle - and you've done! All ready for St. Patrick's Day! |
 |
|
|
Free Spirit Graphics If you would then like an invitation to join, please Email Me. We'd love to have you along! |
|
|
If you need any help - or want to make suggestions to improve this tutorial - or for new ones |
|


This site © Rosie Hardman-Ixer 2001/2/3 |