
ETCHED GLASS BOWL PI VERSION: 8 (but also suitable for 6 and 7). LEVEL: Beginner MAIN TOOLS USED: Path Drawing Tool, Object Paint Eraser, Transform Tools, EasyPalette, Creative Lighting Effect, Text Tool. OPTIONAL DOWNLOADS: TERMS OF USE: Please Read - Thank You! |
|
INSTRUCTIONSUsing the font: If you wish to use the font for the hummingbird as used in the tutorial you may first need to download this from the link above if you do not already have it. You may install this font into Windows on your computer if you wish - however it is possible to use the font for the purposes of this tutorial only - by simply unzipping it the font into a suitable folder (mine is on my desktop) and then simply clicking on the font file itself to open it before you open PI8. It will then be available for use in the tutorial. If you decide to use your own pictorial font/ding try to choose a subject without too much detail and nice clear outlines. |
|
|
|
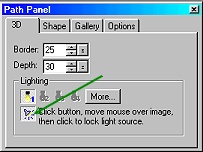
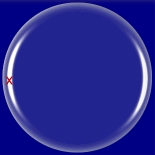
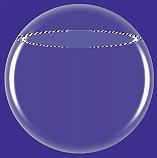
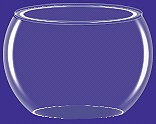
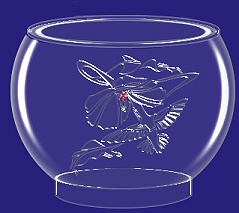
THE BOWL 1. Open a new canvas with a medium to dark background colour (mine is #000075), 350W x 350H pixels. 2. Using the Path Drawing Tool, Shape - Circle: Color - (any at this time): Mode - 3D Round: Border - 25: Depth - 30: draw a shape 300W x 300H pixels. 3. Keep the shape selected then open the EasyPalette/Material Attribute Gallery/Glass. Fill the shape with G23 by double-clicking on the thumbnail. 4. In the Path Panel, click on the Lighting button and then move the cursor to the point (Marked X on the 2nd illustration) to give the effect shown. 5. Now, using the Path Drawing Tool again - this time an Ellipse shape - draw a shape to stretch across the top of the bowl as shown - mine was 250W x 35H pixels. TIP! To make it easier to draw a new shape over the top of a previous one - hold down the ALT key whilst drawing! 6. Right Click/Duplicate this shape and change the Mode to 3D Pipe: Border - 4.
7. Put in place over the first ellipse.
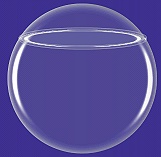
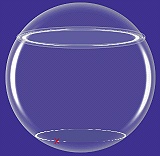
8. Now draw a smaller ellipse, 180W x 25H pixels for the base of the bowl and put in place. 9. Once again - use the lighting button to move the cursor to the point shown by the red X on the pic opposite to give a more subtle effect to the shading on the base. 10. Now select the original, large circle that you drew and Right Click/Convert Object Type/From Text/Path to Image. 11. Using Object Paint Eraser Tool, carefully erase all the parts of the large circle as shown.
An illustration of what this piece would look like without the ellipses is also shown - but of course you do not erase these!
12. Once you are satisfied with your result, Right Click/Select All Objects/then Right Click/Merge as Single Object. |
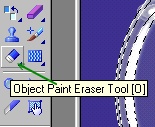
|
|
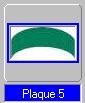
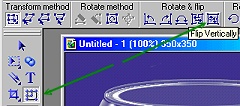
THE BASE 13. Using the Path Drawing Tool, Custom Shape - Plaque 5: Border - 4: Depth - 30: draw a shape. Now use the Transform Tool/Rotate & flip/Flip Vertically - to flip the shape. 14. Use the Transform Tools/Resize to stretch the shape until it looks like the illustration shown - mine was 183W x 50H pixels. You might like to play with the lighting button again to get a lighting effect that you like on this piece - but it is not vital. 15. Once you are happy with the base, Right Click/Select All Objects/then Right Click/Merge as Single Object. Now comes the pretty bit! |
|
|
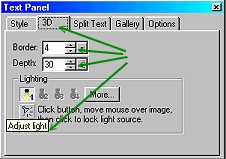
THE ETCHING 16. Click on the Text Tool and, in the Font box, select the 'KR Renee's Hummingbirds Two' font. 17. Change the font size to 250. 18. Change the Mode to 3D -Round. 19. Click the centre of the bowl and type an 'h'. 20. In the Text Panel, click on the 3D tab and change the Border to 4: Depth -30. 21. Open the EasyPalette/Material Attribute Gallery/Glass and fill this shape with G23 by double-clicking on the thumbnail and move the hummingbird into place. 22. In the Text Panel/3D use the lighting button once again to find a lighting effect that looks good. This will vary from design to design - however for the design I've used for the tutorial, I moved the cursor to the point once again marked with a red X (see illustration opposite). 23. Once you are happy with the decoration, Right Click/Select All Objects/then Right Click/Merge as Single Object. At this point you might like to save your glass bowl as a separate ufo for future use? 24. You might have your own ideas for a background here - but I would suggest that you keep this simple and fairly dark to let the etching shine out. I have added a simple Path shape 2D rectangle, with a gradient fill and sent this behind the bowl using Right Click/Arrange/Send to Back. 25. Once you are happy with the background, Right Click/Merge All. |
|
|
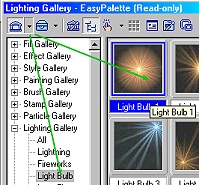
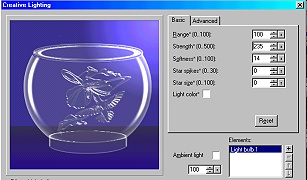
CREATIVE LIGHTING 25. Open the EasyPalette/Lighting Gallery/Light Bulb - click on Light Bulb 1- then Right Click/Modify Properties and Apply. 26. In the Creative Lighting Panel, move the light to the top, right-hand corner of the picture and then use the settings shown in the picture opposite: Range - 100 Light Color - change to white Ambient light - white and 100 Click OK. |
|
|
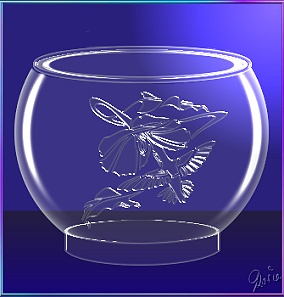
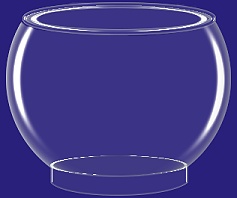
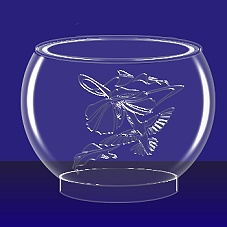
YOUR FINISHED BOWL Add a simple frame to your picture and you're all ready to show off your new creation! |
|
|
With a little imagination my bowl becomes a great little animation by Thanks for letting me use this Solen! |
 |
|
|
Free Spirit Graphics If you would then like an invitation to join, please Email Me. We'd love to have you along! |
|
|
If you need any help - or want to make suggestions to improve this tutorial - or for new ones |
|

This site © Rosie Hardman-Ixer 2001/2/3 |