
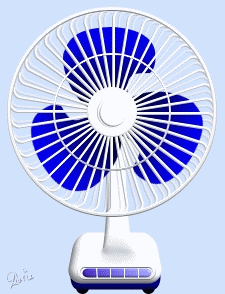
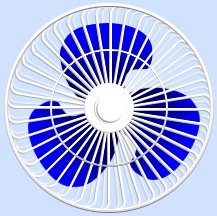
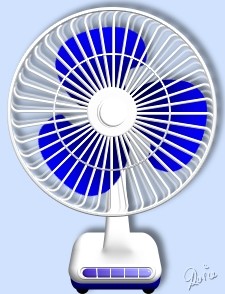
ELECTRIC TABLE FAN PI VERSION: 8. LEVEL: Intermediate MAIN TOOLS USED: Outline Drawing Tool, Path Drawing Tool, Object Paint Eraser, Copy Rotate, Path Edit Tools, Retouch Tools/Blur & Burn, Transform Tools, Gif Animator (optional). TERMS OF USE: Please Read - Thank You! |
|
INSTRUCTIONS |
|
|
|
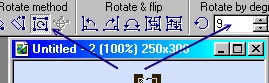
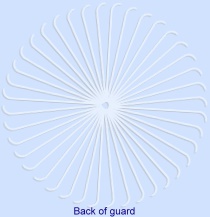
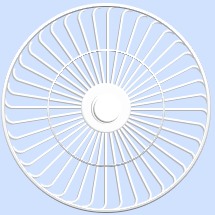
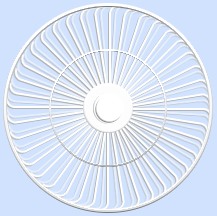
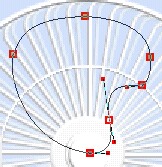
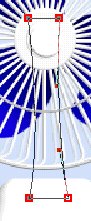
THE WIRE GUARD 1. Open a new canvas, 250W x 300H pixels. I would recommend a coloured background as we are mainly going to be working with white - I have used Hex ##D0E2FD. 2. Using the Outline Drawing Tool, Shape - Rounded Rectangle: Color - white: Mode - 2D: Border - 1: draw a shape 15W x 100H pixels. 3. Right Click/Convert Object Type/From Text/Path to Image. 4. Now use the Object Paint Eraser to remove part of the shape, leaving the resulting shape shown opposite in the first illustration. 5. Using the Transform Tools/Rotate Method/Rotate Freely - drag the rotation point (a circle with a cross through it) down to the bottom left point as shown i.e. to the base of the line. 6. Set the Rotate by degree to 9.00 degrees. 7. Now click on Copy rotate as many times as it takes to complete the circle (39 times in fact). 8. Right Click/Select All Objects. Right Click/Merge As Single Object. 9. Right Click/Duplicate. 10. Using the first white object click on Edit Fill and fill with grey - Hex ##B4B4B4. 11. Drag the grey shape behind the white one so that it creates the effect shown. 12. Right Click/Select All Objects. Right Click/Merge As Single Object. 13. Right Click/Duplicate this piece (this is the BACK of the guard). 14. Using the Transform Tools/Rotate by degree - rotate it 3.50 degrees to the right. 15. Right Click/Properties and set the Transparency to 50% and OK. 16. Drag this to a separate canvas for the time being. 17. On the original canvas, using the Path Drawing Tools, Shape - Circle: Color - white: Mode - 3D Round: Border - 3: Depth - 30: draw a shape 50W x 50H pixels. If you want to add a bit of brightness to this, in the Path Panel click on the 'More...' button under 'Lighting', add an extra light and OK. 18. Draw a second circle, 30W x 30H pixels. I went into the Materials box and added a Custom bevel to this but you can leave it plain if you wish. 19. Right Click/Select All Objects. 20. Right Click/Align/Center Both. 21. Right Click/Merge As Single Object. 22. Using the Outline Drawing Tool, Shape - Circle: Color - White: Mode - 3D Round: Border - 2: Depth - 30: (set these in the Path Panel) - draw a shape 205W x 205H pixels. You may need to adjust this slightly to fit it perfectly around the edge of your fan. Again - if you feel you need to brighten this a little, in the Path Panel click on the More... button under Lighting, add an extra light and OK. 23. Draw another circle, 115W x 115H pixels - Border - 1 this time. Right Click/Select All Objects then Right Click/Arrange/Center Both. 24. Right Click/Merge As Single Object. 25. Now drag the Back Guard on the other canvas back to the main canvas and Right Click/Arrange/Send to Back. 26. Put in position as shown. Close the second canvas. 27. That's the guard finished - on to the blades! Don't forget to save your work regularly ;-) |
|
|
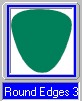
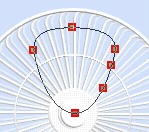
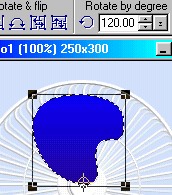
THE FAN BLADES 28. Using the Path Drawing Tool, Custom Shape - Rounded Edges 3: Mode - 2D: draw a shape approximately 84W x 86H pixels. 29. Fill this with a Two Colour, Top to Bottom Gradient of your choice. I am using two blues - Hex #0000FF and #150185. 30. Click on the Editing button on the Attribute toolbar to go into Path Edit mode. It might help to Zoom into to 200% at this point. 31. Under 'Edit point' click on the + (plus) button and add editing points as shown. Click back on the Pick Point button. 32. Drag the lower point you made inward and use the control handles on nodes to create the shape of the blade as shown. Don't forget that you can click on the Toggle button to check your shape without coming out of Path Edit mode. 33. Once you are happy with the shape, click on the Editing button again to bring you out of Path Edit and back into 2D mode. 34. Right Click/Convert Object Type/From Text/Path to Image. 35. Using the Transform tools/Rotate Method/Rotate Freely - drag the crosshair rotation point to the bottom, central point of the blue shape as shown left. 36. Set the 'Rotate by degree' to 120 degrees and click on Copy rotate twice to make the other two blades. 37. Shift/Click to select all three blades and then Right Click/Merge As Single Object. 38. Right Click/Arrange/Send Backward to place between the back and front guards. 39. Now use the Retouch Tools/Burn (Settings - Shape - 70: Level - 100: Soft Edge - 75: to add a bit more shading to the centre of the blades. OK! Blades done.... now for the base! |
|
|
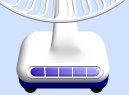
THE STAND & CONTROLS 40. Using the Path Drawing Tool, Shape - Rounded Rectangle: Color - white: Mode - 3D Round: Border - 13: Depth - 30: draw a shape 100W x 50H pixels. 41. Using the Transform Tools/Perspective, narrow this slightly at the top as shown. 42. Now draw another Rounded Rectangle, this time Border - 7, 30W x 140H pixels. 43. Click on the Editing button to go into Path Edit mode. 44. Click on each of the two side lines in turn and under 'Convert line' convert them to curves. 45. Use the control handles to create the curves and move the top two nodes inwards a little to create the overall shape as illustrated. 46. Click on the Editing button to come out of Path Edit mode and back into 3D Round. 47. Shift/Click to select both pieces of the base and then Right Click/Merge As Single Object. 48. Use the Retouch Tools/Blur to blend the bottom line of the upright into the base as shown. 49. Right Click/Arrange/Send to Back. 50. Now for the controls for the fan! Using the Outline Drawing Tool: Shape - Rounded Rectangle: Color - white: Mode - 3D Round: Border - 1: Depth - 20: draw a shape 75W x 12H pixels. 51. Using the Path Drawing Tool, Shape - Rounded Rectangle: Color - white: Mode - 3D Round: Border - 3: Depth - 30: draw a shape to fit inside the outline one. 52. Fill this with a similar gradient to the one you used for the blades but this time a side to side fill. 53. Right Click/Convert Object Type/From Text/Path to Image. 54. Using the Object Paint Eraser with the size set to 2, Lines set to Straight Lines, cut through the shape creating four or five buttons. 55. Now using the Path Drawing Tool, Shape - Rounded Rectangle: Color - any dark shade of your choice: Mode - 3D Round: Border - 8: Depth - 30: draw a shape 90W x 25H pixels. 56. Right Click/Arrange/Send to Back and put in place under the base of your stand as shown. 57. Now using the Circle Shape draw two, even darker, feet. Right Click/Arrange/Send to Back and put in place at the bottom of your stand. Select all parts of your stand and Right Click/Merge As Single Object. If necessary, Right Click/Arrange/Send to Back again. 58. Once you are happy with your fan (and if you aren't going to animate), Right Click/Select All Objects - the Right Click/Merge As Single Object. 59. Add a suitable shadow - it's time to cool off LOL!!! |
|
|
THAT'S REALLY COOL! 60. To animate your fan first set theTransform Tools/Rotate by Degree to 18 degrees. 61. Save the first frame without moving the blade, then rotate the blade to the right once and save again. 62. Repeat this until you have 6 frames. 63. Take your frames into Gif Animator and set the delay to 1. 64. Click on the Optimise tab and in the presets choose Photo 128. Save your animation. |
 |
|
|
Free Spirit Graphics If you would then like an invitation to join, please Email Me. We'd love to have you along! |
|
|
If you need any help - or want to make suggestions to improve this tutorial - or for new ones |
|


This site © Rosie Hardman-Ixer 2001/2/3 |