
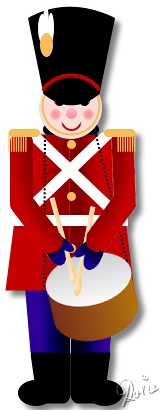
LITTLE DRUMMER BOY PI VERSION: XL/8/7. LEVEL: Intermediate MAIN TOOLS USED: Path Drawing Tool, Path Editing Tool, Outline Tool, Line & Arrow Tool, Retouch Tools/Burn, Object Paint Eraser, Paintbrush, Transform Tools/Slant/Distort/Perspective/Rotate Method. TERMS OF USE: Please Read - Thank You! |
|
INSTRUCTIONS |
|
|
|
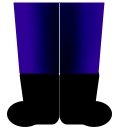
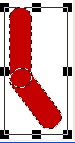
LEGS & FEET 1. Open a new, white canvas 200W x 400H pixels. 2. Using the Path Drawing Tool, Shape - Rectangle: Color - Dark Blue (Hex#150185): Mode 2D: draw a shape 90W x 70H pixels. 3. Using the Transform Tools/Perspective, drag the bottom corners inwards slightly as shown in the first illustration opposite. 4. Right Click/Convert Object Type/From Text/Path to Image. 5. Using the Retouch Tools/Burn on the settings shown left, shade the inner part of the legs. 6. Now use the Paintbrush (Color - pale blue) on the settings illustrated to draw a narrow line down the centre of the legs. 7. Now using the Rounded Rectangle Shape: Color - Black: Mode 2D: draw a shape 40W x 55H pixels. 8. Using the Transform Tools/Distort, draw the lower left corner of the shape inwards as shown. 9. Using the Ellipse shape, Color - Black: Mode 2D, draw a shape 35W x 25H pixels and fit the two black shapes together as shown. 10. Select both pieces of the boot, Right Click/Merge As Single Object. 11. Right Click/Duplicate this piece then use the Transform Tools/Rotate & flip, to flip the shape Horizontally. 12. Put the two boots in place and then select the trousers piece and Right Click/Arrange/Bring to Front. Your legs/boots should now look like the illustration opposite. |
|
|
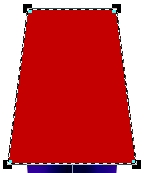
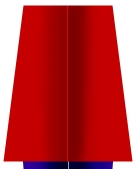
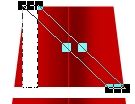
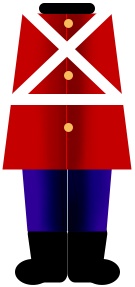
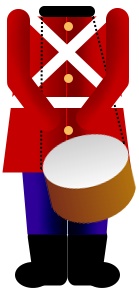
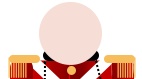
JACKET BODY 13. Using the Path Drawing Tool, Shape - Rectangle: Color - Dark Red (Hex#C40000): Mode 2D: draw a shape 125W x 155H pixels. 14. Using the Transform Tools/Perspective, drag the top corners inwards slightly as shown. 15. Right Click/Convert Object Type/From Text/Path to Image. 16. Using the Retouch Tools/Burn on the same settings used for the legs, shade the inner part of the jacket. 17. Now use the Paintbrush (Color - lighter red) on the settings used for the legs, to draw a narrow line down the centre of the jacket. 18. Using the Rectangle shape, Color - White: Mode - 2D, draw a shape 115W x 10H pixels and put in place for a belt. 19. Now draw another rectangle, 15W x 82H pixels and then use the Transform Tools/Slant to pull this across the chest of the figure as shown. 20. Right Click/Duplicate this piece then use the Transform Tools/Rotate & flip, to flip the shape Horizontally and put in place. 21. Using the Circle shape, draw three small circles for the buttons and add to the jacket. 22. Finally add a black Rounded Rectangle, 55W x 10H pixels, for the collar as shown. |
|
|
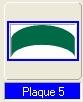
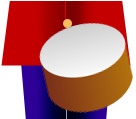
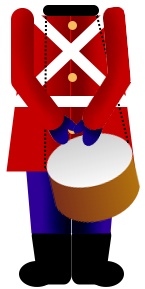
DRUM & CORD 23. Using the Path Drawing Tool, Shape - Plaque 5: Color - Any two-color, side-to-side gradient of your choice: Mode - 2D: draw a shape 85W x 50H. 24. Use the Transform Tools/Rotate & flip to flip the shape Vertically. 25. Use the Transform Tools/Resize to stretch the shape until it is 70 pixels high. 26. Using the Ellipse Shape - draw a shape for the top of the drum, 85W x 55H pixels. 27. Put the two pieces together and then Select both and Right Click/Merge As Single Object. 28. Use the Transform Tools/Rotate Method/Rotate freely to rotate the drum slightly to the left as shown left.
29. Using the Line & Arrow Tool - Shape - Straight Line - on the settings shown left (Path Panel/Outline Tab, Width - 1: Dotted line: No Arrow) draw two lines from the base of the collar to the sides of the drum for the supporting cord.
...and there's the drum finished! |
|
|
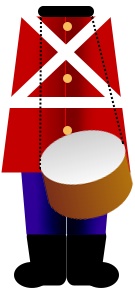
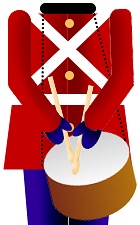
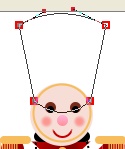
ARMS & DRUMSTICKS 30. Using the Path Drawing Tool, Shape - Rounded Rectangle: Color - Dark Red (Hex#C40000): Mode 2D: draw 2 shapes - the 1st 23W x 80H pixels and the 2nd 23W x 70H pixels. 31. Use the Transform Tools/Rotate Method/Rotate freely to rotate the smaller piece to the left as shown and put in place on the longer rounded rectangle to form the arm as shown. 32. Select both pieces of the arm and Right Click/Merge As Single Object. 33. Use the Retouch Tools/Burn to shade the inner part of the arm and put the arm in place as the drummer's right arm. 34. Right Click/Duplicate this piece and then use the Transform Tools/Rotate & flip to flip the arm Horizontally. 35. Put in place as the drummer's left arm. 36. Using the Path Drawing Tool, Shape - Ellipse, Color - Dark Blue: Mode 2D: draw two shapes - the 1st 15W x 30H pixels and the 2nd 10W x 25H pixels. 37. Use the Transform Tools/Rotate Method/Rotate freely to rotate the smaller piece to the right as shown and put in place on the larger ellipse to form the hand as shown. 38. Select both pieces of the hand and Right Click/Merge As Single Object. 39. Use the Retouch Tools/Burn to shade the upper part of the hand and put it in place as illustrated. 40. Select the arm, Right Click/Arrange/Bring to Front and put the hand in place behind it, turning it with the Transform Tools/Rotate Method/Rotate freely to a good angle. 41. Right Click/Duplicate the hand, flip it Horizontally and then put in place behind the other arm, again rotating it to a good angle. 42. Using the Path Drawing Tool, Shape - Rectangle: Color - Creamy-Beige (Hex#FCE8C7): Mode 2D: draw a shape - 4W x 80H pixels and then a small ellipse of the same colour 7W x 15H pixels. 43. Fit these two shapes together for a drumstick as shown and then select both and Right Click/Merge As Single Object. 44. Again a little shading can be added to the drumstick with the Burn Tool (Size - 10) if you wish. 45. Right Click Duplicate the drumstick and then position both sticks behind the hands using Right Click/Arrange/Send Backwards (or Ctrl + Down Arrow key). 46. Turn each drumstick with the Transform Tools/Rotate Method/Rotate freely until they are at a good angle with the hands. 47. For the epaulettes - first of all draw a Rounded Rectangle, Color - Gold: Mode - 2D, 30W x 8H pixels. 48. Right Click/Duplicate this piece and put the two pieces in place on the shoulders. 49. Using the same colour but this time selecting the Vertical Lines 1 shape, draw a shape approximately 24W x 20H pixels. 50. Use the Transform Tools to narrow this object so that it is only 18 pixels wide. 51. Right Click/Duplicate this and put in place on the two shoulders. |
|
|
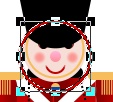
FACE & HAT 52. Using the Path Drawing Tool, Shape - Circle: Color - Pink (Hex#F6DED6): Mode 2D: draw a shape 62W x 62H pixels and put in place for the face. 53. Using the Outline Drawing Tool, Shape - Circle: Color - Gold: Mode - 2D, Border - 1: draw a shape 57W x 57H pixels for the chin-strap and put in place. 54. Again using the Outline Drawing Tool, but this time with the colour red, draw another small circle 18W x 18H pixels. 55. Put in place for the mouth, then Right Click/Convert Object Type/From Text/Path to Image. 56. Now use the Object Paint Eraser to erase the unwanted part of the circle. 57. Using the Path Drawing Tool, Shape - Circle: Color - pink (I have used a two-color, top-to-bottom gradient for this from Hex#FFC8FF to Hex#FF7F7C), Mode - 2D, draw and shape 10W x 10H pixels for the nose and put in place. 58. Draw two more small circles - one in brown, 10W x 10H pixels and one in black 6W x 6H pixels. 59. Put these together to form the eye and then select both and Right Click/Merge As Single Object. 60. Right Click/Duplicate and put both eyes in place (don't worry about exact positioning as we may need to adjust this once we have the hat made). 61. Select the pink face circle. 62. Using the Paint Tools/Paintbrush, Size - 15: Color - pink (Hex#FF7F7C): paint two cheeks onto the face. 63. Using the Path Drawing Tool, Shape - Rectangle: Color - Black: Mode - 2D: draw a shape 85W x 75H pixels. 64. Use the Transform Tools/Perspective to narrow the bottom of the hat so that it fits to the side of the head as shown. 65. Select the Path Drawing Tool again and click on the Editing button on the Attribute Toolbar to go into Path Edit mode. 66. Select the bottom line of the shape so that it turns red then, under 'Convert line' on the Attribute Toolbar, click on the curved line to convert the line to a curve. 67. Select the top line of the hat and convert that to a curve, then use the control handles to create a gentler curve as shown. TIP! If you cannot see the control handles, just Maximise the Canvas window temporarily as I have done in the illustration opposite (or you can move the hat down while you edit it). 68. Once you are happy with the shape of the hat, click on the Editing button to exit Path Edit mode. 69. Using the Outline Drawing Tool, Shape - Circle: Color - Red: Mode - 2D, Border - 2: draw a shape 70W x 70H pixels and put in place on the hat as shown. 70. Right Click/Convert Object Type/From Text/Path to Image. 71. Now use the Object Paint Eraser to erase the unwanted part of the circle. 72. For the cockade, use the Path Drawing Tool, Shape - Ellipse: Color - White: Mode 2D: to draw three small, elongated shapes and put together as shown. 73. Add a gold ellipse at the base and put the whole cockade in place on the hat. |
|
|
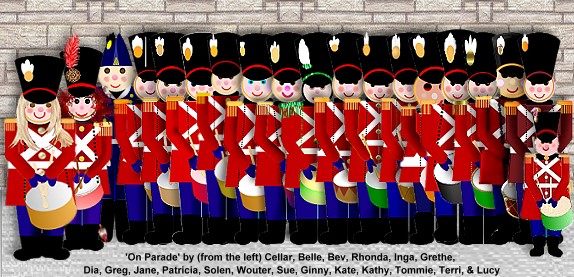
...And there's your little drummer boy! |
|
| |
 |
|
|
Free Spirit Graphics If you would then like an invitation to join, please Email Me. We'd love to have you along! |
|
|
If you need any help - or want to make suggestions to improve this tutorial - or for new ones |
|


This site © Rosie Hardman-Ixer 2001/2/3 |