
DRAW A DOLPHIN PI VERSION: 8. LEVEL: Intermediate MAIN TOOLS USED: Path Drawing Tools, Path Edit Tools, Line & Arrow Tool. TERMS OF USE: Please Read - Thank You! |
|
INSTRUCTIONS |
|
|
|
THE BODY
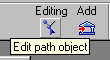
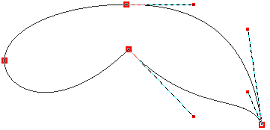
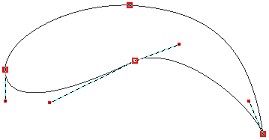
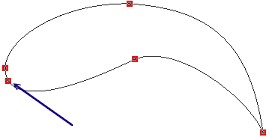
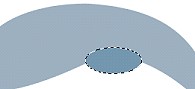
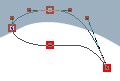
1. Open a new, white canvas - 400W x 300H pixels. 2. Using the Path Drawing Tool, Shape - Ellipse: Color - Hex#8BA6BA: Mode - 2D, draw a shape approximately 325W x 150H pixels. 3. Click on the Editing button on the Attribute Toolbar to go into Path Edit Mode. 4. Move the bottom edit point upwards and the right-hand point downwards to the positions shown. 5. Now click on the lower central edit point and use the Adjustment handles to create the curved shape of the underside. Do the same with the upper central edit point to create a smooth curve for the back of the dolphin. TIP! Remember that if you work in Free Edit Mode you will be able to use each individual adjustment handle instead of them working in pairs. :-) 6. Click on the + under 'Edit Point' and add an Edit Point in the position shown. 7. Pull the Edit point above the one you just created inwards as illustrated - to form the nose of the dolphin. Once you are happy with the body Shape, click out of Path Edit Mode and back into 2D Mode.
|
|
|
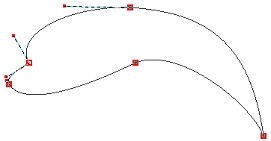
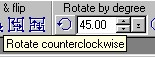
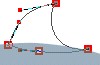
THE TAIL FIN 8. Using the Path Drawing Tool, Shape - Ellipse: Color - Hex#6388A3: Mode - 2D, draw a shape approximately 75W x 30H pixels. 9. Click on the Editing button on the Attribute Toolbar to go into Path Edit Mode. 10. Pull the top Edit Point to the right slightly and then, clicking on the left-hand Edit Point, use the Adjustment handles to create the shape shown. Once you are satisfied with the Shape, click out of Path Edit Mode and back into 2D Mode. 11. Click on the Transform Tools/Rotate by Degree and rotate this shape 45% to the left. 12. Right Click/Duplicate this shape - then use the Transform Tools/Rotate and flip - to flip the shape Horizontally. 13. Put the tail pieces in place on the dolphin. |
|
|
FLIPPERS & FIN 14. 8. Using the Path Drawing Tool, Shape - Ellipse: Color - Hex#6388A3: Mode - 2D, draw a shape approximately 75W x 35H pixels. TIP! If you hold down the ALT button on your keyboard you can draw a new shape on top of an old one without moving it by mistake. :-) 15. Click on the Editing button on the Attribute Toolbar to go into Path Edit Mode. 16. Click on the right-hand Edit Point, pull this downwards and use the Adjustment handles to create the shape shown. Once you have the shape correct, come out of Path Edit Mode and back into 2D Mode. 17. Right Click/Duplicate this piece - then change the colour to Hex#4F6F88. Right Click/Arrange/Send to Back and put this second flipper in place. 18. Now for the dorsal fin. Using the Path Drawing Tool, Shape - Ellipse: Color - Hex#6388A3: Mode - 2D, draw a shape approximately 70W x 40H pixels. 19. Click on the Editing button on the Attribute Toolbar to go into Path Edit Mode again. 20. Click on the top Edit Point, pull this upwards. Pull the two side Edit points downwards to meet the body. Now use the Adjustment handles to create the shape shown. 21. Once you are happy with the shape, come out of Path Edit Mode and back into 2D Mode. 22. Right Click/Arrange/Send to Back - then put the piece in place on your dolphin. |
|
|
THE FACE
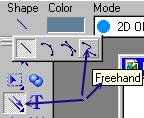
23. Use the Line and Arrow Tool/Freehand - Size - 1: Color - Hex#375871: to draw a mouth and a curved line to go around the eye.
24. Finally, add a small circle using the Path Drawing Tool for the eye.
|
|
|
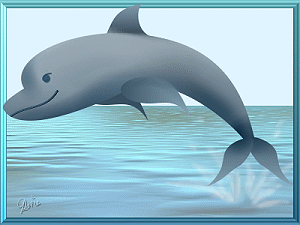
...and here's your happy dolphin! You may choose to keep the pic in 2D or change all the pieces to 3D, add gradient fills, use the Retouch Tools/Burn to add extra shading (as I have done here), add your own background... whatever you wish! |
 |
|
|
Free Spirit Graphics If you would then like an invitation to join, please Email Me. We'd love to have you along! |
|
|
If you need any help - or want to make suggestions to improve this tutorial - or for new ones |
|


This site © Rosie Hardman-Ixer 2001/2/3 |