
DARTBOARD & DARTS PI VERSION: 8 (and 7) LEVEL: Beginner MAIN TOOLS USED: Path Drawing Tool, Outline Drawing Tool, Line & Arrow Tool, Transform Tools (Rotate by degree and Copy Rotate), EasyPalette, Object Paint Eraser, Layer Manager (optional), Magic Wand Tool, Text Tool. NECESSARY DOWNLOADS: If you wish to make the darts as well as the board, you will need to download the Darts kit (path shapes ready for you to colour). TERMS OF USE: Please Read - Thank You! |
|
INSTRUCTIONS |
|
|
|
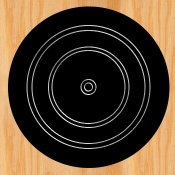
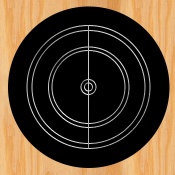
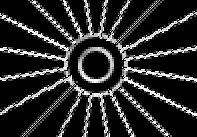
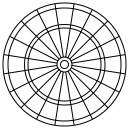
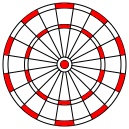
THE BOARD & WIRES 1. Open a new, white canvas, 350W x 350H pixels. I opened the EasyPalette/Fill Gallery/Natural Texture at this point and applied N26 to the background of this new canvas but you may choose to omit this step if you are using the board against a different background eventually. 2. Using the Path Drawing Tool, Shape - Circle: Color - Black: Mode - 2D: draw a shape 322W x 322H pixels. 3. Using the Outline Drawing Tool, Shape - Circle: Color - grey: Mode - 3D: Border Size - 1: Depth - 30: draw a circle 245W x 245H pixels. 4. Open the EasyPalette/Material Attribute Gallery/Metallic and fill this with Silver 2 . 5. Now draw 5 more circles of the following sizes: 6. Select all the silver circles (best done in the Layer Manager) and then Right Click/Align/Center Both. Make sure these are in the center of the black board (your pic should now look like illustration 1). 7. Using the Line & Arrow Tool, Shape - Straight Line: Color - same preset: Mode - 3D: Border - 1: Depth - 30: draw a line from top to bottom of the circles as shown in illustration 2. 8. Now use the Transform Tools/Rotate by degree - set the degrees to 9.00 and rotate this line to the right once. 9. Now set the Rotate by degree number to 18.00 and click on Copy Rotate 9 times. 10. Select all the straight lines you just drew (again, best done in the Layer Manager) and Right Click/Merge as Single Object. 11. Using the Object Paint Eraser (size 8 is about right) - erase all the lines in the bulls-eye area. (It helps to Zoom into 200% to do this - see illustration 3 - above/left). 12. Select all the pieces of the silver wires that you just created and Right Click/Merge As Single Object. 13. Right Click/Duplicate this object and drag the copy to a new, white canvas (known from now on as the 'pattern' canvas). 14. Click on Edit/Fill and fill the copy of the wires with black. Right Click/Merge All. 15. Finally, on the main canvas, use the Outline Drawing Tool again - draw a large circle, 315W x 315H pixels and put in place as shown. OK - that's the wiring done! |
|
|
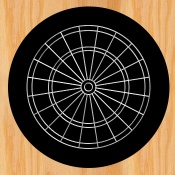
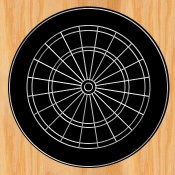
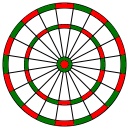
COLOURING THE BOARD 16. On the black and white pattern canvas, select all the areas shown in red using the Magic Wand Tool (click on the + sign below 'Mode' to select multiple areas). 17. Right Click/Expand/Shrink - and Expand by 1 pixel. 18. Click on Edit/Fill and fill with a bright red. 19. Right Click/Convert to Object. Drag this object to the dartboard. 20. Right Click/Arrange/Send Backward - to send the colour behind the wiring.
21. Repeat instructions 16 to 19 - this time adding the green sections. Repeat instructions 16 to 19 again- this time adding the cream sections.
22. Once you have all three colours in place on your dartboard you can close your black and white pattern canvas.
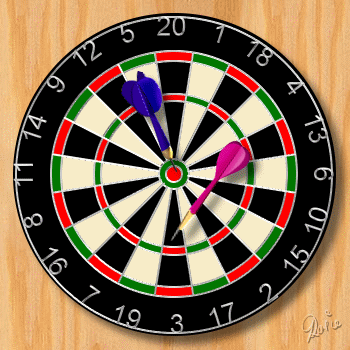
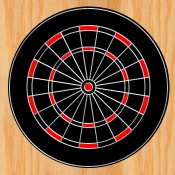
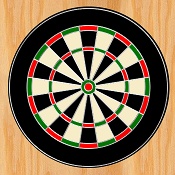
23. Your dartboard should now look like the one opposite.
24. If you are happy with your dartboard so far, Right Click/Select All Objects - then Right Click/Merge As Single Object.
OK - that's the main part of the Board drawn - all we have to do is add the numbers.... |
|
|
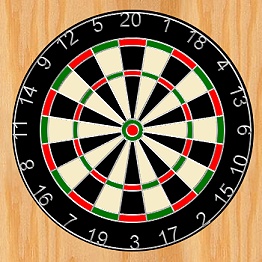
THE NUMBERS 25. The numbers for the Board are applied by first typing a number with the Text Tool. I used Arial, Size 27, Color - same preset again: Mode - 3D Round. The easiest way to do this part of the tutorial is to type separate number for each of the numbers from 1 to 20 first and then start putting them in place. 26. Once I had all the numbers I turned them, using the Transform Tools/Rotate by degree with the rotation set at 18.00 degrees once more. You may have to click to the right or left a number of times to get the correct alignment but you can see where each should be from the finished graphic above. |
|
|
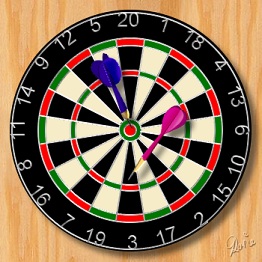
THE DARTS 27. Download and unzip the darts-path-shape kit provided above. 28. Recolour the darts any way that you wish and add to your dartboard. They can, of course, be changed to 3D Mode, resized, turned etc. 29 Finally, add a dropped shadow (Right Click/Shadow - don't forget to do the darts separately!)...... .... and there's your finished dartboard and darts! |
 |
|
|
Free Spirit Graphics If you would then like an invitation to join, please Email Me. We'd love to have you along! |
|
|
If you need any help - or want to make suggestions to improve this tutorial - or for new ones |
|
This site © Rosie Hardman-Ixer 2001/2/3 |