
DAGGER PI VERSION: 8, XL & 10 LEVEL: Intermediate (a reasonable amount of knowledge of the tools used, especially Path Edit, is assumed). MAIN TOOLS USED: Path Drawing Tool, Transform Tools (Resize, Rotate & flip, Rotate by degree & Perspective), EasyPalette (Presets), Outline Drawing Tool, Object Paint Eraser. NECESSARY DOWNLOADS: TERMS OF USE: Please Read - Thank You! |
|
INSTRUCTIONSGENERAL NOTE FOR PI 10 USERS: |
|
|
|
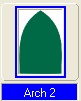
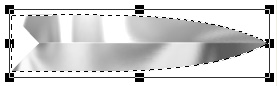
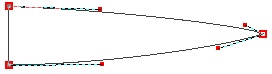
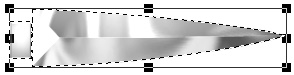
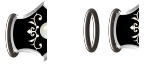
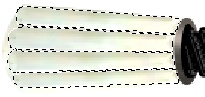
BLADE SECTION 1. Open a new, white or pastel-shade canvas 520W x 330H pixels. 2. Using the Path Drawing Tool, Custom Shape - Arch2 (PI 10 - FR30): Mode - 3D Chisel: Border - Maximum possible (see note below): Depth - - (Minus) 15: draw a shape 68W x 86H pixels. NOTE: Go into the Material Box/Border/Depth tab and check the Smooth Spine box - this should give you a maximum setting of 99. 3. Using the Transform Tools/Rotate & flip, flip the shape through 90 o to the right. 4. Using the Transform Tools/Resize - stretch the shape to the right until it is 260 pixels wide. 5. Open the EasyPalette/Material Attribute Gallery/Metallic (PI 10 - Text/Path Effects/Material Attribute Gallery/Metallic) and apply the Silver 1 preset. 6. Go into Path Edit and edit the blade into the shape shown. Exit Path Edit. 7. Using the Rectangle Shape, Mode - 3D Chisel: Border - 3: Depth - 30, draw a rectangle 23W x 38H pixels and put in place as shown. 8. This time apply the Silver 2 preset. 9. Go into Path Edit and add a node to the right-hand line. Then edit the shape into the one shown, converting lines to curves to accomplish this. Exit Path Edit. 10. Duplicate this shape and convert it to Color - Black: Mode - 2D. 11. Use the Transform Tools/Resize to reduce the size of the object so that it fits onto the silver one below as shown (with just the bevel showing around the edges). 12. Using Custom Shape - Raindrop (PI 10 - S50): draw a shape approximately 18W x 36H pixels and then use the Transform Tools/Rotate & flip to flip the shape through 90 o to the right. 13. Apply the Pearl3 preset from my shells presets and change the Border to 76: Depth 30. 14. You can add any extra decoration to this section that you wish - fancy fonts or simple shapes are equally appropriate (see opposite). I settled for Custom Shape Decoration 1 (PI 10 - F134) for mine. |
|
|
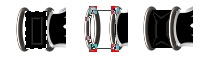
CENTRE SECTION 15. Using the Outline Drawing Tool, Shape - Ellipse: Mode - 3D Round: Border - 3 (set this in the Path Panel - Outline tab): Depth - 30: draw a shape 10W x 38H pixels. 16. Fill this with the Steel 3 preset from the EasyPalette/Material Attribute Gallery/Metallic (PI 10 - Text/Path Effects/Material Attribute Gallery/Metallic). 17. Right Click/Arrange/Send to Back and put in place as shown - the adjust lighting so that the highlight is on the left of the piece. 18. Right Click/Duplicate this piece and put in place as shown. Right Click/Arrange/Send to Back. 19. Using the Path Drawing Tool, Shape - Rectangle: Mode - 2D: draw a rectangle and put in place as shown left. 20. Go into Path Edit and Edit the left-hand side (first Converting to Curve) to fit the inner side of the left-hand ellipse. Exit Path Edit. 21. Right Click/Arrange and Send this piece backwards between the two ellipses as shown. 22. Using the Path Drawing Tool, Color - Steel 3 preset again: Mode - 3D Round: Border - : Depth - 30: draw a shape 5W x 140H pixels. 23. Using the Circle shape draw a small round 3D shape; Duplicate this and put these in place at each end of the rectangle. Align the three pieces Horizontally. 24. Right Click/Merge as Single Object. Right Click/Arrange/Send to Back. 25. Your knife should now look like the one opposite. 26. There are lots of ways to decorate this part of the knife handle and if you wish to use your own decoration here you may. If you wish to use the decoration in the tutorial picture, open the decorative shape ufo provided now. 27. Change the mode to 3D Round and apply the Steel 3 preset. 28. Reduce the size of the shape so that it fits the bar you drew as shown (the little circles at the ends of the shape should fit on either end of the little circles you drew). 29. Right Click and Send this piece backwards so that it lies directly on top of your drawn rectangle (see left). 30. Adjust the lighting on the piece so that it shows up effectively. Although there are other pieces to add to this section, that is all we are going to do for now - you will see why later! |
|
|
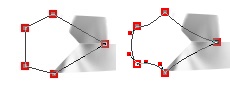
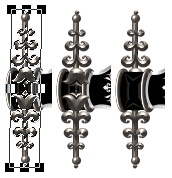
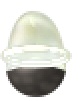
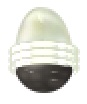
THE HANDLE 31. Select the small, black shape that lies between the two ellipses in the centre section and Right Click/Duplicate it. 32. Using the Transform Tools/Resize, resize the object so that it is 41W x 26H pixels and put in place as shown. Right Click/Arrange/Send to Back. 33. Using the Path Drawing Tool, Custom Shape - Round Shape 4 (illustrated left. PI 10 - S37): Color - Black: Mode - 3D Round: Border - 99: Depth - 30: draw a shape 36W x 53H pixels. Use the Transform Tools/Rotate & flip to flip the shape 90o to the left. 34. In the Material Box/Shading, Change the shading to Metallic/Copper and the number of lights to 2 (if necessary) - both Direct.35. Adjust the lighting so that the shape can be clearly seen as shown left. 36. Put this piece in place and then Right Click/Arrange/Send Backwards until it lies on top of the small black shape in 31 (which now 'seals' any gaps in the centre of the Round Shape 4 piece). 37. Now select any path shape object that used the Steel 3 preset (to select that preset) and using the Path Drawing Tool, Shape - Ellipse: Mode - 3D Trim: draw a shape 18W x 45H pixels. Right Click/Arrange/Send to Back. 38. Now draw a black, 2D ellipse, 9W x 35H pixels and put in place on top of the metallic ellipse - slightly right of centre. 39. Select both ellipses and Right Click/Merge As Single Object. 40. Right Click/Arrange/Send to Back and put in place on the handle as shown left. 41. Now select the pearl tear-drop shape to select that preset and, using the Path Drawing Tool, Shape - Rectangle: Mode - 3D Trim: draw a shape 110W x 46H pixels (Do not worry about Border/Depth settings yet). Put in place as shown. 42. Go into Path Edit and create the shape shown by widening it at the left-hand side and converting the left-hand line to a curve (further editing of the curve should not be necessary). Exit Path Edit. 43. Now reduce the Border setting to 1 (Depth remains at 30). 44. Using the same preset but in 3D Round mode, create four shapes as shown, using the same method as in 41. You should have a nice, scalloped effect on the left-hand side when these are completed. 45. For each of these pieces I adjusted the settings to Border - 83: Depth - 10 in the Path Panel. 46. When you are happy with these, select all five pieces of the pearl handle and Right Click/Merge As Single Object. 47. Right Click/Arrange/Send to Back and put in place. The handle should now look like the picture opposite. Now we're going to make the egg-shaped finials for the handle. 48. Using the Path Drawing Tool, Shape - Circle: Mode - 3D Round: Border/Depth - Maximum: draw a shape 28W x 28H pixels and apply the Steel 3 preset. 49. Using the Ellipse Shape and the Pearl preset, draw a shape 32W x 41H pixels. Place over the metallic circle as shown. 50. Use the Transform Tools/Perspective, to narrow the top edge of the ellipse to form an egg shape then go into Path Edit. 51. Delete the bottom node and create the shape shown in close up left. Exit Path Edit. 52. Using the Outline Drawing Tool, Shape - Ellipse: Color - the Pearl 3 preset: Mode 3D Round: Border - 2: Depth - 30: draw a shape 31W x 8H pixels. 53. Right Click/Convert Object Type/From Text/Path to Image and use the Object Paint Eraser to remove the bottom part of the ellipse as shown. 54. Duplicate this shape twice and put in place one below the other on the egg. 55. Select all three ellipses + the pearl egg (NOT the metallic ball) and Right Click/Merge As Single Object. 56. Select the merged pearl objects AND the metallic ball and Right Click/Duplicate. 55. On the Duplicate alone, use the light-bulb to create a light on the metallic ball as shown and then Merge it with the pearl section you just created. 57. On the original copy, convert the metallic ball to the pearl preset. Merge the pieces of this copy of the egg-shaped finial. 58. You should now have two objects which look like the picture opposite. 59. Using the Transform Tools/Rotate & flip, flip the finial with the metallic ball through 90o to the left and put in place as shown. Right Click/Arrange/Send to Back. 60. Using the Transform Tools/Resize, reduce the size of the pearl finial to 22W x 23H pixels. Duplicate this piece and use the Transform Tools/Rotate & flip to flip the object Vertically. 61. Put these two objects in place as shown. 62. Using the Path Drawing Tool, Shape - (the default) Rounded Rectangle: Color - Black: Mode - 3D Round: Border - 8: Dept- 30: draw an object 55W x 15H pixels. 63. Right Click/Arrange/Send backwards until it is in the position shown. 64. Select all parts of your knife and Right Click/Merge As Single Object. 65. (Optional). Use the Transform Tools/Rotate by degree to rotate the knife through 15 o to the right. A good presentation for your knife is against a simple circular black-white gradient such as that shown with a shadow added. Thank you for doing my tutorial and I hoped you enjoyed making this sharp little customer! |
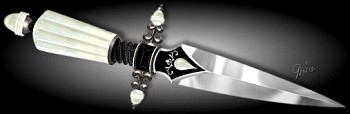
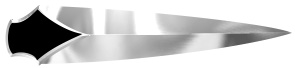
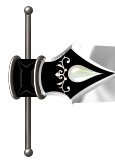
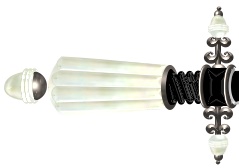
 The full size knife |
|
 |
|
|
Free Spirit Graphics If you would then like an invitation to join, please Email Me. We'd love to have you along! |
|
|
If you need any help - or want to make suggestions to improve this tutorial - or for new ones |
|


This site © Rosie Hardman-Ixer 2001/2/3/4/5 |