
WAGGY - TAILED PUP PI VERSION: 8 (Also suitable for Version 7). LEVEL: Intermediate MAIN TOOLS USED: Path Drawing Tool, Path Edit, Paintbrush, Paint on Edges, Transform Tools, Copy Rotate, Gif Animator 5. TERMS OF USE: Please Read - Thank You! |
|
INSTRUCTIONS |
|
|
|
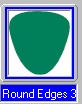
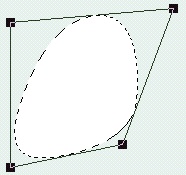
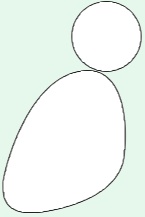
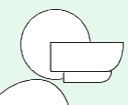
BODY, HEAD & LEGS 1. Open a new canvas - any colour you like - 300W x 300H pixels. 2. Using the Path Drawing Tool, Custom Shape - Round Edges 3: Colour - white: Mode - 2D (ALL this tutorial is done in 2D): draw a shape 140W x 145H. 3. Use the Transform Tools/Rotate & flip to flip the shape Vertically.
4. Now use the Transform Tools/Distort to create the shape shown.
NOTE: From now on, each white piece that you make is going to be edged in black using Instruction 5 - I will just give the instruction 'Edge in black' for this. If you wish to colour your dog another way you might choose to omit this edging.
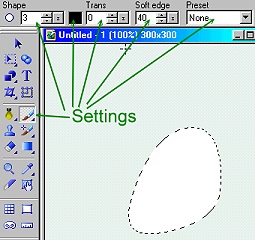
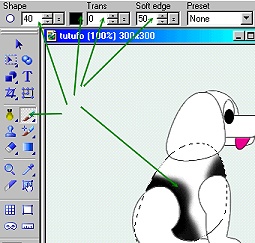
5. Select the Paint Tools/Paintbrush and, using the settings shown opposite, click on Effect/Creative/Paint on Edges.
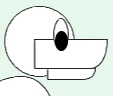
6. Now using the Circle shape, draw a white circle, 70W x 70H pixels and edge in black.
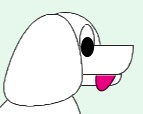
7. Put in position as shown.
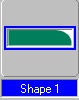
8. Using Custom Shape - Shape 1: draw a shape 50W x 13H and then use the Transform Tools/Rotate & flip to flip it Vertically.
9. Edge in Black and put in place as shown.
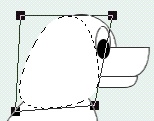
10. Using the same shape, draw a shape 125W x 35H. Use the Transform Tools/Rotate & flip to flip it Vertically and then use the Transform Tools/Resize to make it only 75 pixels wide. 11. Edge in black and put in place as shown. 12. Using the Ellipse shape - draw two small shapes - the first 15W x 33H pixels in white (edge in black) and the second in black to fit inside it for the eye. 13. Shift/Click to select both pieces of the eye and Right Click/Merge As Single Object. 14. Put in place as shown. 15. Now using the Custom Shape - Round Edges 3 again, draw a shape 90W x 95 pixels and then use the Transform Tools/Rotate 7 flip to flip it Vertically.
16. Use the Transform Tools/Distort to create the ear shape shown.
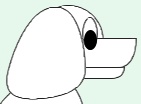
17. Edge in black and put in place.
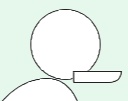
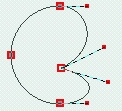
18. Now use the Circle shape to draw a circle 97W x 97H. 19. Click on the Edit button to go into Path Edit mode. 20. Pull in the right-hand node inwards to form the shape shown.
21. Use the control handles to pull the bottom of the shape to the right to form the leg as illustrated.
22. Click on the + (plus) sign under 'Edit point' and add an extra node to the line as shown and then use the control handles to pull the leg into the correct shape shown.
23. Click out of Path Edit and back into 2D Mode.
23. Edge in black and put in place.
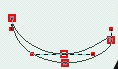
24. Using the ellipse shape, draw a shape 60W x 108H pixels. 25. Click on the Edit button to go into Path Edit mode. 26. Pull the nodes to the positions shown and use the control handles to create the shape of the front leg.
27. Click out of Path Edit and back into 2D Mode.
28. Edge in black and put in place.
29. Using the Custom Shape - Round Edges 3 again, Color -Hex#E90080: draw a small shape 20W x 20H pixels for the tongue. 30. Use the Transform Tools/Slant to drag this shape to the left slightly and then edge in black. 31. Use Right Click/Arrange/Send Backwards to send the tongue behind the UPPER jaw.
32. Select the main body part of the pup and click on the Paint Tools/Paintbrush again.
33. Using the settings shown, paint some black areas onto the pup's body.
34. Select each part of the body in turn and add some black patches - being sure to add a nice dark nose and shading to the upper line of the LOWER jaw for the mouth. You can also add shading to the tongue - but I would change the Paintbrush 'Trans' (Transparency) setting to a higher one to do this - around 70 would be best. 35. Once you have all parts of your pup complete, Right Click/Select All Objects - then Right Click/Merge As Single Object. OK - only the waggy tail to draw now! |
|
|
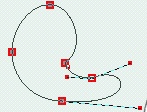
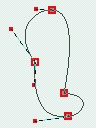
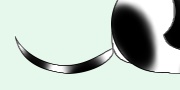
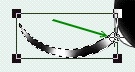
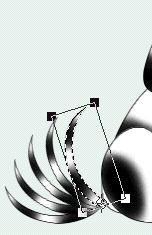
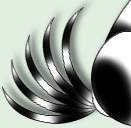
TAIL 36. First of all - using the ellipse shape - draw a shape 100W x 37H pixels. 37. Click on the Edit button to go into Path Edit. 38. Pull the top node downwards and the left-hand node upwards - as shown and the use the control handles to create a nice tail shape. TIP! Don't forget you can keep checking what your shape will be like in 2D by clicking the Toggle button on and off! 39. Once you are happy with the shape click on the Edit button again to return to 2D mode. 40. Using the Original settings for the Paintbrush - Size 3, Trans - 0: Soft Edge - 40: edge in black. 41. Paint some patches on the tail in black. 42. Put the tail in place and then click on the Transform Tools/Rotate freely. Move the rotation point to the end of the tail as shown. 43. Set the 'Rotate by degree' to 18.00 degrees and then click on Copy Rotate four times. 44. Select the merged body of the pup and Right Click/Arrange/Bring to Front. Put in place over the tail as shown. Add a shadow to all parts of your pup if you wish 45. Right Click/Select All Objects and then click on Edit/Crop - to crop the background to the best size needed for the animation. 46. Save this as pup.ufo somewhere you can find it easily - and let's go animate him! |
|
|
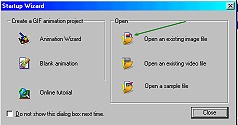
ANIMATION 47. Open Gif Animator 5 and when the Startup Wizard opens click on 'Open an existing image file'.
48. Browse to the pup.ufo file you just saved and Open.
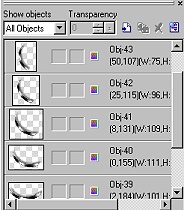
49. In the Object Manager Panel on the right close the eye icon on ALL the tail objects (see left).
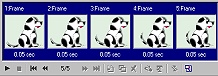
50. Click on the the Duplicate Frame button at the bottom of the screen four times. 51. Click on Frame 5 in the list at the bottom of the screen and open the eye on the top tail object in the Object Manager Panel list. 52. Click on Frame 4 and open the eye on the second tail object down in the Object Manager Panel list. 53. Click on Frame 3 and open the eye on the third tail object down in the Object Manager Panel list. 54. Click on Frame 2 and open the eye on the fourth tail object down in the Object Manager Panel list. 55. Click on Frame 1 and open the eye on the bottom tail object in the Object Manager Panel list. 56. Shift/Click to select all the Frames in the list and then Right Click/Frame Properties and change the Delay to 5. OK. 57. Click on the Optimise tab and in the pull-down list under Preset choose Photo128. 58. Save the animation. looking pleased to see you! |
|
|
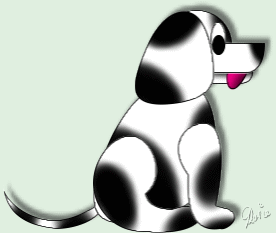
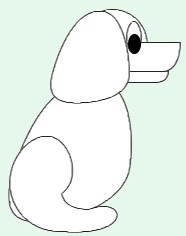
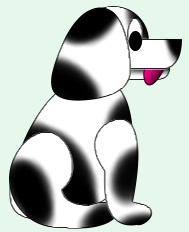
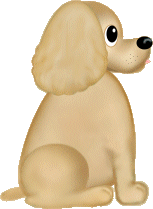
A lovely little spaniel made from this tutorial Thanks for this Eileen! |
 |
|
|
Free Spirit Graphics If you would then like an invitation to join, please Email Me. We'd love to have you along! |
|
|
If you need any help - or want to make suggestions to improve this tutorial - or for new ones |
|


This site © Rosie Hardman-Ixer 2001/2/3 |