
DRAWING A CROCUS PI VERSION: 8 (also suitable for 6 & 7). LEVEL: Intermediate (some knowledge of the Path Drawing and Path Edit Tools is assumed). MAIN TOOLS USED: Path Drawing Tool, Path Edit Tools, Paintbrush, Transform Tools, Retouch Tools (Burn & Dodge). TERMS OF USE: Please Read - Thank You! |
|
INSTRUCTIONS |
|
|
|
FLOWER & BUD 1. Open a new, white canvas, 300W x 400H pixels. 2. Using the Path Drawing Tool, Custom Shape - Raindrop: Color - any for the moment: Mode - 2D: draw a shape approximately 70W x 130H pixels. 3. Now fill this with any color/gradient of your choice. I am using a 2 - color Gradient (top to bottom) using Hex #6F1A6C at the top and Hex#FFFFFF at the bottom. 4. Using the Transform Tools/Rotate & Flip, flip the shape Vertically.
5. Click on the Editing button to go into Path Edit Mode.
6. Drag the top editing point upwards a little to form a slight point. (Note - some varieties of crocus have very rounded petals, others more pointed - it is up to you to decide which shape you prefer). 7. Drag the two lower side editing points downwards. Now click on the bottom editing point to give you the necessary adjustment (control) handles to curve the lower sides as shown. Tip! You can check on how your shape is by clicking the Toggle button on and off whilst you work.
8. Once you are happy with the shape, click out of Path Edit Mode and back into 2D Mode. 9. Now use the Transform Tools/Resize to narrow the shape to approximately 60 pixels wide. 10. Now use the Path Drawing Tool (Color - Gold) to draw a long narrow rectangle and a small ellipse for the stamen. 11. Right Click/Merge As Single Object and put in place on your flower as shown. 12. Right Click/Duplicate this stamen and use the Transform Tools/Rotate freely to rotate it a little then put in place on the flower. Use this method to build up a little group of stamens in the flower.
13. Select the original petal shape and Right Click/Duplicate it.
14. Use the Transform Tools/Resize to narrow the shape to only 35 pixels wide and then use Rotate freely to rotate the shape to the left.
15. Put this petal in place as shown.
16. Right Click/Duplicate this smaller petal and then use the Transform Tools/Resize to widen a little then Rotate & flip - to flip the shape Horizontally. Put in place.
17. Reselect the original, large petal and Right Click/Duplicate once more. 18. Use the Transform Tools/Resize to reduce the height of this petal to 130 pixels and put in place as the front petal. I changed the purple color in the gradient for this petal to several shades darker, just to give more depth to the flower. 19. Select the smallest, left hand petal, Right Click/Duplicate and put to one side for a minute. 20. Select all the other parts of your flower and Right Click/Merge As Single Object. 21. Using the Line and Arrow Tool, Shape - Spline: Color - Hex#808040: Mode - 2D: Outline Width - 3: draw a stem as shown. 22. Select the stem and the flower and Right Click/Merge As Single Object. 23. Using the Paint Tools/Paintbrush, Color - Hex#FDF2D9: Trans - 60: Soft Edge - 100: paint the sheath at the join of the stem and flower. 24. Using the Duplicate petal that you put to one side, use the methods described above to make a more tightly-closed, smaller bud. OK - that's the flowers - now onto the leaves! |
|
|
LEAVES
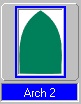
25. Using the Path Drawing Tool, Custom Shape - Arch 2: Color - green: Mode - 2D: draw a shape 20W x 25H pixels.
26. Fill this shape with a top-to-bottom, 2 colour gradient using Hex colours #8ECA13 (top) to #808040 (bottom).
27. Use the Transform Tools/Resize to make this leaf approximately 15W x 360H pixels.
28. Click on the Editing button to go into Path Edit Mode.
29. Drag the bottom left editing point (node) closer to the right hand one and then use the adjustment (control) handles to curve the leaf out slightly as per the illustration opposite. 30. Right Click/Duplicate this leaf a number of times as we are going to use this basic shape as a starting point for all our leaves. Put the duplicates to one side.
You might like to open a new canvas at this point (the same size as the original will do fine), for working your leaves on.
31. Using the first leaf - click on the Editing button to go into Path Edit Mode.
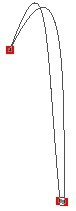
32. Now pull the top editing point down to the point shown and click out of Path Edit Mode - and there's a beautiful curving leaf!
Put it in place on your picture. Use the Transform Tools/Rotate freely to make sure that the bottom of the leaf joins the stems of the flowers at the base of the plant.
33. Drag another copy of the leaf to your working canvas and once more go into Path Edit Mode.
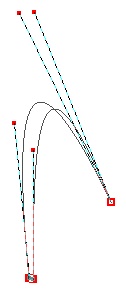
34. Add two edit points (nodes) to the left hand side of the leaf as shown (click on the + under 'Edit point' on the Attribute Toolbar to do this but then click back onto the Pick Point button to continue working).
35. Drag these two edit points (nodes) to the other side of the leaf and use the adjustment (control) handles of these two and the top point to create the shape shown.
Opposite are a couple of examples of leaves in Path Edit Mode and the results in 2D Mode. Play with adding edit points and seeing what shapes of leaves you can create!
don't forget that a few nice straight leaves are nice for variety too!
36. Once you have all your leaves for the plant, use Right Click/Arrange/Send Backwards or /Send to Back to arrange them however you wish with your flowers.
OK - we have all our leaves - so let's see how the plant is looking now..... |
|
|
FINISHING TOUCHES
37. It's looking nice but it would be even better with a bit more shading...
Select each leaf and Right Click/Convert Object/From Text/Path to Image.
38. Use the Retouch Tools/Burn to add shading (Level - 40: Soft Edge - 100 - this will give you more control over the amount of shading applied).
39. Similarly, use the Retouch Tools/Dodge to add highlights when required. Again - use the Level and Soft Wedge used for the Burn Tool - to give control over the amount of highlight applied).
40. Once all your shading is complete, Right Click/Select All Objects - then Right Click/Merge as Single Object.
41. Add a shadow to your plant if required..... and there you have your beautiful crocus! |
 |
|
|
Free Spirit Graphics If you would then like an invitation to join, please Email Me. We'd love to have you along! |
|
|
If you need any help - or want to make suggestions to improve this tutorial - or for new ones |
|


This site © Rosie Hardman-Ixer 2001/2/3 |