
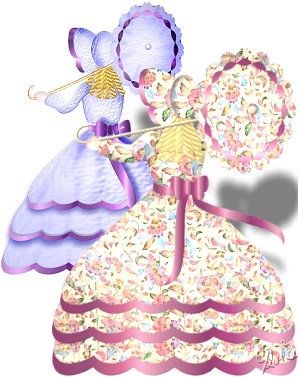
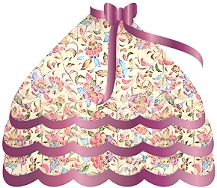
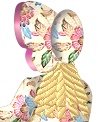
CRINOLINE LADY PI VERSION: 8. LEVEL: Intermediate MAIN TOOLS USED: Path Drawing Tool, Path Edit, Transform Tools, Paint Tools/Paintbrush, Line & Arrow Tool/Spline, Object Paint Eraser, Retouch Tools/Burn (Optional). TERMS OF USE: Please Read - Thank You!PSP version by Littelrose HERE |
|
INSTRUCTIONS |
|
|
|
SKIRT 1. Open a new, white canvas, 350W x 410H pixels.
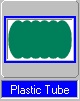
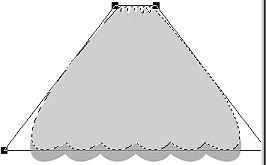
2. Using the Path Drawing Tool, Custom Shape - Plastic Tube: Color - any for the moment: Mode - 3D Round: Border - 3: Depth - 3: draw a shape 310W x 195H pixels.
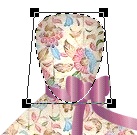
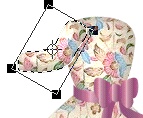
3. Right Click/Duplicate this shape and put in position as shown (it helps to make this shape a little lighter so you can see the two easily). 4. Using the Transform Tools/Resize, widen the upper shape a little so that only the scallops at the bottom of the lower shape show (see opposite).
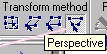
5. Now use Transform Tools/Perspective to narrow the top of your shapes and widen the bottom of the shapes as shown. 6. Now is the time to decide on the main material for your dress. You may use a plain colour or if you have some nice floral presets with a tiny pattern, they would also be suitable. Once you have chosen your preset for the dress apply it to the upper of the two shapes - being sure to reset the Border and Depth to 3 if the preset has changed either of these.
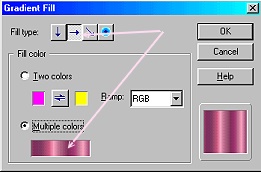
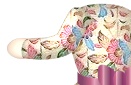
7. Now select the lower shape and apply a satin edging by Right Clicking on Color/Gradient - check Miltiple Color and select a gradient (mine was 006) with a side-to-side fill as shown.
8. You should now have two shapes which look something like the picture opposite. Right Click/Duplicate this shape then use the Transform Tools/Resize to make it a little smaller.
9. Put in place.
Now repeat Instruction 8 once more.
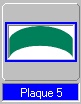
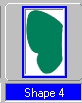
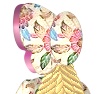
11. Now using the Path Drawing Tool, Custom Shape - Plaque 5: Color - same gradient as your satin edging: Mode - 3D Round: Border - 3: Width - 3: draw a shape the width of the waist of the skirt. 12. Use the Transform Tools/Rotate and flip, to flip the piece Vertically. 13. Use the Transform Tools/ Resize to lessen the height a little (this also flattens out the curve) and put in place on the waist. 14. BOW: Using the Path Drawing Tool: Custom Shape - Shape 4: Color - same: Border & Depth - 3: draw a shape 20W x 30H pixels. 15. Right Click/Duplicate and then use the Transform Tools/Rotate & flip - to flip Horizontally. 16. Now using the Ellipse shape - draw a central knot for the bow and put the three pieces together - see illustration.
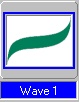
17. Using Custom Shape - Wave 1: draw a shape - then use the Transform Tools/Resize to narrow this. 18. Use the Transform tools/Rotate & flip - to flip the shape Horizontally then use Rotate Freely to rotate the shape into the correct place for the flowing ribbon. 19. Right Click/Duplicate the ribbon and use Rotate Freely again to create the second ribbon.
20. Select the bow and Right Click/Arrange/Bring to front and put in place with the ribbons on the waist.
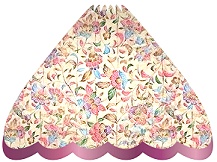
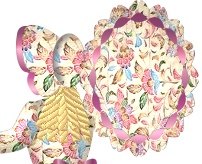
Your skirt is finished! |
|
|
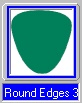
BODY 21. Using the Path Drawing Tool, Custom Shape - Round Edges 3: Mode - 3D Round: Border - 40: Depth - 10: draw a shape 85W x 90H pixels and put in place at the waist. Right Click/Arrange/Send to Back.
22. Now use the Transform Tools/Perspective to narrow the shoulders a little as shown.
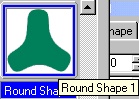
23. Now using Path Drawing Tool, Custom Shape - Round Shape 1: Mode - 3D Round: Border - 30: Depth - 10: draw a shape 75W x 75H pixels.
24. Click on the Editing button to go into Path Edit mode. 25. Under 'Edit point' click on the - (Minus) sign and remove all the points at the bottom right until you are left with the shape shown left. 26. Now use the Control Handles to create a slimmer arm as shown. Once you are happy with the shape, click out of Path Edit mode and back into 3D Round.
27. Use the Transform Tools/Rotate freely - to rotate the arm into the position shown and then put the arm in place at the shoulder. 28. Using the Path Drawing Tool, Shape - Ellipse: Color - flesh (I used Hex #F9D5B9): Mode - 3D Round: Border -7: Depth - 10: draw a shape 30W x 20H pixels. 29. Right Click/Arrange/Send to Back and put in place for the hand. Select the arm and hand and Right Click/Merge As Single Object - but DO NOT merge with the body yet. OK - onto the bonnet & hair! |
|
|
BONNET & HAIR 30. RINGLETS: Using the Path Drawing Tool, Custom Shape - Round Shape 4: Color - gold (or you can choose a dark shade for a brunette!): Mode - 3D Round: Border - 7: Depth - 10: draw a shape 28W x 45H pixels. 31. Using the Transform Tools/Resize, narrow this to 10 pixels wide. 32. Right Click/Duplicate this shape and then use the Transform Tools/Rotate freely to rotate the shape to the angle shown. 33. Right Click/Duplicate this shape and rotate again to make the three pieces illustrated. 34. Select the two angled shapes and Right Click Duplicate - then use the Transform Tools/Rotate & flip - to flip the two shapes Horizontally. Put in place as shown. 35. Shift/Click to select all the hair pieces, Right Click/Merge As Single Object. 36. Right Click/Duplicate the hair and put in place - then Shift/Click to select both hair pieces and Right Click.Merge As Single Object. TIP! If you want to add a little shine to the hair, click on Effect/Sharpen - and sharpen a little. 37. BONNET: Using the Path Drawing Tool: Custom Shape - Shape 4: Border & Depth - 3: draw a shape 45W x 72H pixels. 38. Right Click/Duplicate this piece. 39. Fill the first copy with the same satin gradient that you used for the bow (top to bottom fill this time) and fill the second copy with the preset or color you used for the body/skirt. 40. Now, using the ellipse shape, draw an ellipse 33W x 54H pixels. Fill this with your main colour and then put the three pieces of the bonnet in place as shown. 41. Select the ellipse shape of the bonnet and Right Click/convert Object Type/From Text/Path to image. 42. Using the Paint Tools/Paintbrush on the settings shown, shade the left-hand side of the bonnet. Just the parasol to go now! |
|
|
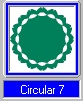
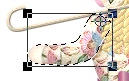
PARASOL 43. Using the Path Drawing Tool: Custom Shape - Circular 7: Border & Depth - 3: draw a shape 165W x 165H pixels and fill this with your main preset. 44. Now using a Circle shape, draw a shape 135W x 135H pixels and fill this with your satin gradient. Right Click/Arrange/Send to Back. 45. Shift/Click to select both shapes and Right Click/Align/Center Both. Right Click/Merge As Single Object. 46. Using the Transform Tools/Resize, narrow the parasol to 120 pixels wide. This should now look like the picture opposite.
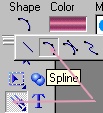
47. Using the Line & Arrow Tool/Spline, Outline - 2 (No arrow): draw a handle for the parasol (see note below).
This is best drawn from the centre of the parasol, across the shoulder of the figure to a point beyond the hand - click at the end of the straight line and then create the curve, before double-clicking to finish.
48. Now select the arm and hand piece and click on the Transform Tools/Rotate freely. Move the rotation point to the shoulder (see illustration, left).
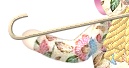
49. Now rotate the arm until the hand is below the parasol handle as shown. 50. Select the parasol handle, Right Click/Convert Object Type/From Text/Path to Image. 51. Use the Object Paint Eraser to remove the excess from the handle. I also used this to add a little shaping to the hand see illustration). 52. I also used the Retouch Tools/Burn to add a bit more shading to the hand but you do not have to do this if you do not wish to. 53. Finally I added a small knob to the centre of the parasol. Once you are happy with all the pieces of your picture, Right Click/Select All Objects, then Right Click/Merge As Single Object. NOTE! When you have finished this tutorial, either please EMAIL me your result, post it on the PING or PIRC Board - or send me the URL where I can come and see it and I will send you a little Thank You Gift to use in PI! |
|
|
'But surely you see my lady out in the garden there.... rivalling the glittering sunshine with a glory of golden hair...?' |
 |
|
|
Free Spirit Graphics If you would then like an invitation to join, please Email Me. We'd love to have you along! |
|
|
If you need any help - or want to make suggestions to improve this tutorial - or for new ones |
|


This site © Rosie Hardman-Ixer 2001/2/3 |