
MARBLE COLONADE PI VERSION: XL/8. LEVEL: (Easy) Intermediate MAIN TOOLS USED: Path Drawing Tool, Trace, EasyPalette, Transform Tools, Reset Text/Path Object command, Paintbrush, Shadow & Object Paint Eraser. TERMS OF USE: Please Read - Thank You! |
|
INSTRUCTIONS |
|
|
|
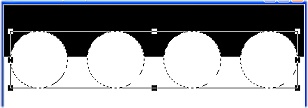
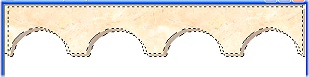
ARCHED TOP 1. Open a new, white canvas 500W x 350H pixels. 2. Using the Path Drawing Tool, Shape - Rectangle: Color - Black: Mode - 2D: draw a shape 500W x 85H pixels and put in place at the top of the canvas. 3. Right Click/Merge. 4. Now using the Path Drawing Tool, Shape - Circle: Color - White: Mode - 2D: draw a shape 95W x 95H pixels. 5. Right Click/Duplicate this three times. 6. Put two of the circles accurately in place at each end of the black rectangle (so that they are equidistant from the sides of the canvas) then place the other two circles between them. 7. Now select all four of the circles and Right Click/Align/Align Top - then Right Click/Align/Space Evenly (ensure that 'Even (fix object on both ends)' is checked) and OK. 8. Right Click/Merge All. 9. Click on Edit/Trace/Image - accept the defaults and OK. 10. Change the mode to 3D Chisel: Border - 8: Depth - 30. 11. Open the EasyPalette/Material Attribute Gallery/Realistic and fill this with marble preset T8. 12. Select the marble arches and Right Click/Duplicate.
13. Change the Mode of the Duplicated piece to 3D Round: Border - 1: Depth - 1. 14. Fit the two shapes together as shown - then Right Click/Merge As Single Object. 15. Open a new, white canvas 485W x 350H pixels and move the shape to it, positioning it at the top of the canvas as shown to hide the untidy right and left sides. OK - on to the columns! |
|
|
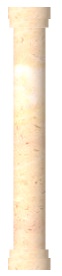
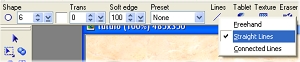
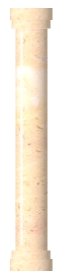
COLUMNS In this section we are going to make a number of pieces in 3D Trim mode. As you make each one I am going to ask you to 'Turn the 3D Trim shading through 90o'. To do this you will need to use the following steps on each of the pieces: To turn 3D Trim shading through 90o:a. Create the shape to the dimensions stated. b. Click on the Transform Tools/Rotate & flip and flip the shape 90o to the left. c. Right Click/Convert Object Type/Reset Text/Path Object. d. Flip the shape back 90o to the right. NOTE: Border settings will change after turning the shading. Leave them at the new setting! You will find that the 3D Trim shading now goes from left to right. 16. Using the Path Drawing Tool, Color - same marble preset: Shape - Rectangle: Mode 3D Trim: Border - Maximum possible: Depth 30: draw a shape 42W x 12H pixels. Turn the 3D Trim shading through 90o. Make sure that the Border setting is at the Maximum possible. 17. Now draw another rectangle, Border - 5: Depth - 30: 35W x 9H pixels. Turn the 3D Trim shading through 90o. Make sure that the Border setting is at the Maximum possible. 18. Finally draw a tall rectangle, Border - 99: Depth - 30: 30W x 224H pixels for the column. Turn the 3D Trim shading through 90o. Make sure that the Border setting is at the Maximum possible. 19. Select the two, smaller rectangles by holding down the Ctrl key and clicking on each one - then Right Click/Merge As Single Object. 20. Right Click/Duplicate then use the Transform Tools/Rotate & flip to flip the duplicate Vertically and put in place at the base of the column. 21. Now keep the column selected and use the Paint Tools/Paintbrush on the settings illustrated (Size - 6: Trans - 0: Soft Edge - 100: Preset - None: Lines - Straight Lines), using White as the colour - to draw a shine line on the column as shown. 22. Right Click/Duplicate the column 4 times. 23. Put in place as shown on picture opposite. Then Right Click/Select All Objects - Right Click/Merge As Single Object. |
|
|
TILED FLOOR 24. Using the Path Drawing Tool, Shape - Rectangle: Mode - 3D Round: Border - 1: Depth - 30: draw a shape approximately 30W x 15H pixels. 25. Right Click/Duplicate this shape three times and put the four rectangles together in a row. 26. Select all four sets of rectangles and Right Click/Merge As Single Object. 27. Right Click/Duplicate this set three times and put all four blocks in a row. 28. Select all four blocks of rectangles and Right Click/Merge As Single Object. 29. Right Click/Duplicate the long object twice and put the rows together staggered like bricks - as shown in the first illustration in this section opposite. 30. Select all three rows and Right Click/Merge As Single Object. 31. Now use the Transform Tools/Slant to slant the tiles to the right as shown. Use the Transform Tools/Resize to stretch the tiles to fit the floor space if necessary - and to lessen the height - and then Right Click/Arrange/Send to Back. 32. Make sure that you reduce the height of the floor to the extent shown in the tutorial. If you leave it any higher than this it will look as if the floor is standing up behind the columns. 33. For the purposes of this tutorial a shadow along the floor moving from bottom left to top right is required for the columns (though the direction may vary for other pictures of course). This should be Split from the Object and moved upwards so that NO shadow shows in front of the columns (otherwise they will look as if they're floating!). 34. Use the Object Paint Eraser (on a very low Soft Edge) to erase all shadow that falls beyond the edge of the floor. You need to do this so that it is erased cleanly on the precise line of the floor edge. .... and there is your colonade! |
|
|
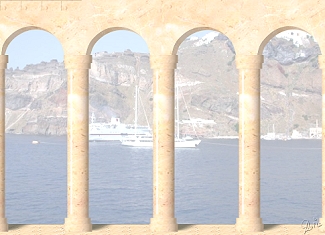
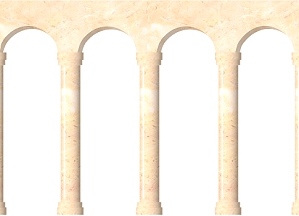
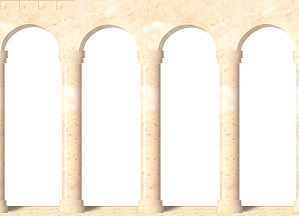
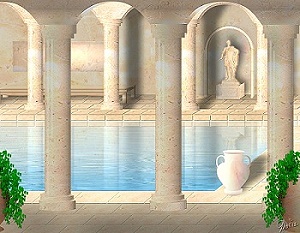
Similar, finished colonades |
|
|
... and the columns |
 |
|
|
Free Spirit Graphics If you would then like an invitation to join, please Email Me. We'd love to have you along! |
|
|
If you need any help - or want to make suggestions to improve this tutorial - or for new ones |
|


This site © Rosie Hardman-Ixer 2001/2/3 |