
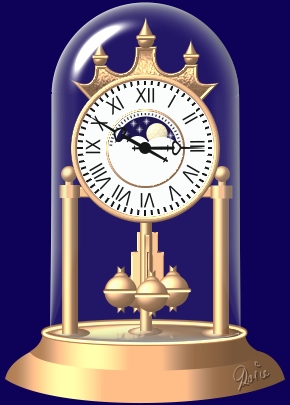
GLASS-DOMED ANNIVERSARY CLOCK PI VERSION: XL LEVEL: Intermediate MAIN TOOLS USED: Path Drawing Tool, Outline Drawing Tool, Line & Arrow Tool, Path Edit, Transform Tools (Resize, Rotate & flip, Copy Rotate, Rotate by Degree), EasyPalette, 'Select on Objects' Command, Layer Manager, Font Tool, Object Paint Eraser, Paintbrush (optional), Stamp Tool (optional). NECESSARY DOWNLOADS: Download Clock Parts Shapes here, Clock Presets here. If you don't have a white star stamp you can also download this White Star into your Stamps folder for use in this tutorial. TERMS OF USE: Please Read - Thank You! |
|
INSTRUCTIONS |
|
|
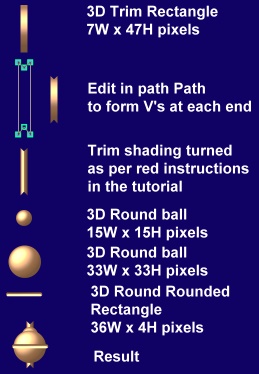
PLEASE READ! - TURNING THE SHADING IN 3D TRIM In the first section we are going to make a number of pieces in 3D Trim mode. As you make each one I am going to ask you to 'Turn the 3D Trim shading through 90o'. To do this you will need to use the following steps on each of the pieces: To turn 3D Trim shading through 90o:a. Create the shape to the dimensions stated and do any path edit work where appropriate. b. Click on the Transform Tools/Rotate & flip and flip the shape 90o to the left. c. Right Click/Convert Object Type/Reset Text/Path Object. d. Flip the shape back 90o to the right. You will find that the 3D Trim shading now goes from left to right. |
|
|
|
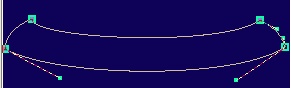
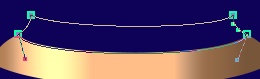
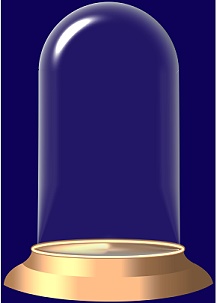
BASE & GLASS DOME Before you start, be sure to download and install the presets provided above and have the path-shapes provided available. Whilst it is possible to use other colours of silver, gold, copper etc for the main parts of your clock if you wish, the results may not look similar to the ones in the tutorial, in terms of shading etc, if you do. 1. Open a new canvas, preferably with a dark background (colour of your choice, mine is Hex#0E0158), 290W x 405H pixels. 2. Using the Path Drawing Tool, Shape - Ellipse, Color - the clock-tut-preset: Mode - 3D Trim, draw a shape, 278W x 56H pixels. 3. Go into Path Edit and use the control handles to edit into the shape shown. Exit Path Edit. 4. Turn the 3D Trim Shading through 90o as per the instructions in red above. Your Border (Width in PI 10) should be 99 and Depth 30. 5. Now draw a second ellipse with the same settings, 225W x 54H pixels. 6. In Path Edit, create the shape as shown opposite, then exit Path Edit. 7. Turn the shading through 90o once again - resulting in the picture opposite. Make sure that the edges make one smooth inward and then outward curve at the left and right sides of the base. 8. Draw another ellipse, this time Mode - 3D Round, Border - 10: Depth - 30: 200W x 20H pixels for the top of the base. 9. Duplicate this piece, then change the Border to 3 and the Mode to 3D Pipe. Use the Light Bulb feature to create the smoother shading on the 3D Pipe piece shown then put these pieces in place. 10. Move all the pieces of your base to the very BOTTOM of your canvas. 11. Using the Path Drawing Tool, Custom Shape - Arch 3 (PI 10 - Fr31): Color - the dome-glass preset provided (which will also set the Border & Depth for you): draw a shape 190 pixels wide to fit on your base. 12. Place this shape right at the TOP of your canvas, then go into Path Edit and drag the two bottom nodes downwards to meet the base, being careful to keep the sides perfectly vertical. 13. Convert the bottom line of the shape to a curve and then edit it to fit along the line of the base so that it lies along the top line of the 3D Pipe piece.
That's your base and dome completed! |
|
|
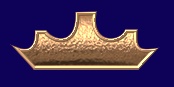
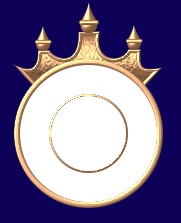
THE DECORATIVE FINIALS 14. Before tackling the next part of your clock, open the Layer Manager, lock all the pieces you have made so far in place and make the dome invisible by clicking on the eye icon. 15. Open the finials-shape provided at the top of this tutorial and change the Color to the finial preset: Mode to 3D Trim: Border (Width in PI 10) - 27: Depth - 30. 16. Duplicate this piece, change the Color to the clock-tut preset: Mode to 3D Pipe: Border - 2: Depth - 30: and put the two pieces together as shown. 17. Using the Path Drawing Tool: Custom Shape - Raindrop (PI 10 - S50): Colour - clock-tut preset: Mode - 3D Round: Border (Width in PI 10) & Depth - Maximum possible: draw a shape for the centre finial. 18. Using the Rounded Rectangle shape draw a small cross-bar to put across the centre of the raindrop-shaped finial. 19. Make two smaller versions of the same finial and put all three finials in place as shown opposite. 20. Once you are happy with this section, select all the pieces of this decorative section and Right Click/Merge as Single Object. 21. Now is a good time to make the dome visible again for a moment to check that the finial section is in the correct position, relative to the top and sides of it. |
|
|
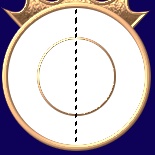
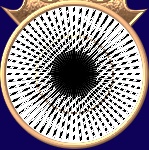
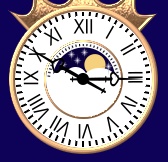
THE CLOCK FACE 22. With the dome invisible again and using the Path Drawing Tool, Shape - Circle: Color - White: Mode - 2D: draw a shape 142W x 142H pixels. 23. Duplicate this circle and make the following changes: Color - clock-tut preset: Mode - 3D Pipe: Border (Width in PI 10) - 3: Depth - 14. Put in place to edge the white circle. 24. Draw another circle, Color - clock-tut preset: Mode - 3D Pipe: Border (Width in PI 10) - 1: Depth - 30: 76W x 76H pixels. Put in place in the centre of the clock face then select all parts of the face and use Right Click/Align/Centre Both to be sure of correct alignment. Lock these pieces in place in the Layer Manager. 25. Using the Line & Arrow Tool, Color - Black: Mode - 2D: Outline Width - 1: draw a line in the position shown. 26. Set the Transform Tools/Rotate by Degree to 6o and then click on the Copy/Rotate button until all the lines are drawn (see opposite).
27. Select ALL the black lines in the Layer Manager, Right Click/Merge as Single Object keep this object selected.
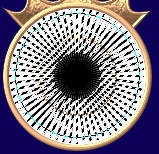
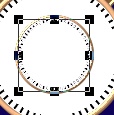
PI 8 users please go to Instruction 29a here NOTE: It helps to Zoom in to 200% for this bit! 28. Using the Selection Tools/Standard Selection Tool, Shape - Circle: check the 'Fixed Size' Box and enter the number 130 for both dimensions. Click on the 'Select on Objects' button. 29. Make a selection, ensuring that the selection marquee is right in the centre of the circle of black lines as shown, then hit the Delete key. 29a. PI 8 ONLY Using the Path Drawing Tool, Shape - Circle: Color - White: Mode - 2D: draw a circle 124W x 124H pixels and centre it on the black lines. Select the black-lines object and this white circle and Right Click/Merge as Single Object then Right Click/Send Backward behind the small gold circle.
30. Select the resulting set of short lines (PI8 - the lines+white circle object) and Right Click/Duplicate. Use the Transform Tools/Resize to make this object 71W x 71H pixels and put in place in the centre of the clock-face.
31. Using the Path Drawing Tool: Custom Shape - Half Circle (PI 10 - B46): Color - Hex#0A003E: Mode - 2D: draw a shape 64W x 34H pixels and put in place as shown.
33. Using the Circle shape: Color - Hex#F5D17E: Mode - 2D: draw a shape 21W x 21H pixels for the moon.
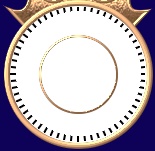
34. Using the Ellipse shape, Color - White: Mode - 2D: draw two or three shapes to represent the clouds.
35. Select the small, black-lines (PI 8 black lines/white circle) object that you made in Instruction 30 & use the Object Paint Eraser to remove the lower half of it object as shown. 36. Draw, Paint or Stamp, some tiny white stars on the dark blue 'sky' object (a star stamp is provided in the downloads above). 37. Now we need to add numerals to our clock... you can use ordinary Arabic numerals if you wish - or Roman ones which are more traditional for these types of clocks. 38. If you wish to rotate your numerals, in order to achieve the correct angles you need to set the Transform Tools/Rotate by Degree to 30o. The number 1 will need this clicking once, 2 twice, 3 three times and so on up to 11. However a lot of clocks have the numerals all kept in an upright position and I will leave it up to you what style and orientation you use. TIP! I would recommend that if you are going to use Roman numerals, you choose a narrow Font such as Arial Narrow, otherwise, your clock face may become very crowded. Also - for the double figures, 10 (in Arabic), 11 and 12 (in both styles) it can help to type the two numerals separately as you can put them together closer than the program will and thus save room. Opposite you can see alternative styles of numerals. 39. Once your numerals are in place, use the Path Drawing Tool, Shape - Circle: Color - Black: Mode - 2D: to draw a shape 10W x 10H pixels and put this in the exact centre of your clock. 40. Now open the hand-shape.ufo provided (or you may draw hands to your own design if you wish here). Use the Transform Tools/Resize to make two copies of this of appropriate sizes for the hours and minutes hands for your clock. 41. Put these in place aligned with the centre of your black circle and rotated to any time you wish. ... and on to the final part! .... |
|
|
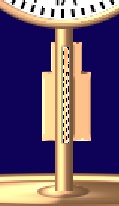
THE PILLARS & ROTATING SECTION 42. Using the Path Drawing Tool, Shape - Rectangle: Color - clock-tut preset (used throughout this whole section): Mode - 3D Trim: Border (Width in PI 10) - 8: Depth - 30: draw a shape 145W x 15H pixels. 43. Use the Transform Tools/Rotate & flip to flip the shape through 90o to the left. 44. Right Click/Duplicate this piece and put the two pieces in place as shown left. 45. Draw another rectangle, 22W x 13H pixels. Flip this to the left also, then Right Click/Duplicate and put the two pieces in place as shown (the smaller rectangle should JUST touch the outer rim of the clock face and the pillar should be aligned to its centre). 46. Now draw third rectangle this time in 3D Round mode: Border - 2: Depth - 21: 155W x 11H pixels. 47. Right Click/Arrange/Send to Back and put in place as shown. 48. Back in 3D Trim again, draw a small rectangle, approximately 22W x 8H pixels and then rotate this through 90o as in Instruction 43. 49. Using the Circle Shape: Mode - 3D Round: Border (Width in PI 10) - 8: Depth - 30: draw a ball shape 15W x 15H pixels. 50. Put this on top of the small rectangle and select them both. Right Click/Merge as Single Object. 51. Right Click/Duplicate this object then Right Click/Arrange/Send to Back with each piece and put the two pieces in place as shown. Select the pillar, the small rectangle and the last piece you made and then Right Click/Align/Centre Horizontally - so that they are all centred in line with one another. 52. Using the Rectangle Shape: Mode - 3D Trim: Border (Width in PI 10) - 6: Depth - 30: draw a shape 120W x 12H pixels. 53. Use the Transform Tools/Rotate & flip to flip the shape through 90o to the left and then Right Click/Arrange/Send Backwards until the post lies behind the clock face but in front of the base (see left). 54. Using the Ellipse shape: Mode - 3D Round: Border (Width in PI 10) - 5: Depth - 30: draw a shape 38W x 9H pixels. Right Click/ Duplicate this object. Put the two ellipses in place between the base and the side pillars as shown. 55. Draw a smaller rectangle, 34W x 8H pixels and put in place behind the back, central pillar as shown. 56. Now click on the horizontal strut that you made in Instruction 46 to select its attributes and, using the Rectangle Shape, draw a rectangle 11W x 75H pixels. 57. Go into Path Edit, add a node to the top and the right side paths and then drag the top right node downwards and inwards to form the shape shown in close up, left. Exit Path Edit. 58. Put this in place on the right of the central pillar. Right Click/Duplicate this object and Right Click/Arrange/Send to Back. Put in place on the left of the central pillar as shown (adjust the lighting if you wish to). 59. Draw two thin rectangles as shown in the close-up illustration left to represent the front flange seen in perspective , and put in place on the front of the central pillar - slightly below the previous two shapes.
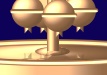
60. The rotating balls consist of four separate shapes. I have put these in detail for you on the graphic, left, so that you can take this into PI and use it for reference.
61. Once you have the first ball made, select all pieces of it and Right Click/Merge as Single Object. 62. Right Click/Duplicate this object 3 times and put all four ball objects in place on your clock as shown (very little shows of the back ball). 63. Select the central post and the 4 balls and Right Click/Duplicate (probably easiest to do in the Layer Manager). 64. Merge all of the pieces of this Duplicate by using Right Click/Merge as Single Object then Right Click/Properties and set the Transparency to 55%. 65. Use the Transform Tools/Rotate & flip to flip the object Vertically. 66. Put in place on the base to make a reflection and then use the Object Paint Eraser to remove all the excess part of the object as shown. 67. The artistic ones amongst you might like to try painting a little face on the moon to represent a 'man in the moon' before finishing - using the Paintbrush on a VERY small size - only about 1 or 2 pixels. Or perhaps if you have done my PI Paths course you might like to use your moon preset (but without the transparency on) - as I have done here, maybe deepening the colour a little and adjusting the light if needed. 68. Finally - in the Layer Manager, select the Glass Dome object - open the eye icon and Right Click/Arrange/Bring to Front. |
 |
|
|
Free Spirit Graphics If you would then like an invitation to join, please Email Me. We'd love to have you along! |
|
|
If you need any help - or want to make suggestions to improve this tutorial - or for new ones |
|


This site © Rosie Hardman-Ixer 2001/2/3/4/5 |