
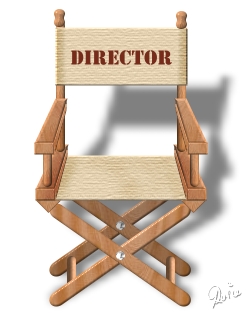
THE DIRECTOR'S CHAIR PI VERSION: 6/7 (but PI6 Users might like to download the joined-circles shape provided). LEVEL: Beginner MAIN TOOLS USED: Path Drawing Tool, Path Edit, Transform Tools, EasyPalette, Retouch Tool/Burn (optional), Texturiser (optional). OPTIONAL DOWNLOADS:Wood Presets by Fr. Michael, are hosted by the PIRC (click on Presets on the left-hand side. Joined-Circles Shape (for PI6 Users only!) TERMS OF USE: Please Read - Thank You! |
|
INSTRUCTIONS |
|
|
|
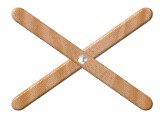
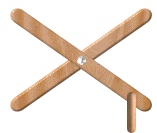
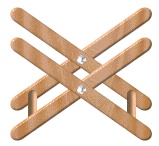
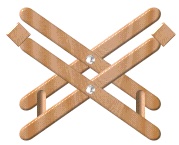
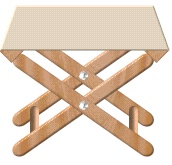
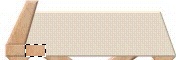
LEGS & SEAT 1. Open a new, white canvas 250W x 350H pixels. 2. Using the Path Drawing Tool, Shape - Rounded Rectangle: Color - Any (we are going to fill this with a wood preset): Mode - 3D Round: Border - 3: Depth - 30: draw a shape 15W x 170H pixels. 3. Fill this shape with a suitable wood preset - I am using a Wood Preset - Vertical 16 by Fr. Michael (hosted by the PIRC, these are available Here. Click on Cool Stuff #3 - Free Presets on the right-hand side). You will need to change the Border back to 3 if you use these presets. 4. Using the Transform tools/ Rotate by Degree, rotate this shape 55% to the right. Right Click/Duplicate this piece. 5. Using the Transform tools/Rotate & flip - flip the duplicate piece horizontally. 6. Using the Path Drawing Tool, Shape - Circle: Colour - Grey: draw a small circle and fill this with any suitable silver preset (I used Silver 1 from the EasyPalette/Material Attribute Gallery in PI7). Put in place on the X-piece. 7. Right Click/Select All Objects then Right Click/Align/Center Both. Right Click/Merge as Single Object. 8. Using the Path Drawing Tool, Shape - Rounded Rectangle: Color - (the same wood preset as before): Mode - 3D Round: Border - 5: Depth - 30: draw a shape 8W x 40H pixels - then use the Lighting button in the Path Panel to change the lighting on the strut to that shown opposite. 9. Right Click/Duplicate the strut and put in place on the other side. Now select the original X-piece you made and Right Click/Duplicate this and put in place as shown. 10. Using the Path Drawing Tool, Shape - Diamond: Color - (the same wood preset as before): Mode - 3D Round: Border - 3: Depth - 30: draw a shape 24W x 24H pixels. Right Click/Duplicate this and put the two pieces in place as shown. 11. Using the Path Drawing Tool, Shape - Rectangle: Color - (I used Hex #FBDDAA but you can use any colour you like): Mode - 3D Round: Border - 2: Depth - 30: draw a shape 170W x 45H pixels. 12. Use the Transform Tools/Perspective to narrow the top of this shape as shown then put in place for the canvas seat. |
|
|
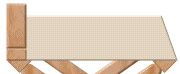
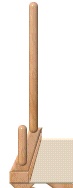
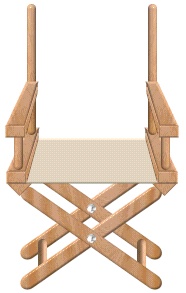
THE ARMS 13. Using the Path Drawing Tool, Shape - Rectangle: Color - (the same wood preset as before): Mode - 3D Round: Border - 2: Depth - 30: draw two shapes - the first one 20W x 45H pixels - the second one 20W x 12H pixels. Put in place as shown. 14. Select the taller of the two pieces and then use the Transform Tools/Perspective to narrow the top of it slightly. Now use the Transform Tools/Slant to pull the top over to the right - until it looks like the illustration on the left. 15. Select the smaller rectangle and Right Click/Duplicate this - then position it next to the original one (on its right-hand side). Change the Border size of the duplicate to 1. 16. It helps to Zoom in to 200% for this bit! Click on the Path Edit button. Now move the two right hand red squares to the positions shown. 17. Shift/Click to select all three pieces of the arm and Right Click/Merge as Single Object. 18. Using the Path Drawing Tool: Shape - Rounded Rectangle: Color - (the same wood preset as before): Mode - 3D Round: Border - 6: Depth - 30: draw two shapes - the first 8W x 130H pixels - the second 8W x 40H pixels. Put in place as shown. 19. Now select the merged base piece and duplicate this to make the chair arm. Put in place. 20. Select ALL the pieces you have made in this section and Right Click/Merge as Single Object. Right Click/Duplicate. 21. Use the Transform Tools/Rotate & flip to flip the duplicate Horizontally. Put in place for the right-hand arm. |
|
|
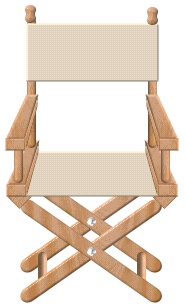
FINISHING TOUCHES 22. Using the Path Drawing Tool, Shape - Rectangle: Color - (same as you used for the seat): Mode - 3D Round: Border - 2: Depth - 30: draw a shape to make the back-rest of your seat (the width of this will vary a little depending on how you placed your back supports, so I'm not providing exact measurements). 23. I now finished off the top of the two back supports with small finials (I used the joined-circles shape - rotated through 90 degrees. This is not available in earlier versions of PI - but you may download this at the top of this tutorial if you wish). 24. Other finishing touches might include a texture on the canvas of the seat, a little shading added with the Retouch Tools/Burn, some lettering on the seat and a dropped shadow (see top illustration).
|
 |
|
|
Free Spirit Graphics If you would then like an invitation to join, please Email Me. We'd love to have you along! |
|
|
If you need any help - or want to make suggestions to improve this tutorial - or for new ones |
|


This site © Rosie Hardman-Ixer 2001/2/3 |